Electronic case report forms (eCRFs) are the fundamental instrument to structure and gather the valuable information from the observations or experiements (clinical data). This introduction is a step-by-step guide how to use Phoenix eCRFs and covers their full life cycle during a trial:
- eCRF setup
- import/export eCRF setups
- data entry
- data verification
- export collected data
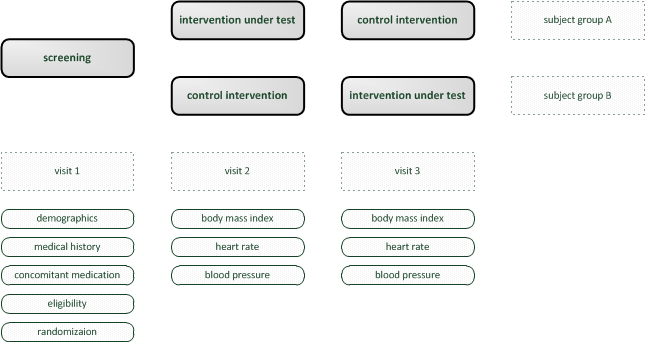
Therefore, an example of an simple trial is considered. It shows a rudimentary crossover design and is focused on demonstration of software capabilities rather than completeness. For imagination, one can think of a revolutionary diet plan as the “intervention under test”. The goal is to collect data to analyse if it has any positive effect compared to no or some established diet plan.
As a prerequisite to start with, please prepare a Phoenix CTMS instance as your test environment.
eCRF Setup
Trial
A trial is the container for an unlimited number of eCRF forms that will be used to collect the data according to the trial’s protocol. So before starting with the detailed eCRF setup, we initially need to create a trial.
- Open Phoenix CTMS in the browser and click on the New Trial link on the portal page to start with creating our sample trial.
- A new browser tab is opened. Fill in some basic details in the trial’s master data tab shown, then click the Add button. Data entry for all eCRFs will be locked as long the trial is in Design status.
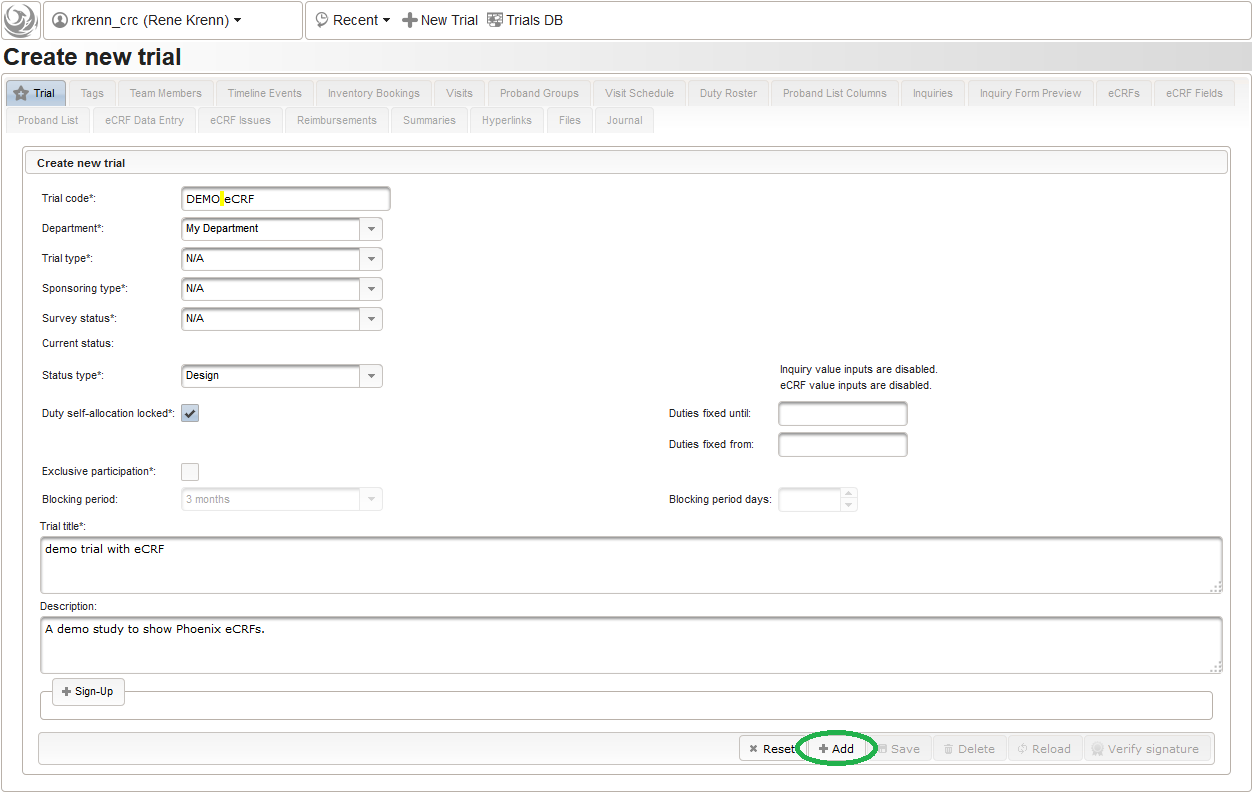 The record is now persisted in the database, which is confirmed by a blue success message at the bottom. Once the trial is created, the remaining tabs get enabled.
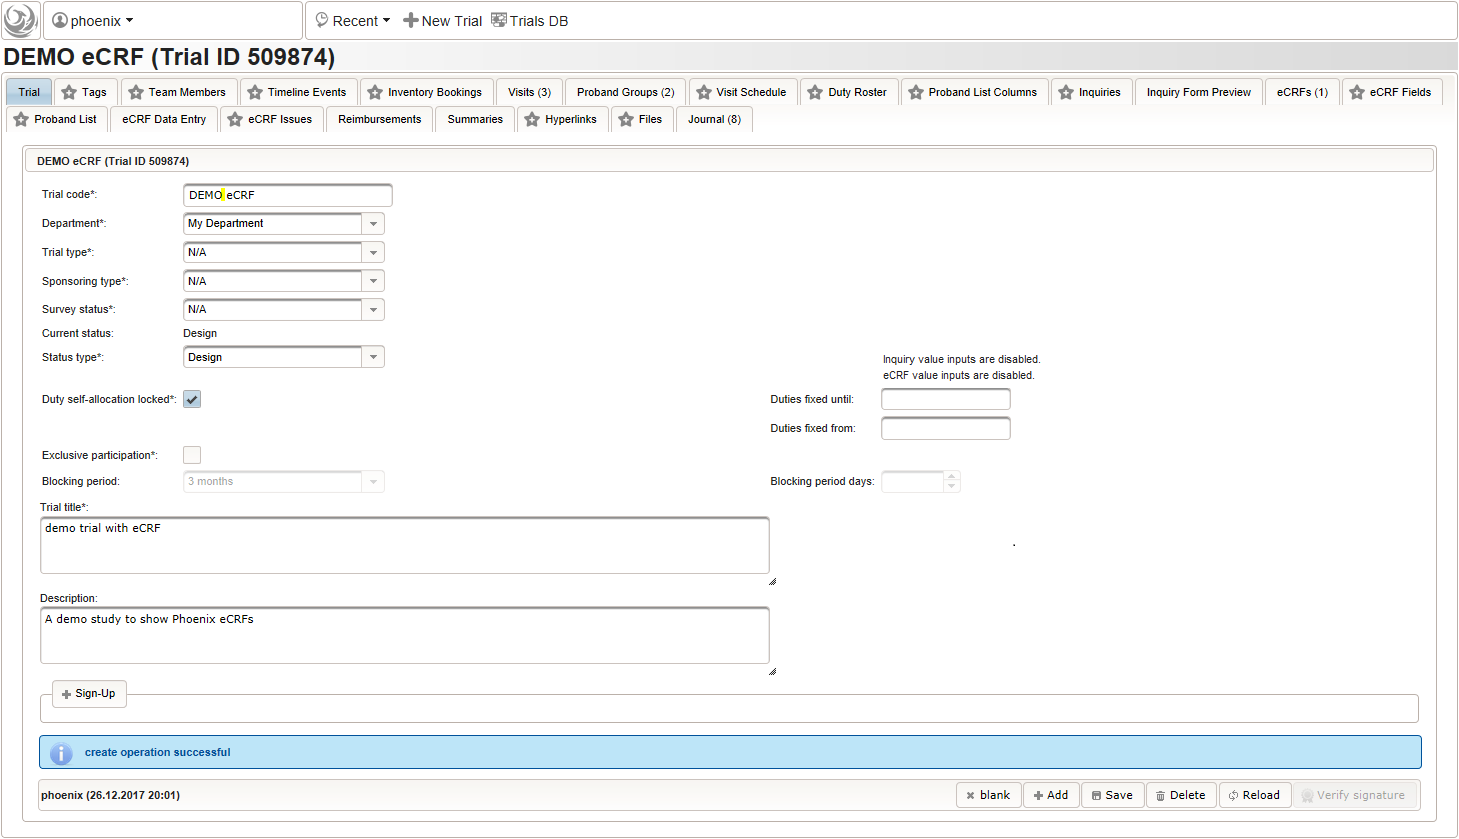
Visits
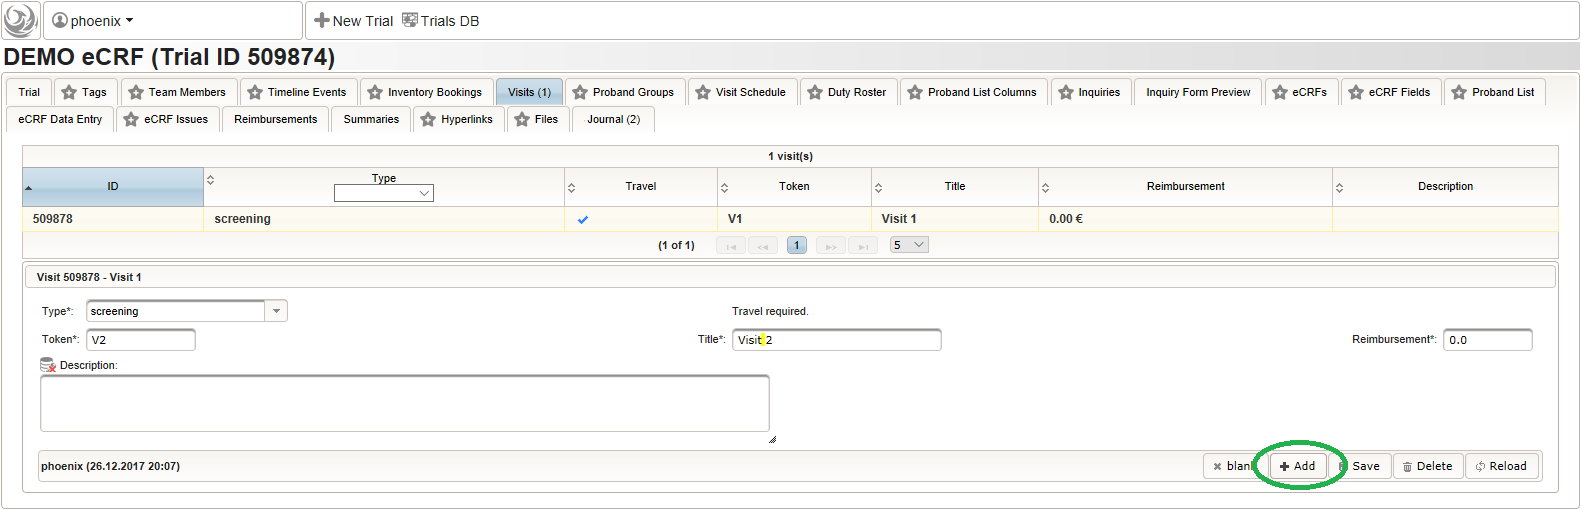
Trial visits are items to reflect events according to the trial’s protocol. The trial’s subject groups and visits form a plain matrix, which is the foundation for detailed time planning (Visite Schedule tab) and eCRFs (eCRFs tab). Visits are not repeated by the software and do not hold time information. For this demo trial, a set of three visits will be created.
- Click on the visit tab to start creating visits. Enter details as below for the screening visit (“Visit 1”) and create the record by clicking the Add button.

- After pressing the Add button, the fields reflect the “Visit 1” record stored, which now could be edited and changes persisted by pressing the Save button. To create another visit, adjust fields like below to describe the first intervention visit (“Visit 2”) and click Add again to create the additional visit record.
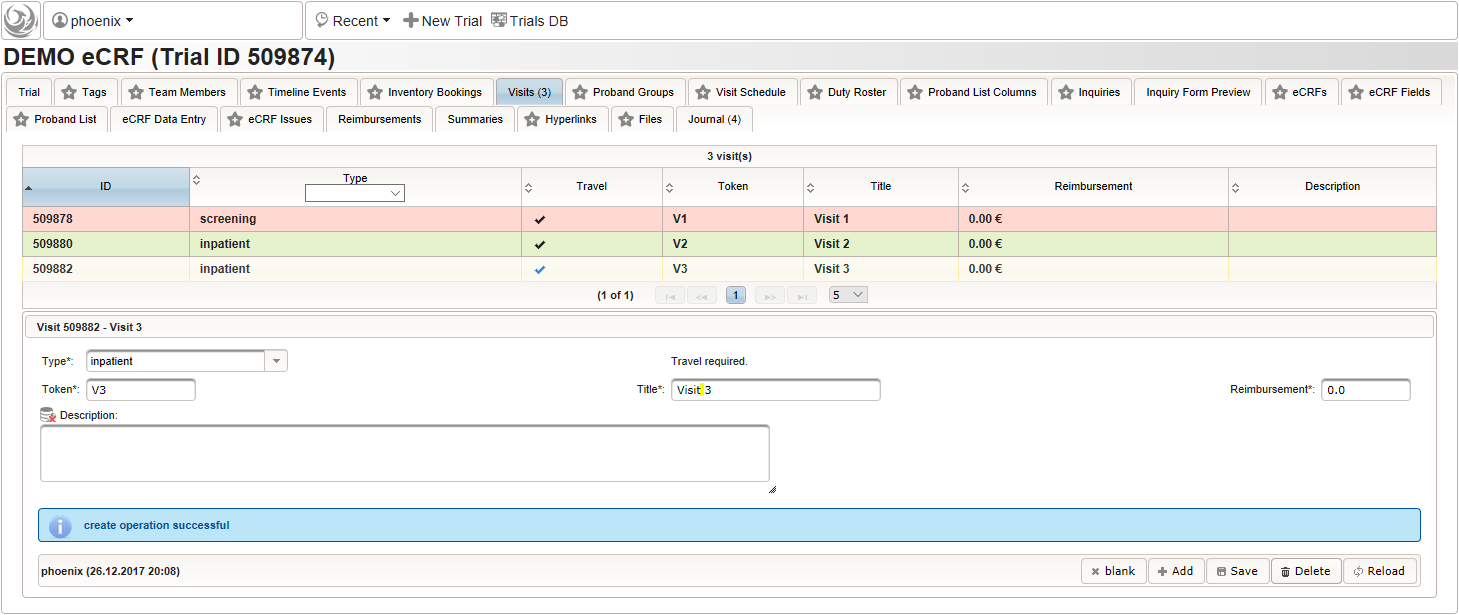
- Repeat the above step to add the second intervention visit (“Visit 3”), to end up with 3 visits overall as shown below.
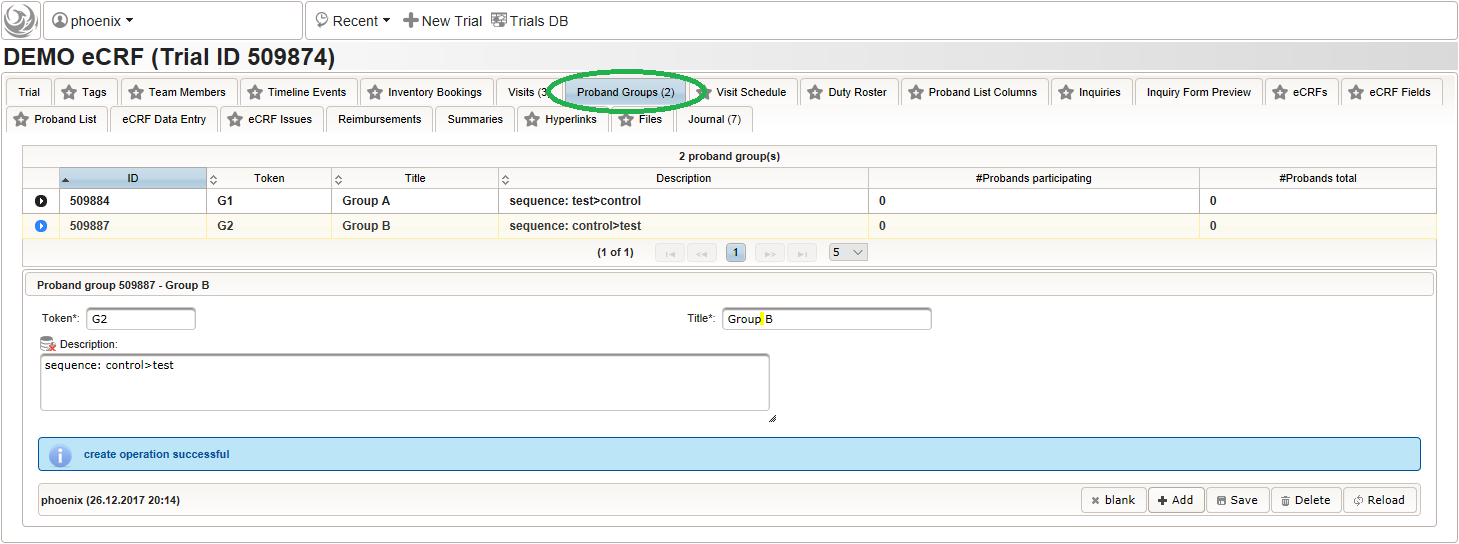
Proband Groups
Subjects can be organized in loose groups eg. to help dispatching/scheduling investigations or to globally denote the assignment from the randomization. Each enrolled subject can be assigned to one of the groups prepared. For this example we want to use proband groups to reflect the randomization result of the crossover design:
- “Group A” is the group of subjects that were randomized for the treatment sequence (1. intervention under test, 2. control intervention) of the first branch
- “Group B” is the group of subjects that were randomized for the treatment sequence (1. control intervention, 2. intervention under test) of the second branch
So a total of two subject groups (G1, G2) need to be prepared, which should then look like below:
eCRFs
The trial protocol requires data collection for a screening visit and the two investigation visits. We already have prepared the corresponding visit records and are now about to create a dedicated eCRF form for each, beginning with the intervention visit forms.
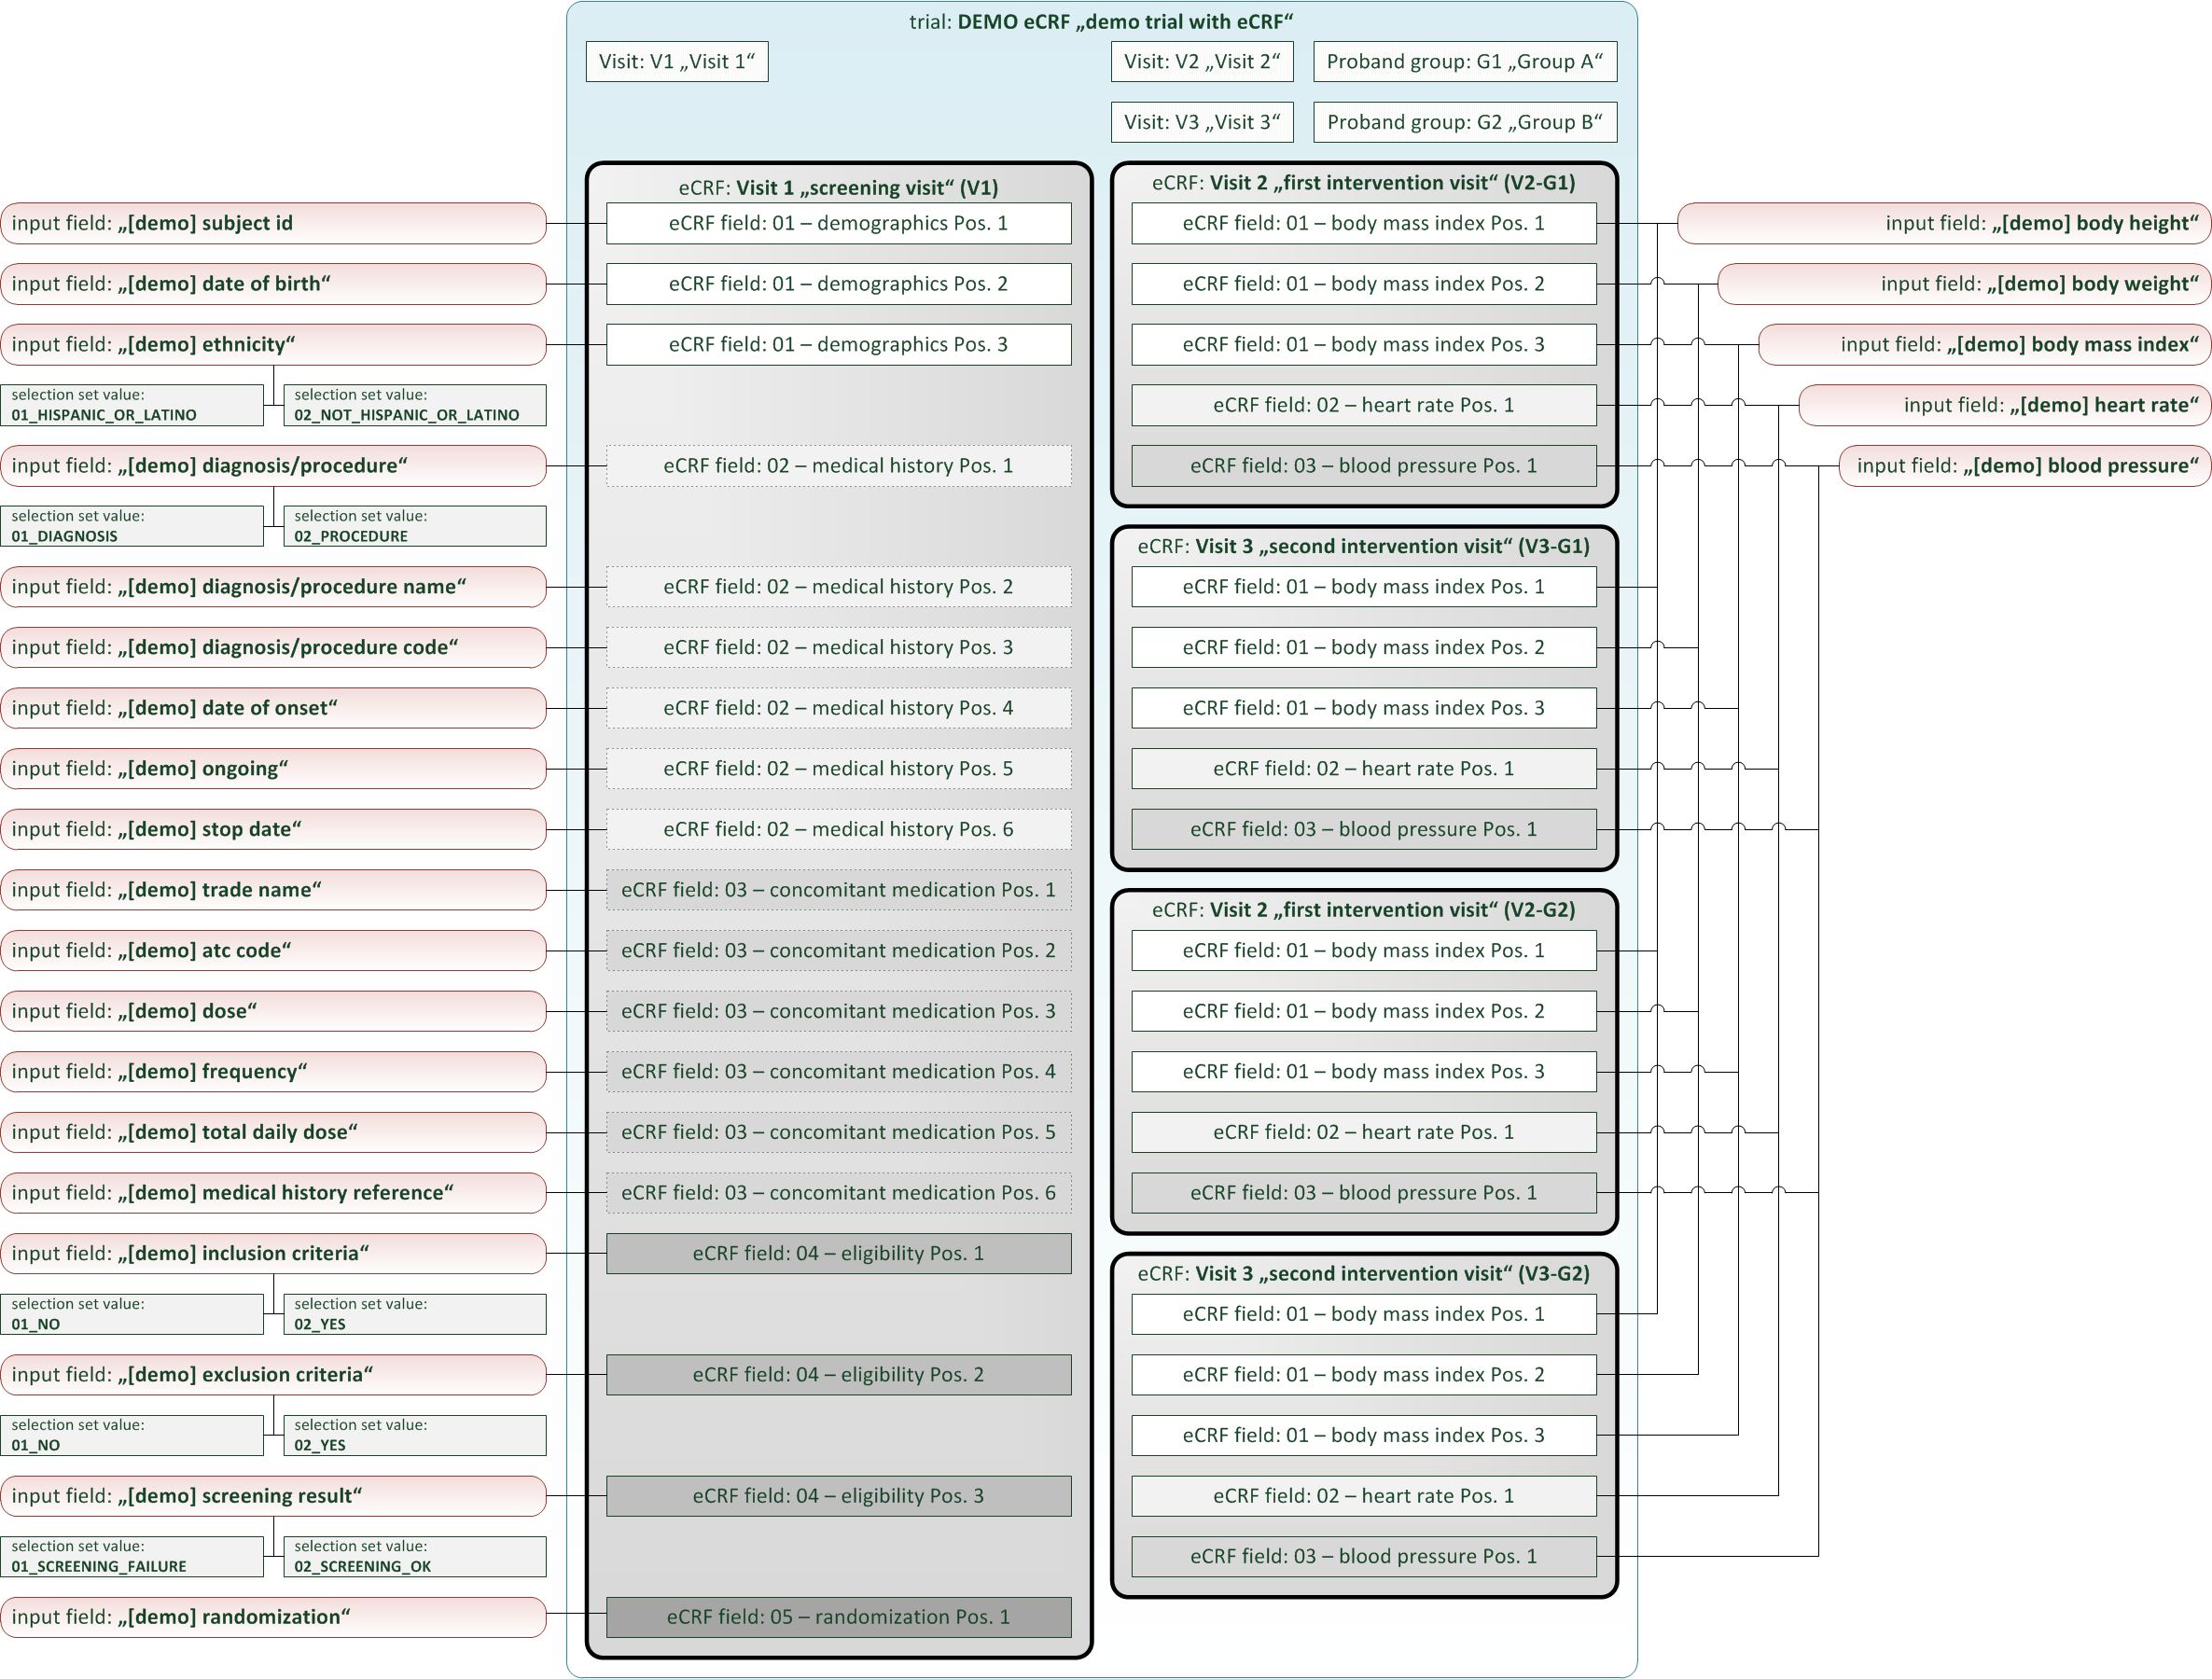
The definition elements of a eCRF form follow a simple topology, consisting of:
- eCRF: The eCRF element is a dedicated eCRF form that can be selected independently for data entry, monitoring, signing etc. It has configuration properties such as title, ordinal position or reference to a proband group and visit. If a proband group is assigned, the eCRF will be visible for data entry to subjects of that group only. The eCRF element will contain form fields as child elements, which are arranged into sections. To support entering tabular data, sections can be “repeatable” – users can fill in a section’s values multiple times.
- eCRF Fields: A eCRF field is a single form field inside the eCRF. It configures and references an input field from the repository of input fields. This means it is possible to create an input field once and use it many times for eCRF fields of the trial or other trials. The eCRF field has properties to control mandatory data entry (optional/required) or specify a distinctive UI comment below the form input. Most remarkable properties are a variable name and expressions to leverage form scripting.
- Input Fields: An input field is a form input widget of a dedicated type (text, number, selection, …). It has a unique name property and supports range checks for data entry (min/max value, regular expression, …) which are enforced when saving values. Aside eCRF fields, input fields can be referenced in similar way also by inquiry fields (inquiry forms) or subject list columns (proband list forms).
- Selection Set Values: For input fields of selection type, selection set values are the available option items to choose from. They are child elements of their selection input field, providing a unique name and value property each.
There is a focus is on demonstrating form scripting, the feature with outstanding flexibility for implementing
- value calculations (provided by a form field’s Value expression)
- advanced univariate and multivariate edit checks (provided by a form field’s Output expression)
- interactive data entry eg. suggestions for medical coding (provided by a form field’s Output expression)
Value expressions and Output expressions are Javascript anonymous functions, representing nodes in an expression tree of dedicated variables of the eCRF form (see chapter 4.8.3 in the publication for details on this concept). The form scripting framework exposes a number of utility functions, system variables (beginning with $) and exported Javascript libraries (Date.js, json2.js, jQuery, Phoenix RestApi and LocationDistance).
| utility function | description |
|---|---|
| sprintf(format,format arg1,format arg2,...) | create a string using a format pattern |
| quoteJs(string) | escape quotes in a string |
| getInputFieldSelectionSetValue(variable,id) | get a selection form field's option object by id |
| containsName(variable,value,option name) | test if a selection form field's selected options contain one matching the given name |
| containsValue(variable,value,option value) | test if a selection form field's selected options contain one matching the given value |
| getSeriesValues(variable) | get an array of values of a field belonging to a series section |
| empty(value) | test if a value is empty (string, date, selection, ...) |
| parseDate(string) | convert a date string (in system-wide dd.MM.yyyy format) to a Javascript Date object |
| parseTime(string) | convert a time of day string (in system-wide HH:mm format) to a Javascript Date object |
| parseDatetime(string) | convert a combined datetime string (in system-wide dd.MM.yyy HH:mm format) to a Javascript Date object |
| parseDateCustom(string,errorCallback,default day, default month) | convert a partial date string (in dd-mmm-yyyy format) to a Javascript Date object |
| parseTimeCustom(string,errorCallback,default minute) | convert a partial time of day string (in hh:mm format) to a Javascript Date object |
| selectionSetValueIdsEqual(value1,value2) | check if two selection form fields' values (array of option object ids) are equal (set equality) |
| setVariable(variable,value) | write another form field's internal (calculated) value |
| setOutput(variable,output) | write another form field's output string |
| printSelectionSetValues(value,separator,name/value) | create a string by concatenating the option names/values for a given value (array of ids) of the selection form field |
| printValue(value) | format the given value as a string |
| printCalculated() | format the form field's internal (calculated) value as a string |
| printEntered() | format the form field's entered value as a string |
| findSelectionSetValueIds(filterCallback) | list the selection form field's options |
| findTagValues(filterCallback) | list subject list column values |
| throwError(message,localize) | throw a managed form scripting exception object |
| errorIfEmpty() | throw exception if a value other than null, empty string or empty selection is expected |
| errorIfUnSet() | same as errorIfEmpty(), but a boolean value is expected to be true |
| errorIfSet() | throw exception if a null, empty string or empty selection value is expected |
| system variable | description |
|---|---|
| $value | the current internal (calculated) value of the form field's variable |
| $enteredValue | the currently entered value of the form field |
| $oldValue | the form field's previous internal (calculated) value, eg. before a keypress or applying a calculated value |
| $output | the form field's output string |
| $delta | true if the internal (calculated) value differs from the entered value |
| $oldOutput | the form field's previous output string, eg. before a keypress or applying a calculated value |
| $created | false if the value never was persisted yet |
| $disabled | true if the form field is disabled |
| $index | the 0-based variable index (series sections only) |
| $selectionSetValues | array of all the selection form field's option objects |
| $proband | the subject object |
| $trial | the trial object |
| $listEntry | the subject's enrollment record object |
| $visitSchedule | array of the subject's visit schedule item objects |
| $probandGroups | array of the trial's proband group objects |
| $activeUser | the active user's user object |
| $locale | the active user's locale string ("en"/"de") |
| $section | the form field's section name |
| $inputFieldName | the name of the form field's input field |
| $probandGroup | the token of the eCRF's proband group |
| $visit | the token of the eCRF's visit |
The unrestricted (but sandboxed) Javascript language supports iteration constructs rather than only arithmetic expressions and is interpreted identically both server-side (to generate eCRF issue records from edit check messages) as well as browser-side (evaluation as-you-type). eCRF issues (better known as discrepancies or queries) are the basis for the trial monitoring workflow. When finalizing an eCRF data entry, the server will generate query records for each of the situations below:
- An exception was raised by the framework (ie. because of Javascript syntax errors, circular variable references or runtime exceptions such as division by zero etc.)
- An exception was raised manually by the expression code (using the Javascript throw keyword or framework utility functions such as throwError())
- The user entry differs from a calculated value, and the Output expression produces a non-empty text (the “edit check message” eg. the expected value as returned by the printCalculated() utility function)
This will give you maximum control when designing edit checks. While edit checks will allow the user to save entries violating checks for later resolution when resolving the raised discrepancies, there also is the possibility to strictly prevent saving invalid data by means of a form field’s underlying range checks or marking form fields as Optional/required. You will however not find a way to dynamically hide/show form fields (aka skip logic) – Phoenix eCRFs and their printouts are made to correspond to paper-based SDFs (source data forms).
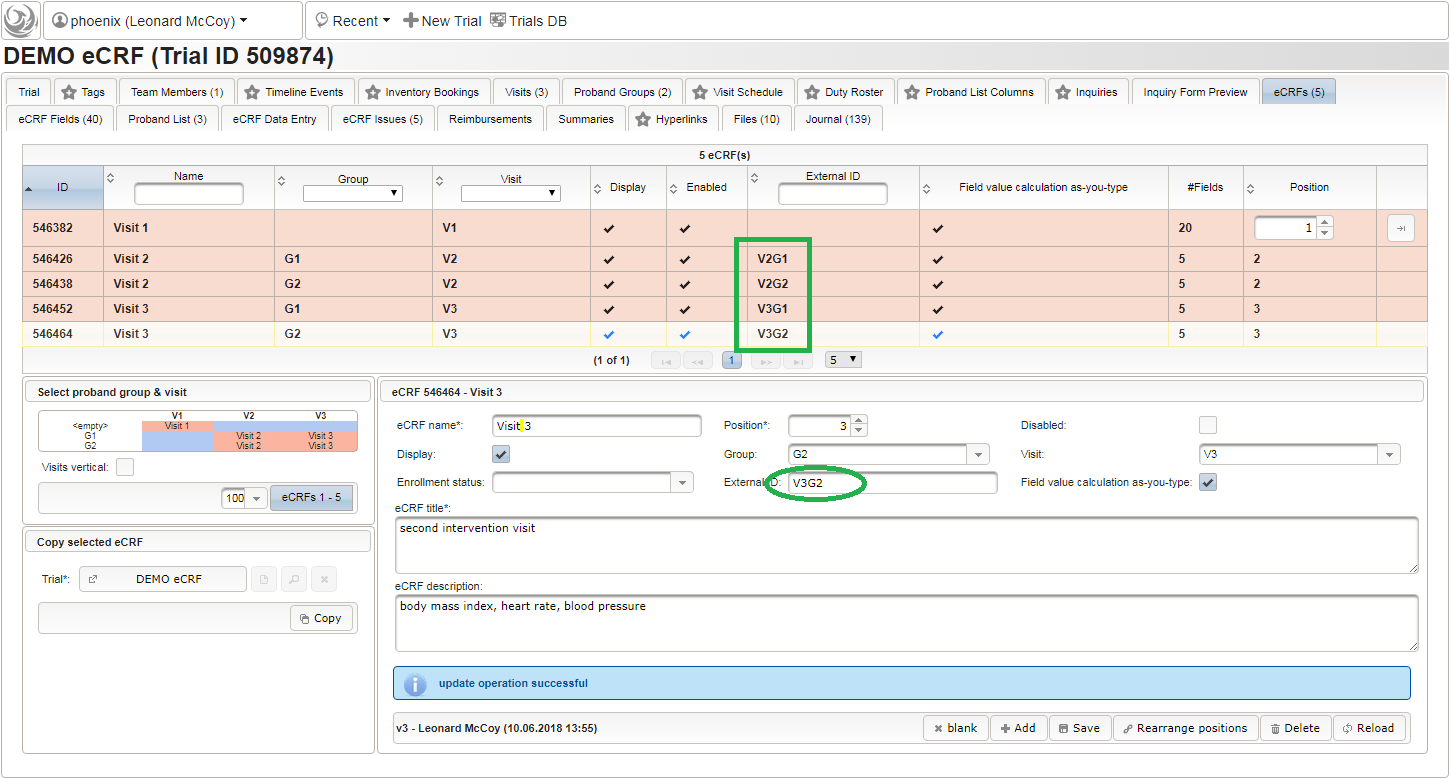
Intervention Visits V2, V3
Although the data to collect (body mass index, heart rate and blood pressure) is identical for each of the two intervention visits (so a single form would suffice), we consider it beneficial eg. for later amendments to create dedicated forms for each visit/branch:
- Visit 2 – Group A
- Visit 3 – Group A
- Visit 2 – Group B
- Visit 3 – Group B
- To start, create the eCRF for the first intervention visit (“Visit 2”) of the first branch (“Group A”):
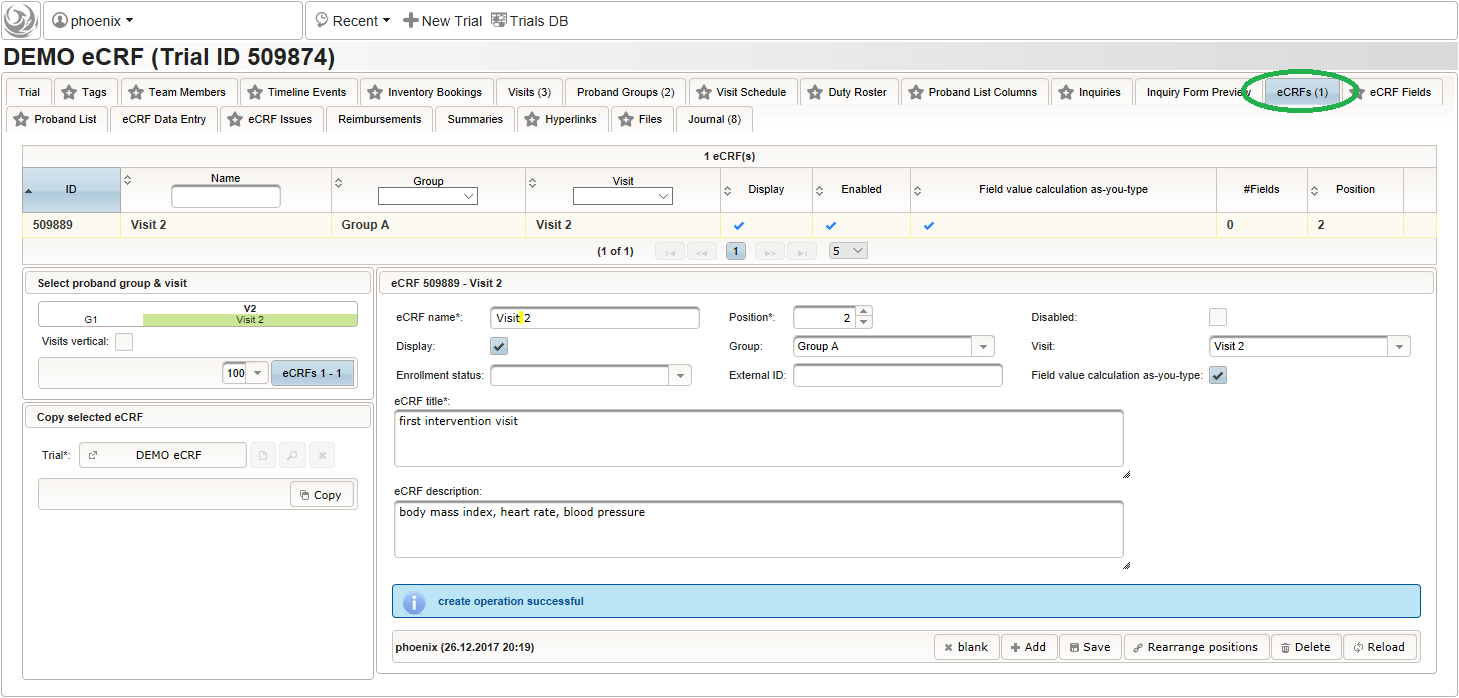
- Once the eCRF is created, form fields can be added to it. Form fields are grouped by the section name. Fields with the same section name will be enclosed by a collapsable UI panel, froming a eCRF section. We will use a section named “01 – body mass index” to group the form fields needed to collect and calculate the body mass index (BMI). It will contain three form fields:
- body height
- body weight
- calculated BMI
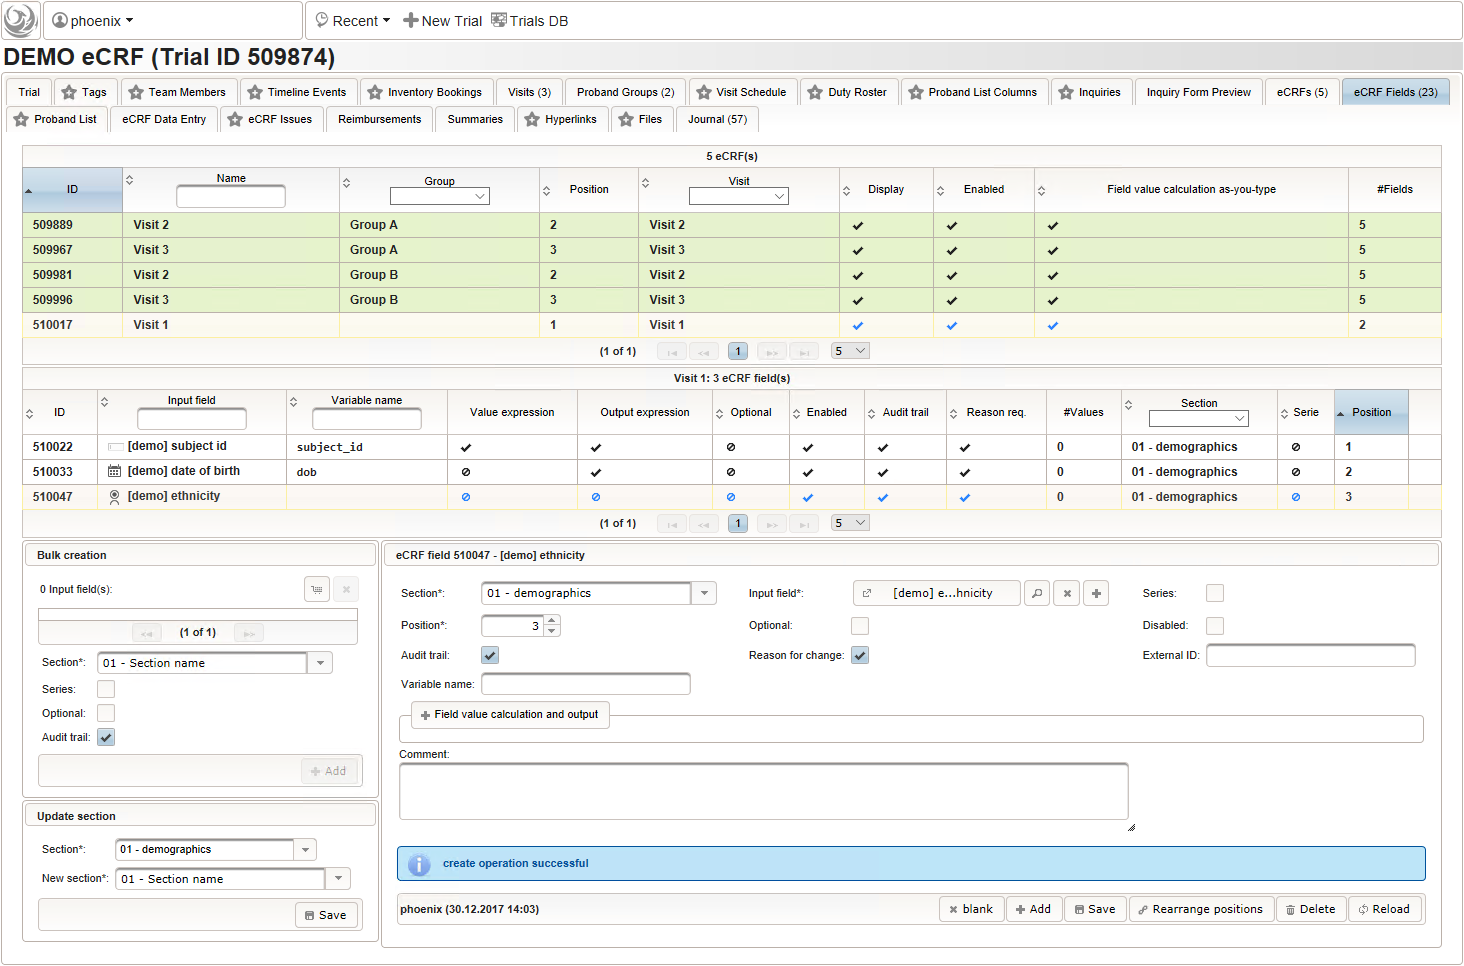
- To start creating the body height field of the “01 – body mass index” section, switch to the eCRF fields tab and click on the row showing the previously created “Visit 2” eCRF (1). The data table below starts emtpy and will display the form fields of the selected eCRF.
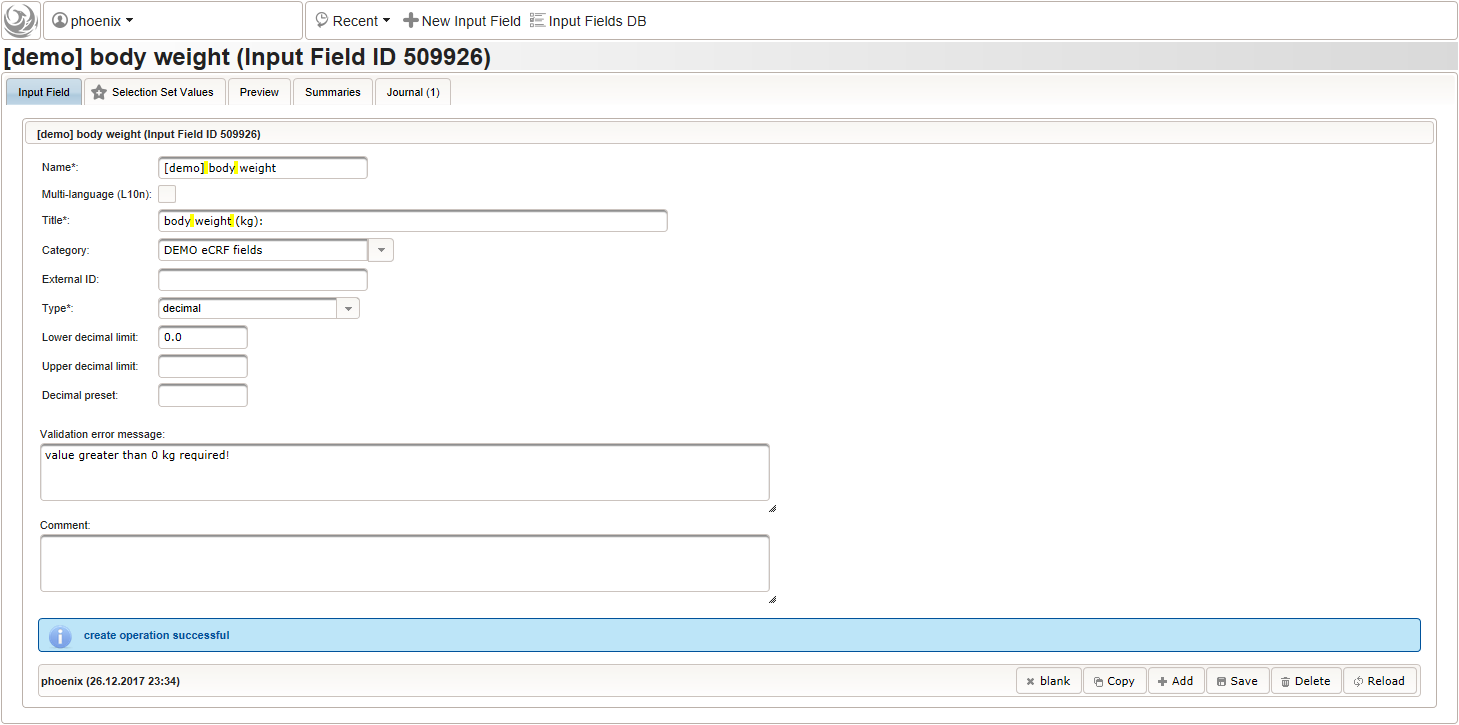
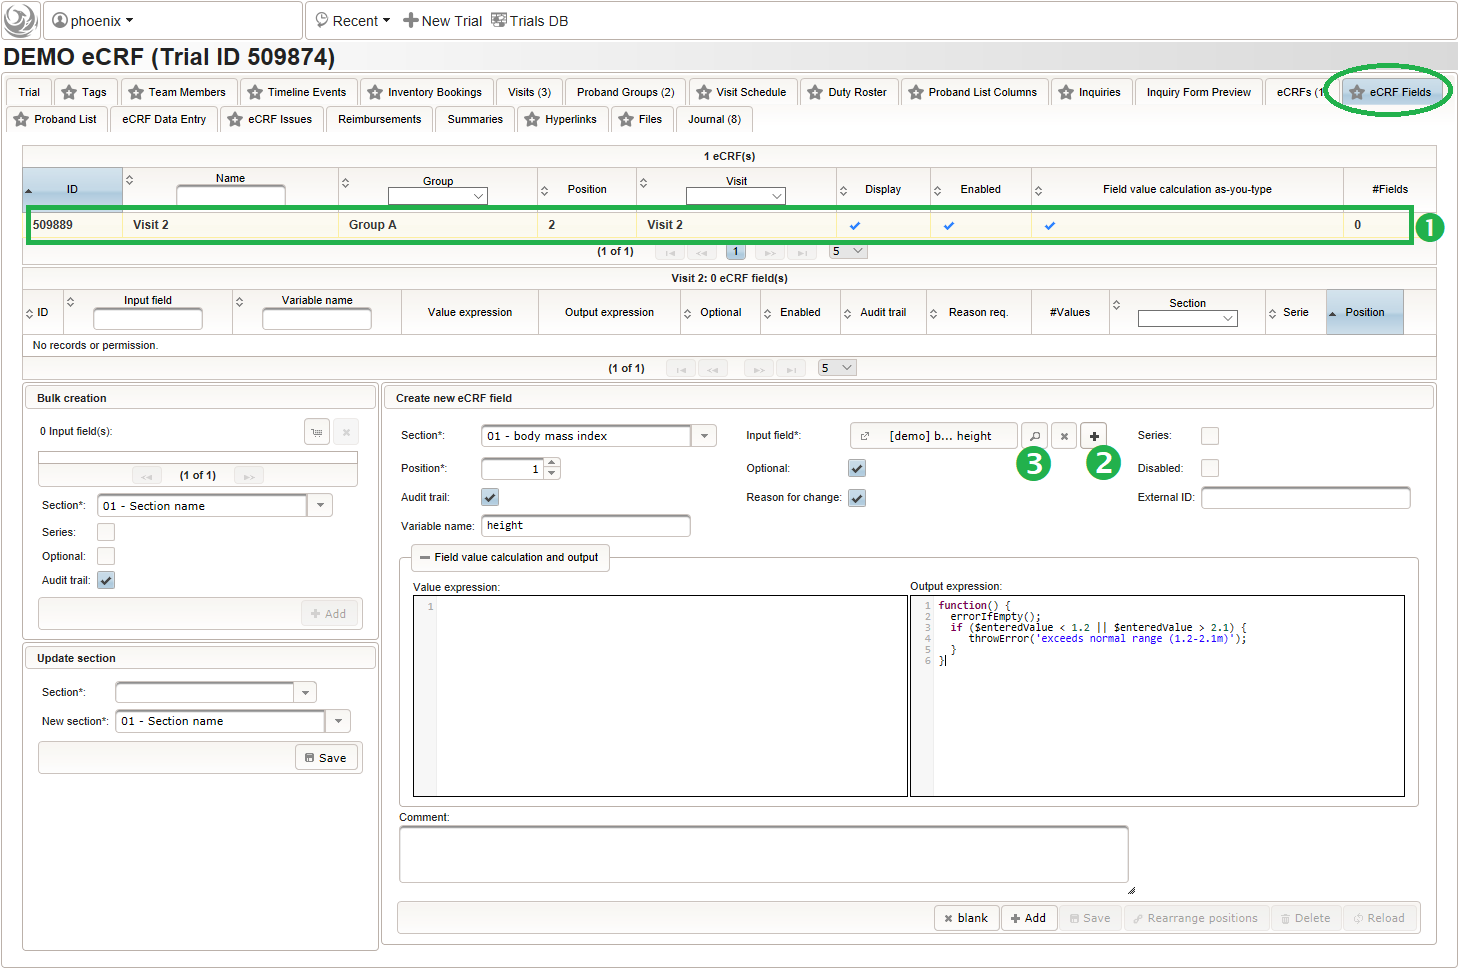 Click on the plus icon of the input field selector (2) above to open a new browser tab for creating a input field for the body height. We consider the body height as a decimal value in meters. If limits for range checks are specified, storing exceeding values will be strictly prevented, which can be beneficial if you want to rely on this in exported data. Since the height cannot be negative, we do so for the lower bound of 0.0 meters. After clicking Add, the new “[demo] body height” input field below is permanently added to the repository (representing the Phoenix input field module). The “[demo]” prefix in the name helps to keep input field names unique in case a similar field is created for another trial (unless it is re-used there). Once created, the browser tab showing the input field can be closed and it is ready to be assigned to the form field in the next step.
  Back at the browser tab showing the eCRF fields, now click the input field selector’s search icon (3) in order to pick the input field we just created. It will open a pop-up browser window to search and select from existing input fields. When doing this for the first time (eg. right after a vanilla installation), there are no search queries defined yet. The most simple search query contains no criteria, which will list all existing input fields. To prepare such once, remove the empty criterion row and click Add after providing a name.
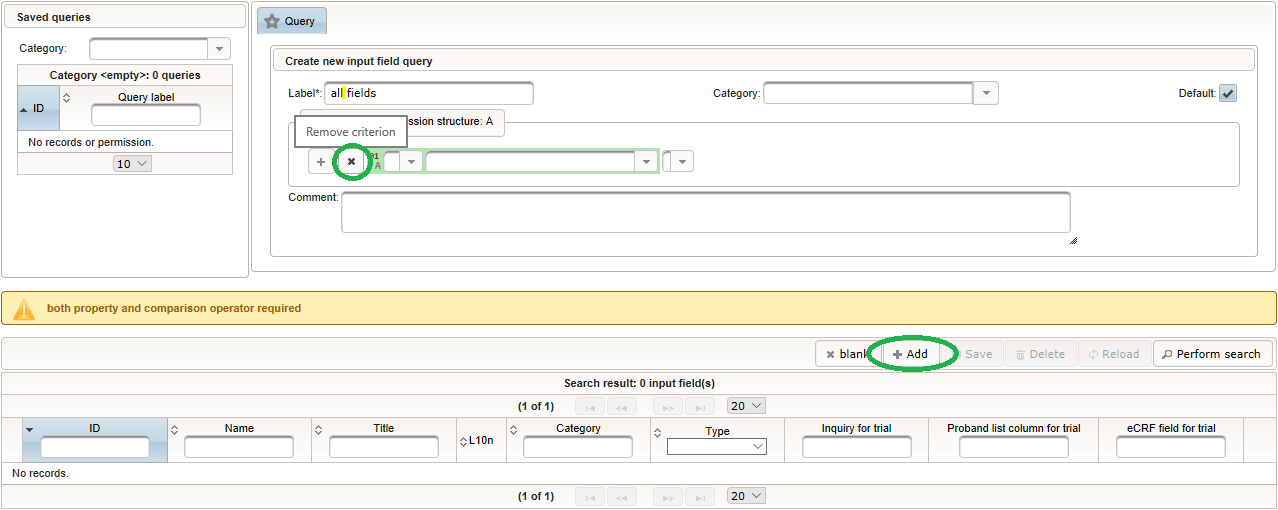 Now click Perform search to see the search query result list. By clicking the Pick button of the row of the desired [demo] body height input field, it will be selected in the eCRF Fields browser tab, and the search pop-up window will close.
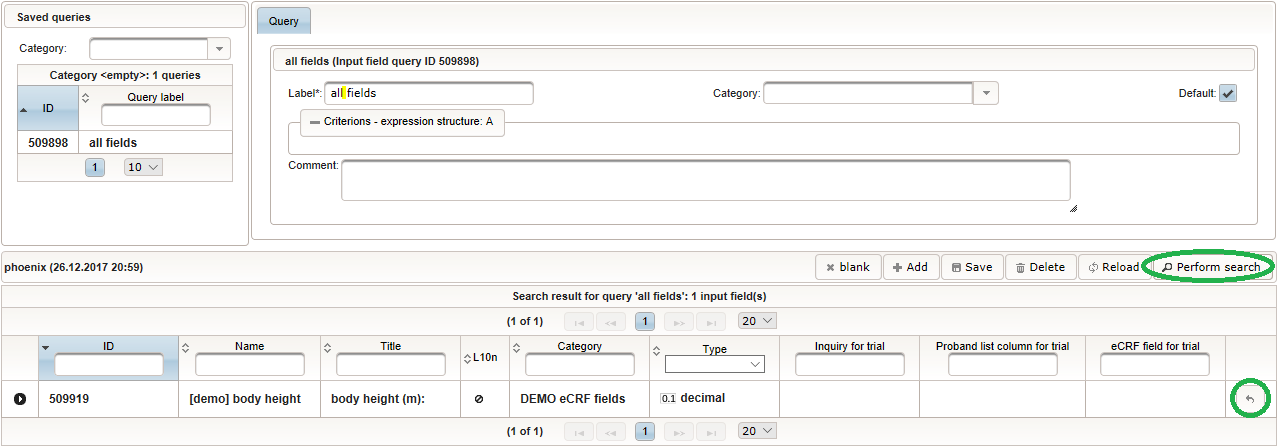 When completing the remaining fields of the body height, we utilise the form scripting capabilities by specifying a Javascript Output expression (Output denotes the UI area below a form input):
function() { errorIfEmpty(); //The field is optional, so empty values can be stored. It will however generate a discrepancy in that case. if ($enteredValue < 1.2 || $enteredValue > 2.1) { throwError('exceeds normal range (1.2-2.1m)'); //A discrepancy is generated when the entered value exceeds the range. } } - Repeat the steps to add a similar decimal field for entering the body weight in kilograms:
 The output expression can look similar, it again should cause a discrepancy if no value was entered, or the value exceeds some range:
function() { errorIfEmpty(); if ($enteredValue < 40 || $enteredValue > 160) { throwError('exceeds normal range (40-160kg)'); } } - Given the body height and weight, the body mass index can be calculated (\(bmi=weight/height^2\)). To hold the calculated BMI value, a third form field is required. It will be another decimal input field as shown below.
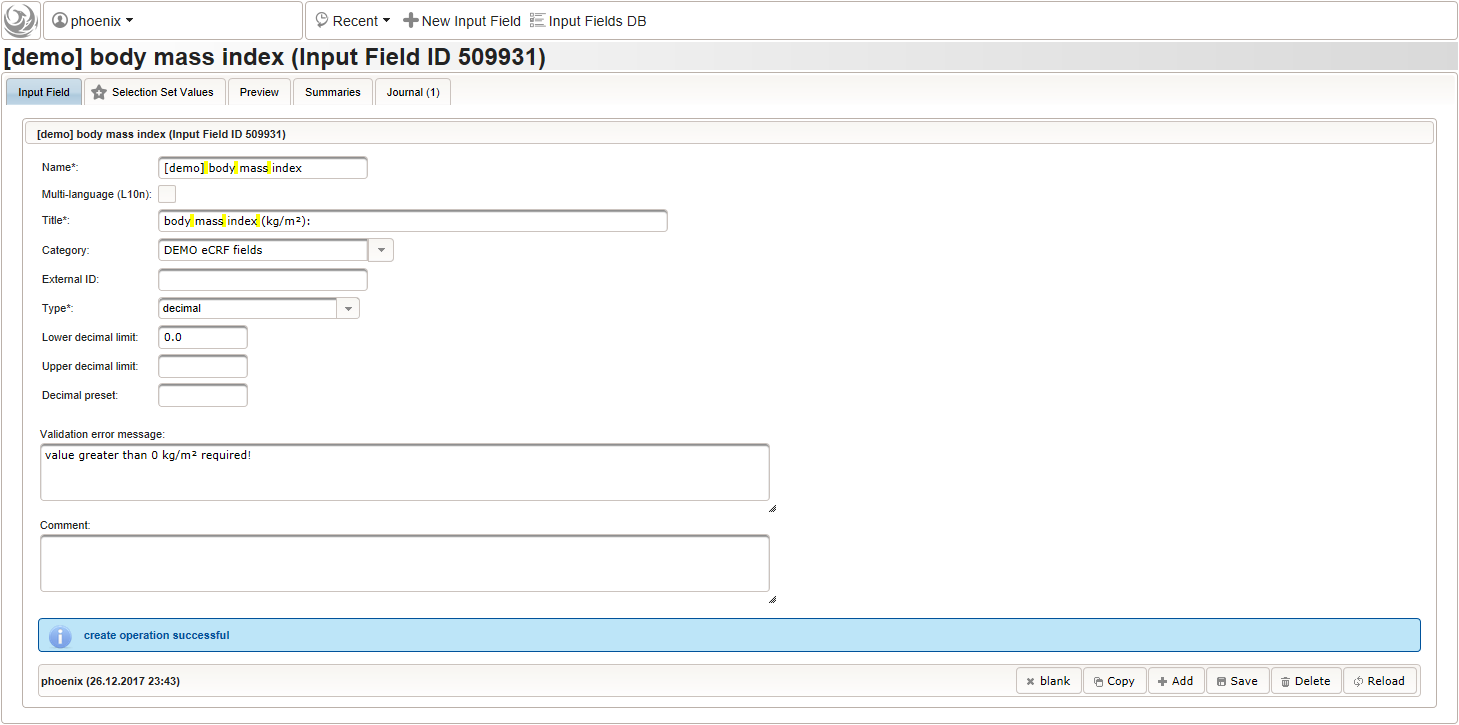 By adding the BMI field, the “01 – body mass index” section is complete and should look like this:
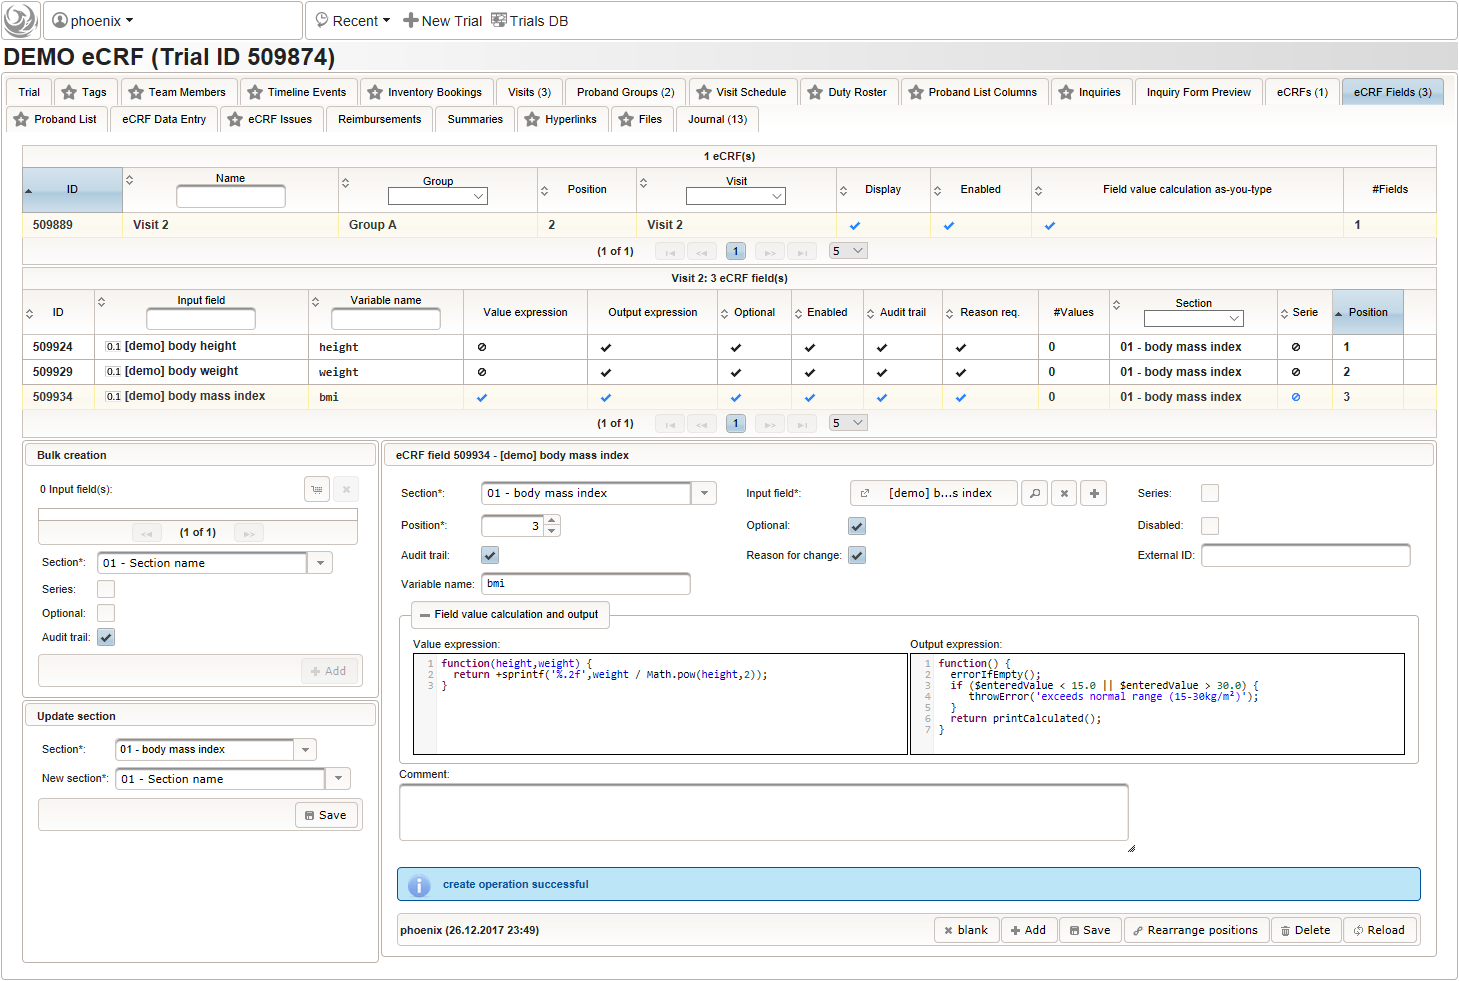 The Value expression is used to implement the actual BMI calculation using Javascript. The function gets the height and weight values entered by the user passed as arguments and returns the BMI value rounded to two decimals (using the sprintf utility function).
function(height,weight) {
  return +sprintf('%.2f',weight / Math.pow(height,2));
}
Apart from range and emtpiness checks, the Output expression this time also returns a text to display the calculated (expected) value. This text will appear in green color below the BMI form field if the entered value matches the calculated value, or red otherwise (discrepancy will be generated).
function() {
 errorIfEmpty();
 if ($enteredValue < 15.0 || $enteredValue > 30.0) {
   throwError('exceeds normal range (15-30kg/m²)');
 }
 return printCalculated(); //Generates a pretty text message of the field's calculated variable value.
}
While it is allowed to save malformed form scripting code, resulting errors such as Javascript syntax errors will be displayed in the output area of the affected form field once the code gets executed. The form scripting code gets evaluated by the browser’s Javascript engine when the form is initially opened for data entry, and with every subsequent keypress of the user typing into a input element of a field that has a variable name assigned. When developing an eCRF, it is therefore recommended to enroll a sample subject and open the trial in a second browser tab to test the data entry form side-by-side.
- An integer input field should be used for entering the heart rate in beats per minute. It can be put into a dedicated section “02 – heart rate”.
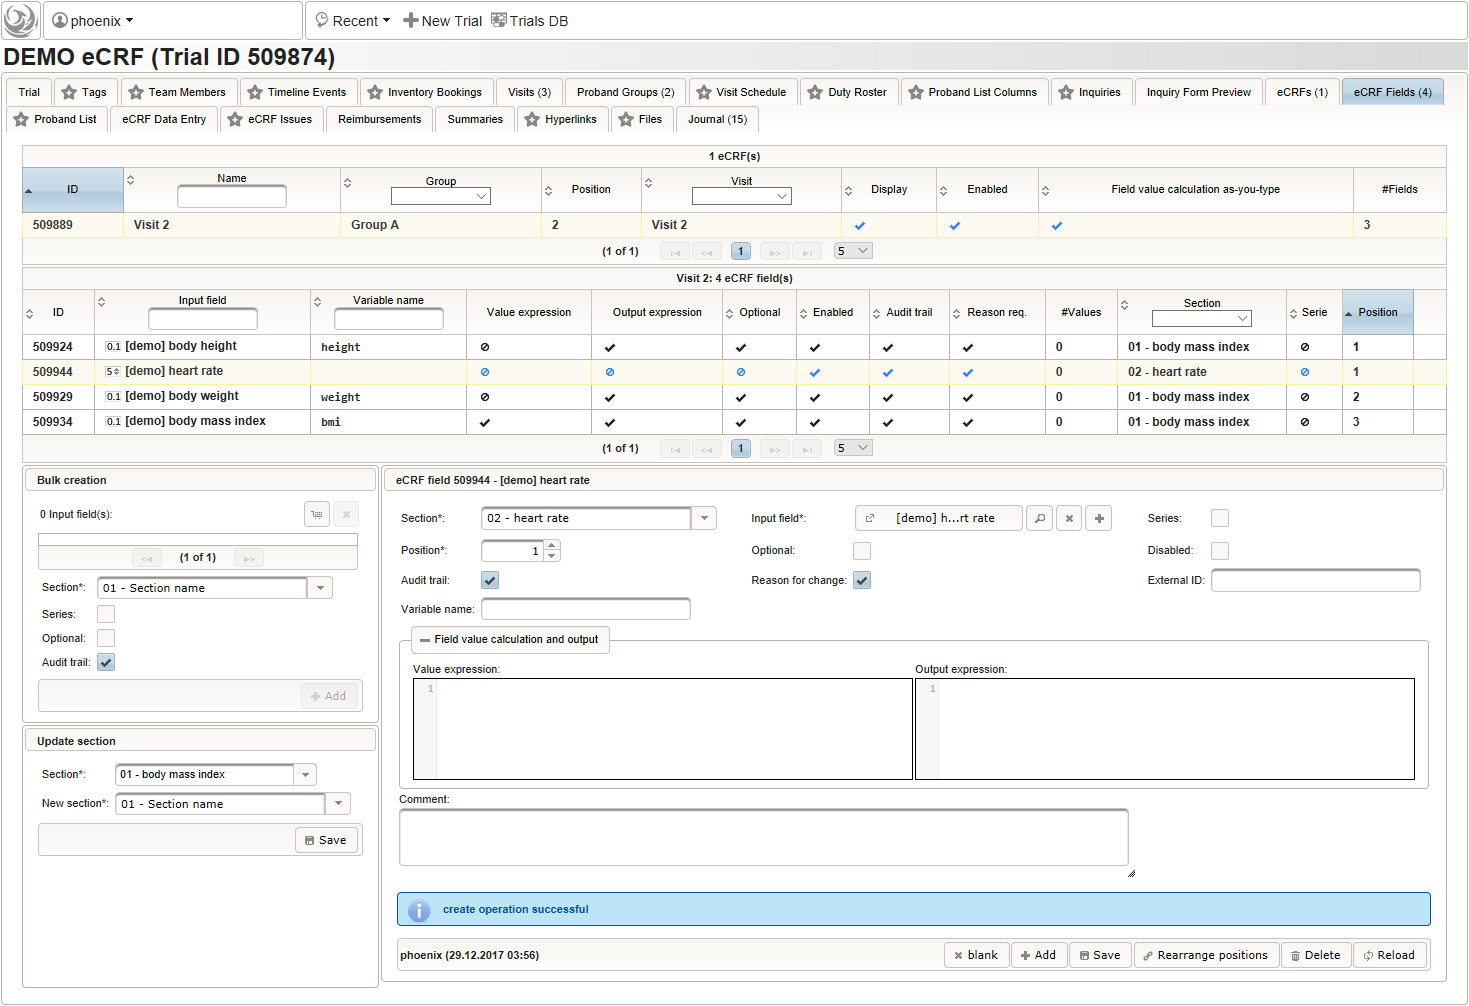 The Output expression is ommitted this time but range limits are used for the input field instead.
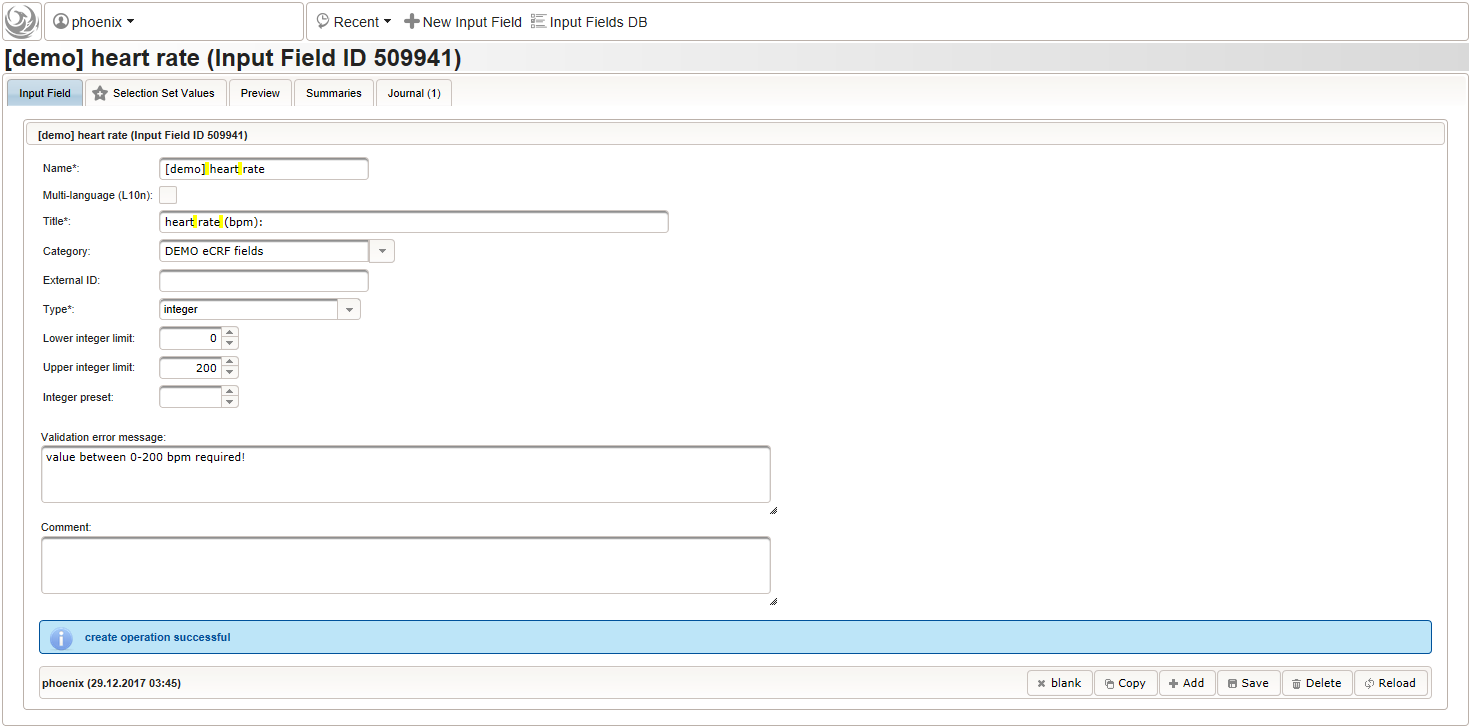
- To record the blood pressure, a single text input field will be used. It is placed in another separate section such as “03 – blood pressure”.
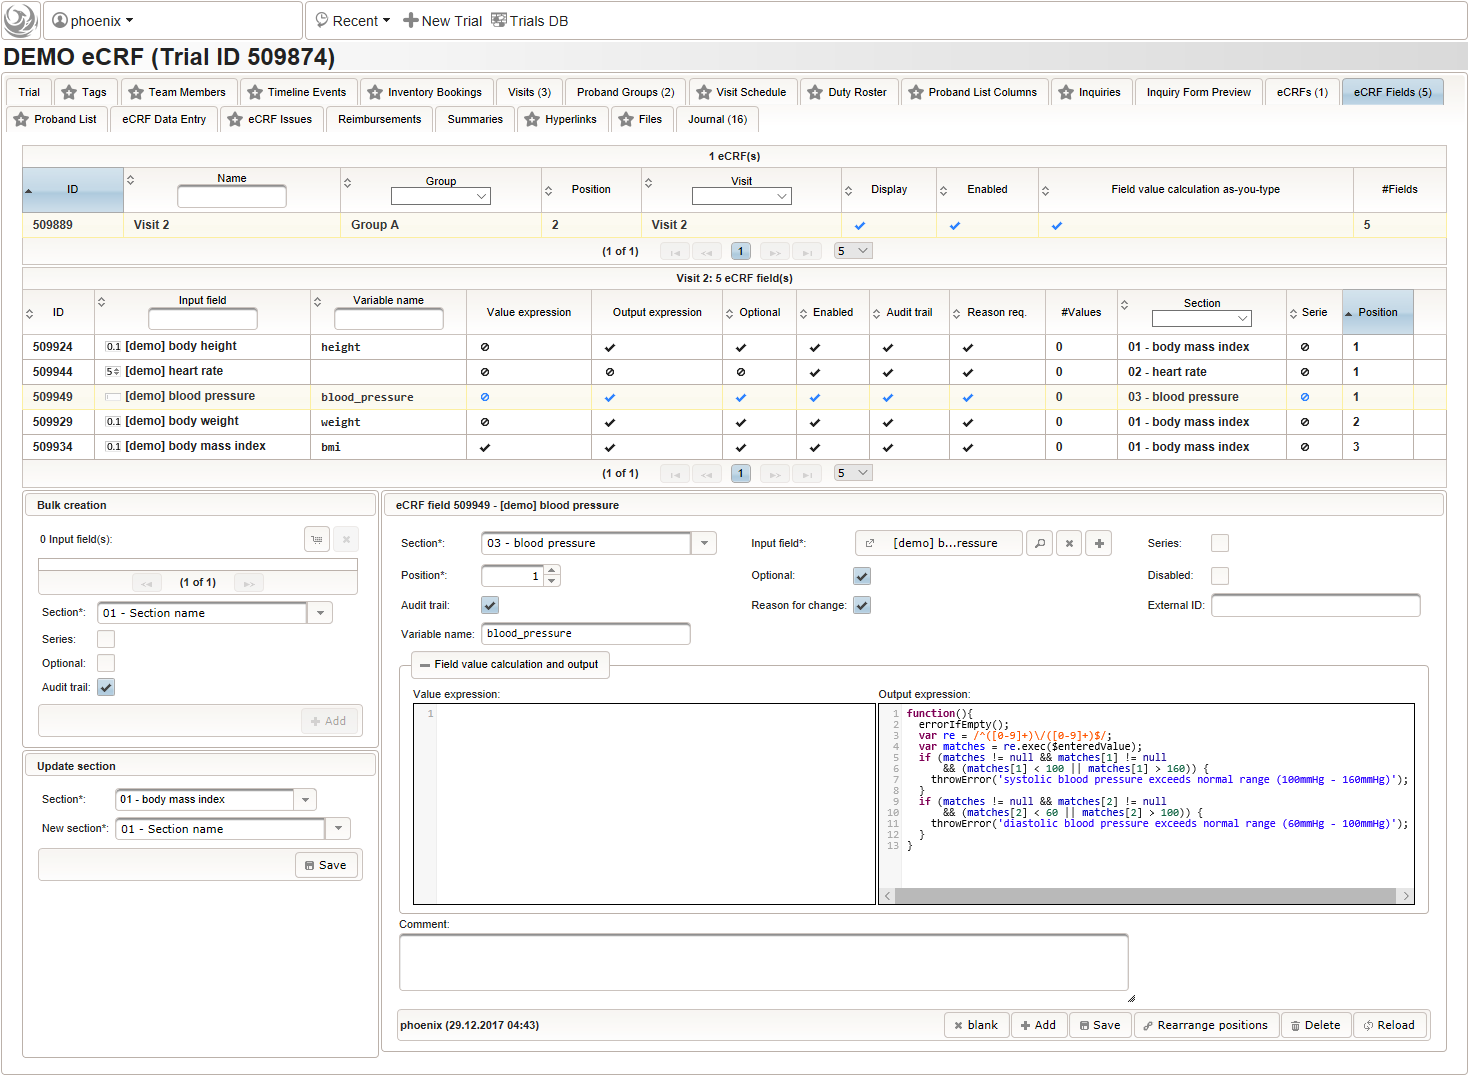
 The blood pressure is expected in “<systolic mmHg>/<diastolic mmHg>” format. While this format can be enforced by a regular expression range check, we opt for a more detailed inspection of systolic and diastolic values using the Output expression:
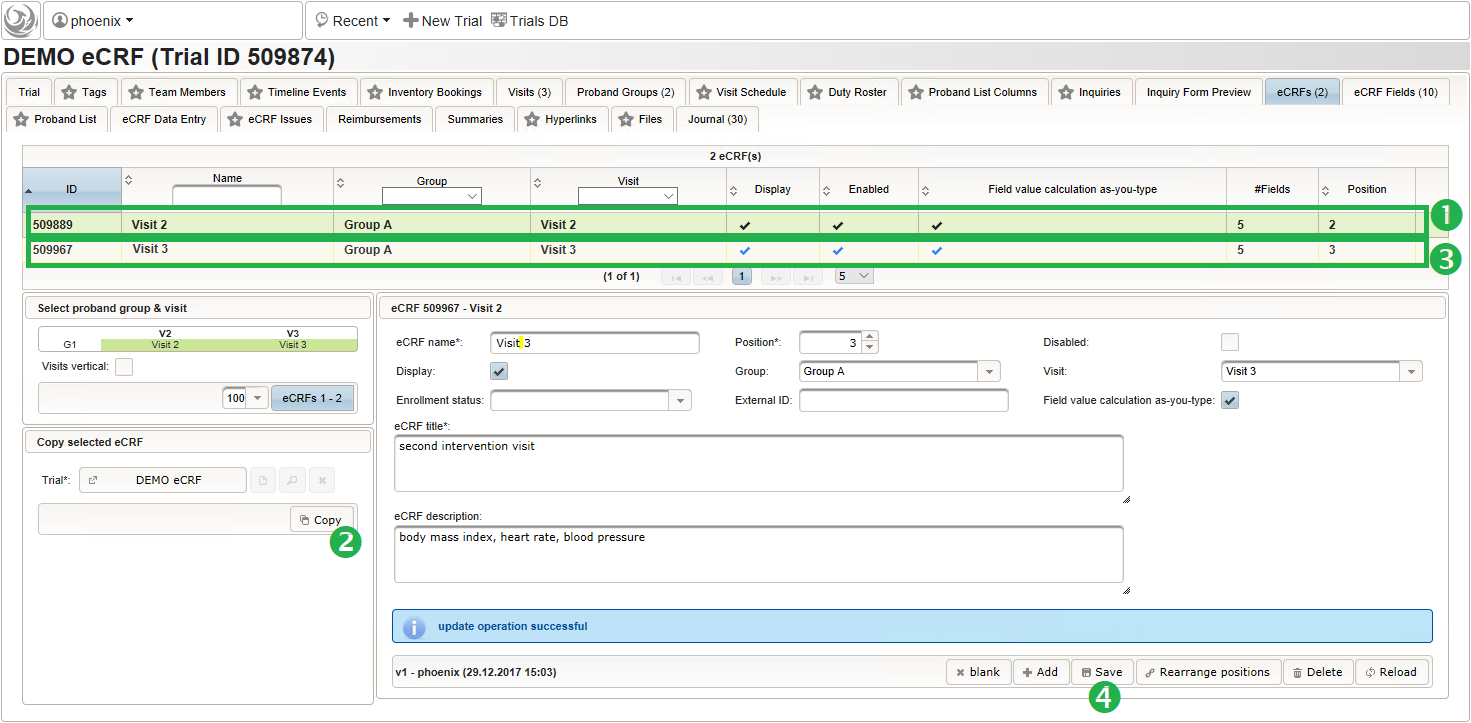
function(){ errorIfEmpty(); var re = /^([0-9]+)\/([0-9]+)$/; //The regular expression is used to split a string like "110/90" into "110" and "90". var matches = re.exec($enteredValue); if (matches != null && matches[1] != null && (matches[1] < 100 || matches[1] > 160)) { throwError('systolic blood pressure exceeds normal range (100mmHg - 160mmHg)'); } if (matches != null && matches[2] != null && (matches[2] < 60 || matches[2] > 100)) { throwError('diastolic blood pressure exceeds normal range (60mmHg - 100mmHg)'); } } - The eCRF for “Visit 2” – “Group A” is completed at this point and now can be cloned. This means a sort of deep copy – the eCRF record including the eCRF fields are recreated, while input fields are not. Cloning will be used to set up identical forms for the three remaining intervention visits.
- Visit 2 – Group A
- Visit 3 – Group A
- Visit 2 – Group B
- Visit 3 – Group B
- Switch to the eCRF tab and select the row showing the “Visit 2” – “Group A” eCRF (1). Then click Copy in the lower-left are of the UI (2). Click on the new row showing the cloned eCRF to edit it (3). The eCRF name, Group, Visit and Title should be changed as shown below to fit the “Visit 3” – “Group A” eCRF. Click Save to persist the changes (4).
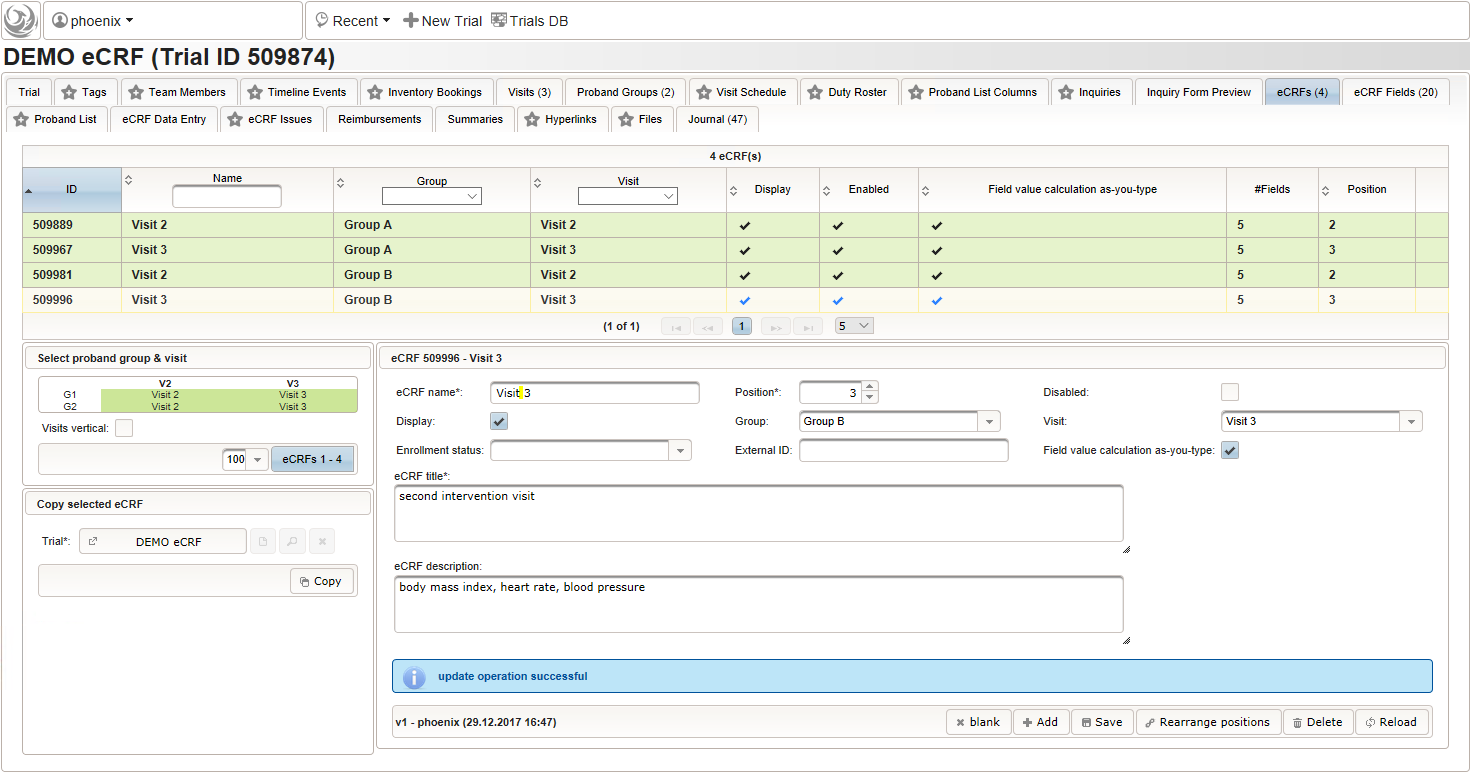
- Repeat the cloning steps for the remaining two intervention visit eCRFs, to end up with the result as shown below.
Screening Visit V1
The screening visit eCRF does not depend on branches but is unique for all subjects. It should act as a showcase for advanced form scripting features, which will be used for the form fields to collect data of a typical screening visit.
- demographics: subject id, date of birth, ethnicity
- medical history: ICD10 diagnosis name and code/ICPM procedure name and code, onset date, end date/ongoing
- concomitant medication: product name and ATC code, dose, frequency, total daily dose
- eligibility: calculate screening failure result from inclusion/exclusion criteria
- randomisation: a simple adaptive randomization
Demographics
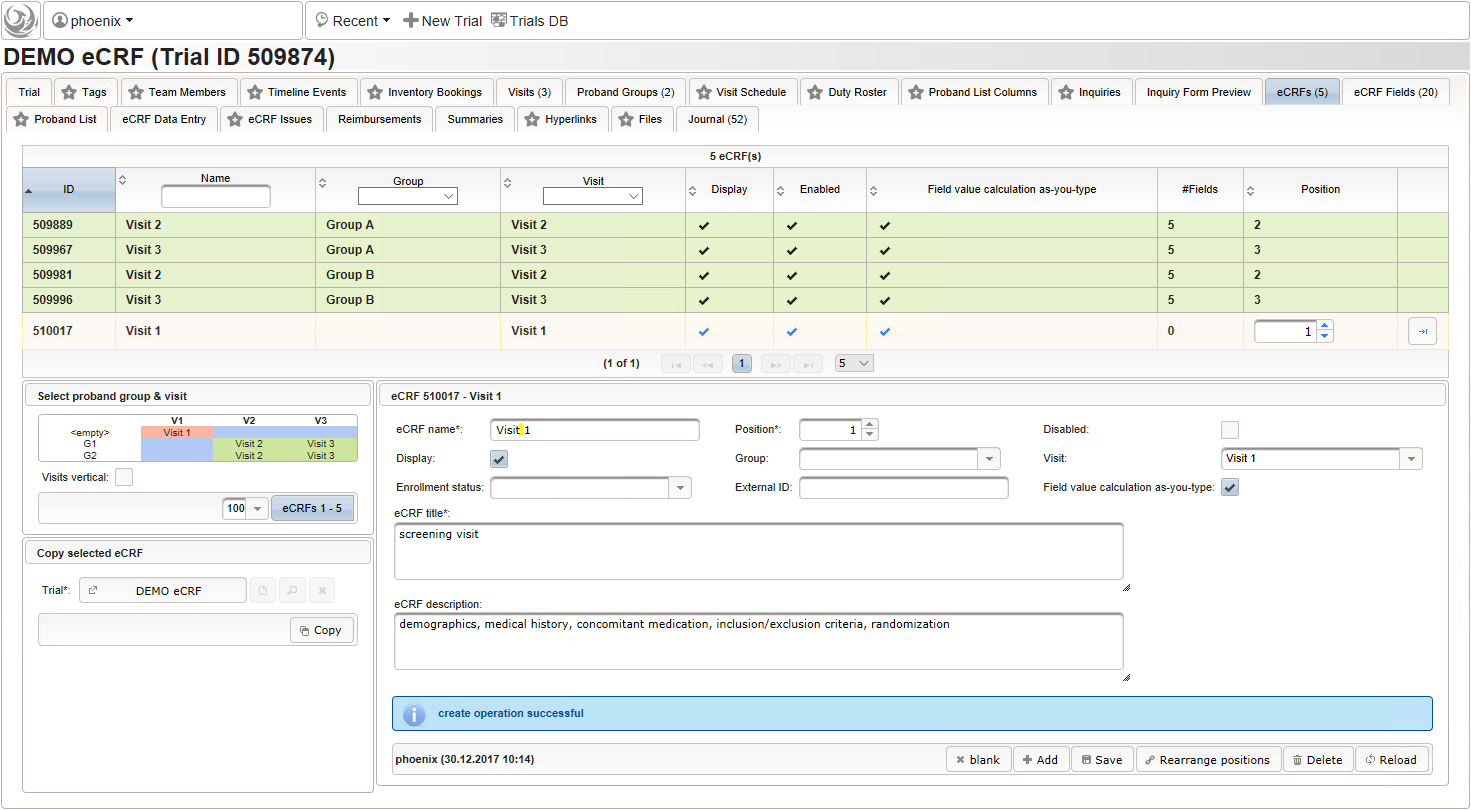
- To start with, a the “Visit 1” screening visit eCRF is created. It is not associated to a Group but the Visit only. The Position of 1 will result in the overall correct order when eCRFs are displayed for data entry.
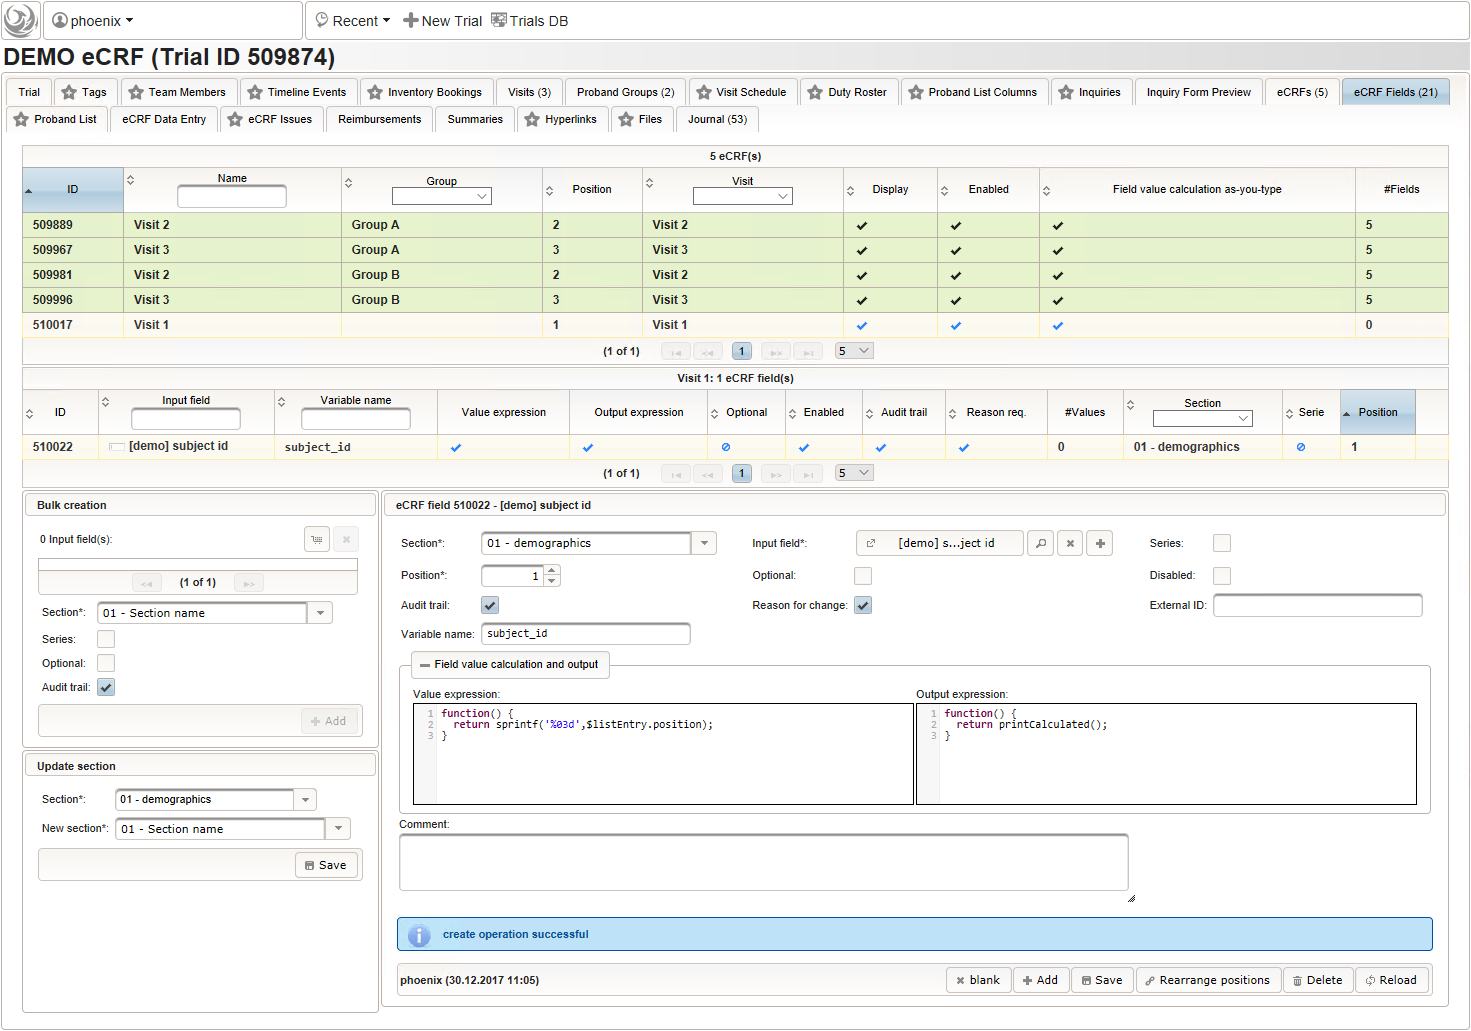
- Now form fields to collect demographic data can be added, the first of which will be the subject id. We decide to make it a three digit number (up to 1000 enrolled subjects possible), which is enforced by a Regular expression range check of the input field. To keep leading zeros, the input field will not be an integer but a string (single-line text).
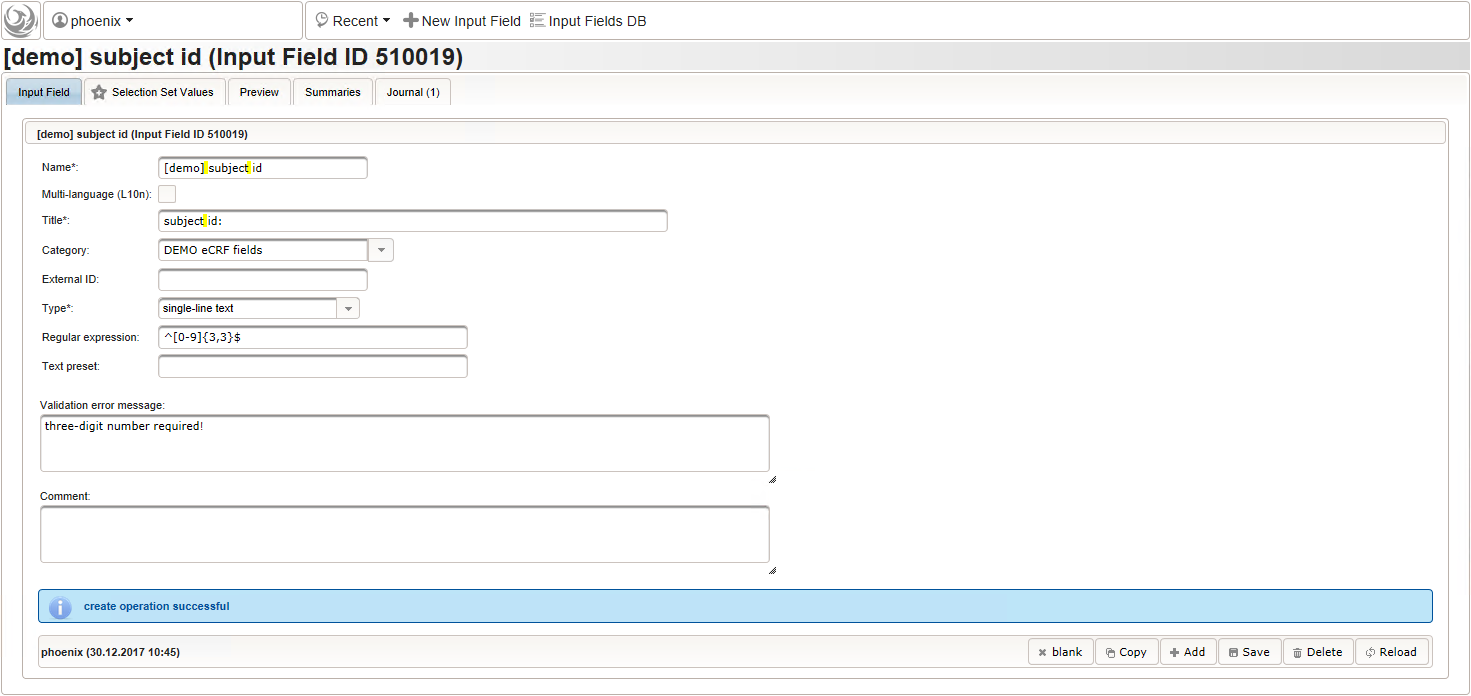 For advanced range checks such as regular expressions, it is advisable to test it for accepted/rejected input values. Clicking Test input in the Preview tab will simulate the response message the user will see when trying to save a given input value.
 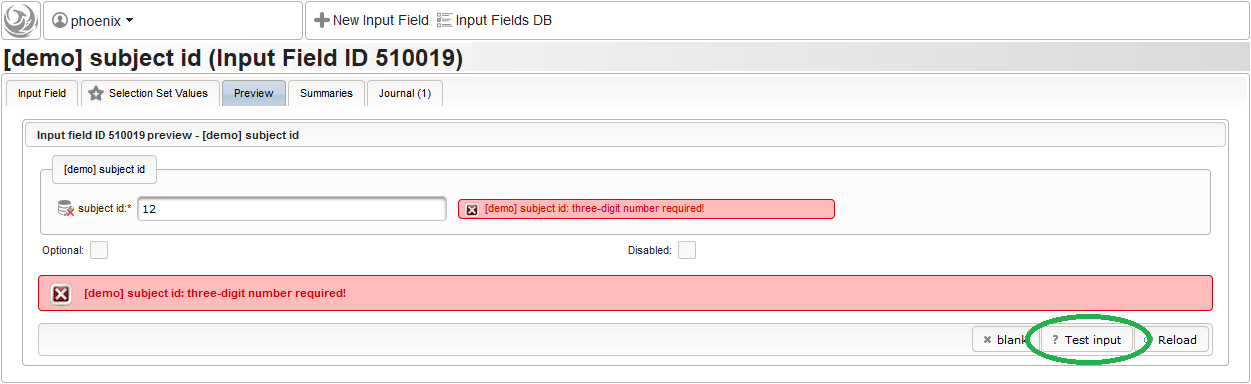 The subject id is not provided externally but should be generated using form scripting instead. It must be an unique number, which we simply take from the enrollment record’s consecutive Position value.
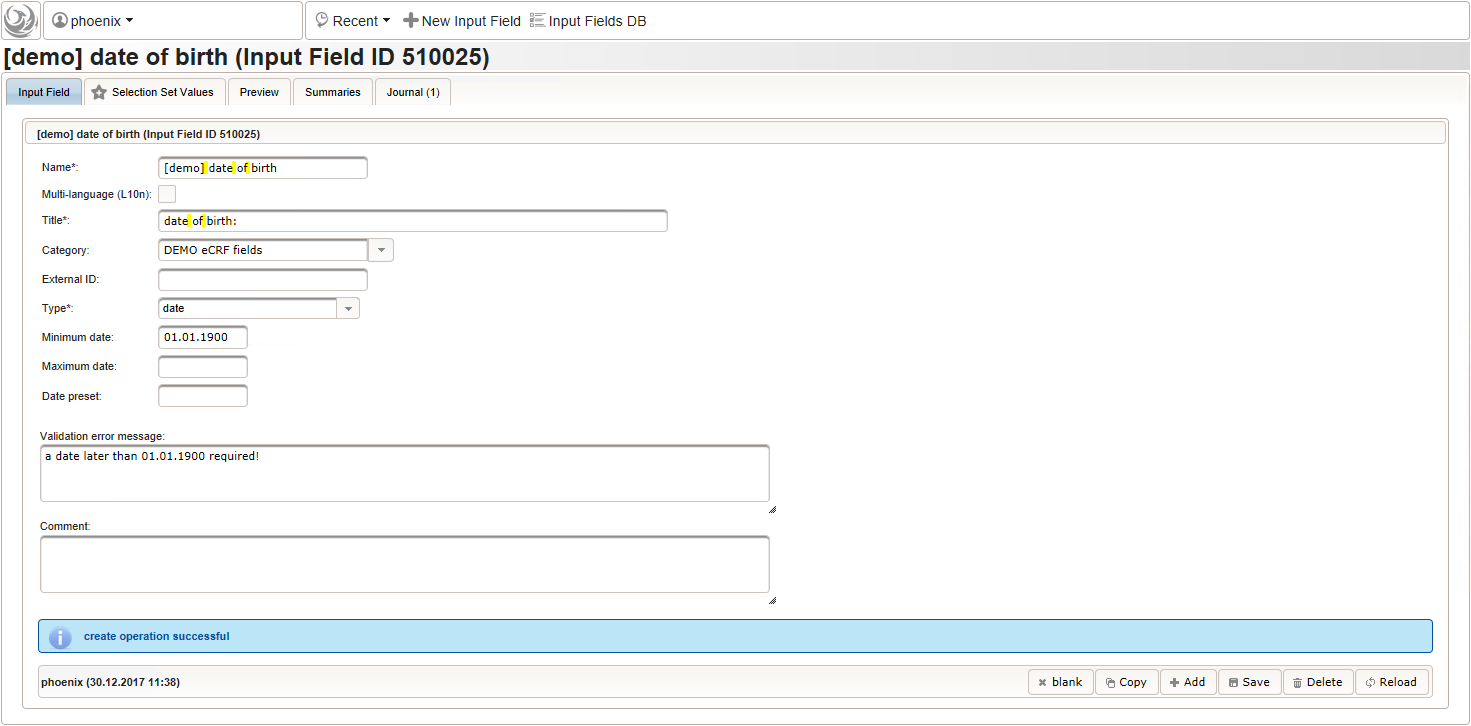
function() { return sprintf('%03d',$listEntry.position); } - A date of birth (DoB) entry is to be added in the “01 – demographics” eCRF section next, which will be of date input field type. While this will inherently enforce full date entries (including a date picker), later sections will demonstrate how to handle partial dates. Be aware that collecting the DoB as a part of the clinical data could violate applicable data privacy law. If so, you should instead opt for using the dedicated DoB field when creating a subject in Phoenix. The DoB value is considered as personally identifyable information (PII) there, so it will be encrypted and is not included in eCRF data exports by default (requires a password to decrypt otherwise).
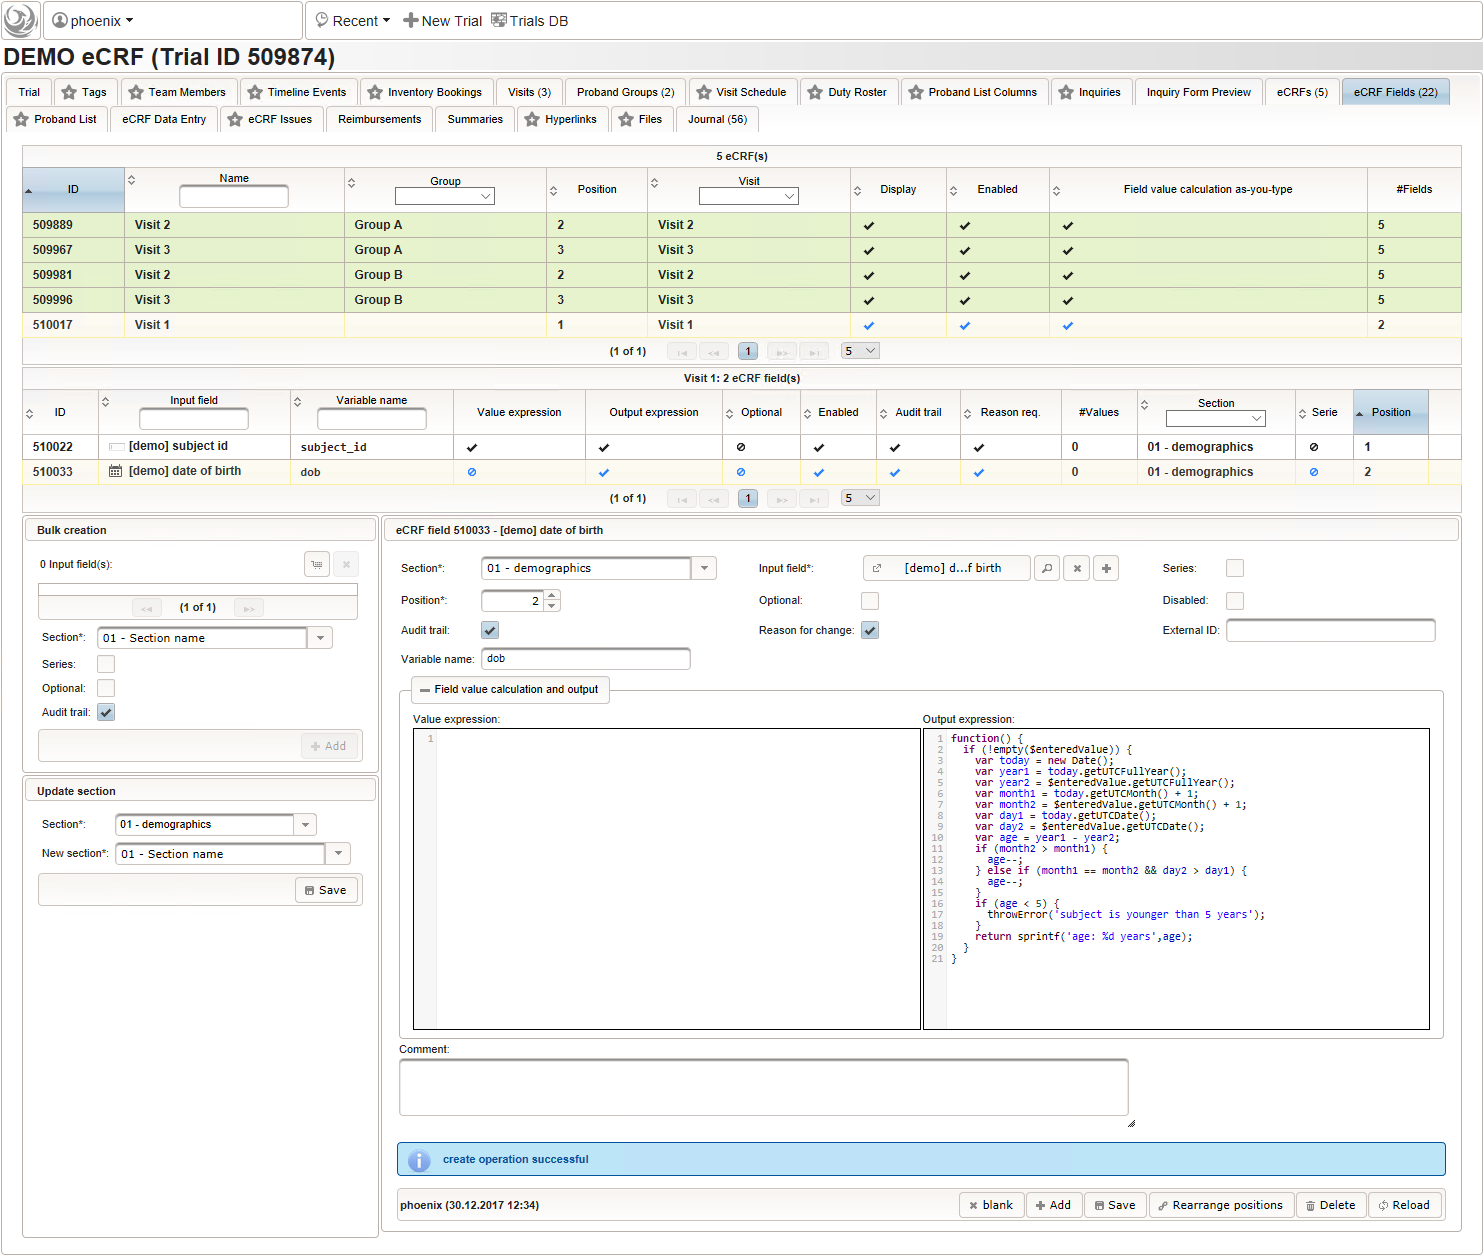
 An Output expression is used to calculate the subject’s current age, to be displayed when entering the date of birth. A check for subjects younger than 5 years is added for demonstration.
function() { if (!empty($enteredValue)) { var today = new Date(); var year1 = today.getUTCFullYear(); var year2 = $enteredValue.getUTCFullYear(); var month1 = today.getUTCMonth() + 1; var month2 = $enteredValue.getUTCMonth() + 1; var day1 = today.getUTCDate(); var day2 = $enteredValue.getUTCDate(); var age = year1 - year2; if (month2 > month1) { age--; } else if (month1 == month2 && day2 > day1) { age--; } if (age < 5) { throwError('subject is younger than 5 years'); } return sprintf('age: %d years',age); } } - The last form input for the demographics section will be an example for a selection input element. There are different flavours available:
- single selection (dropdwon)
- single selection (horizontal radio button group)
- single selection (vertical radio button group)
- autocomplete text (in strict mode)
- multiple selection (horizontal checkbox group)
- multiple selection (vertical checkbox group)
- multiple selection (sketch – select bounding regions by drawing crosses)
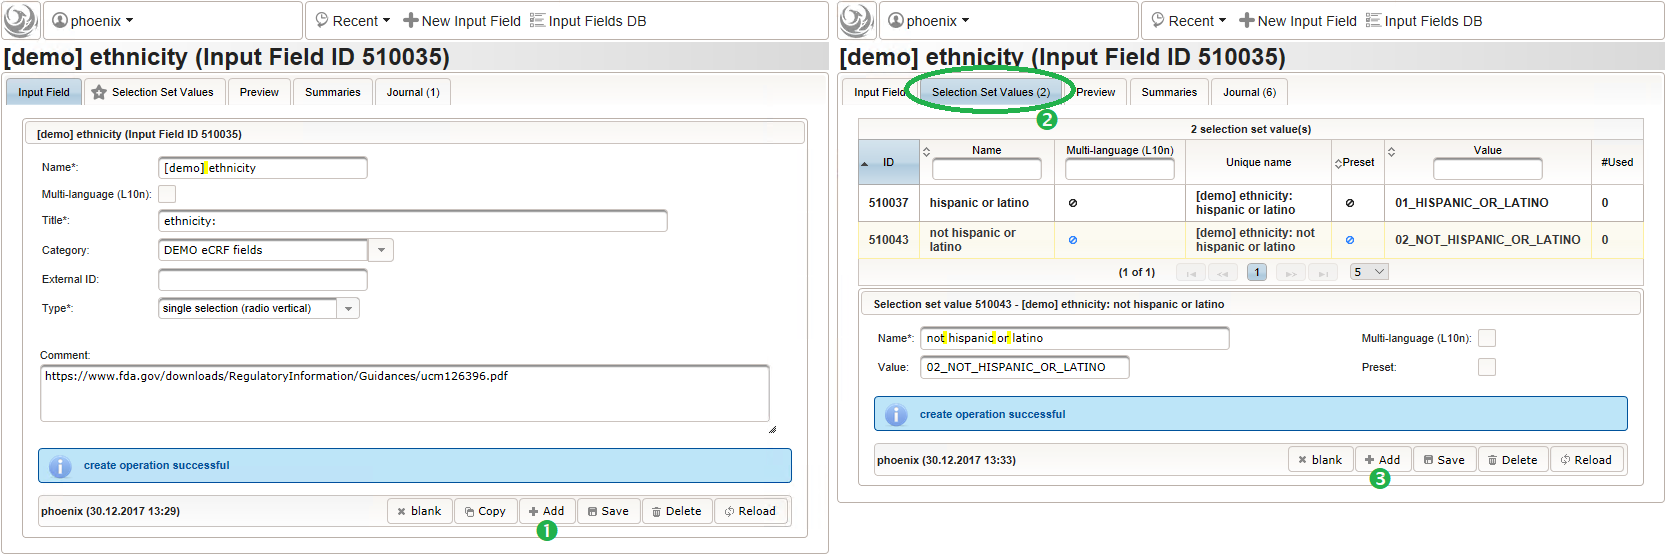
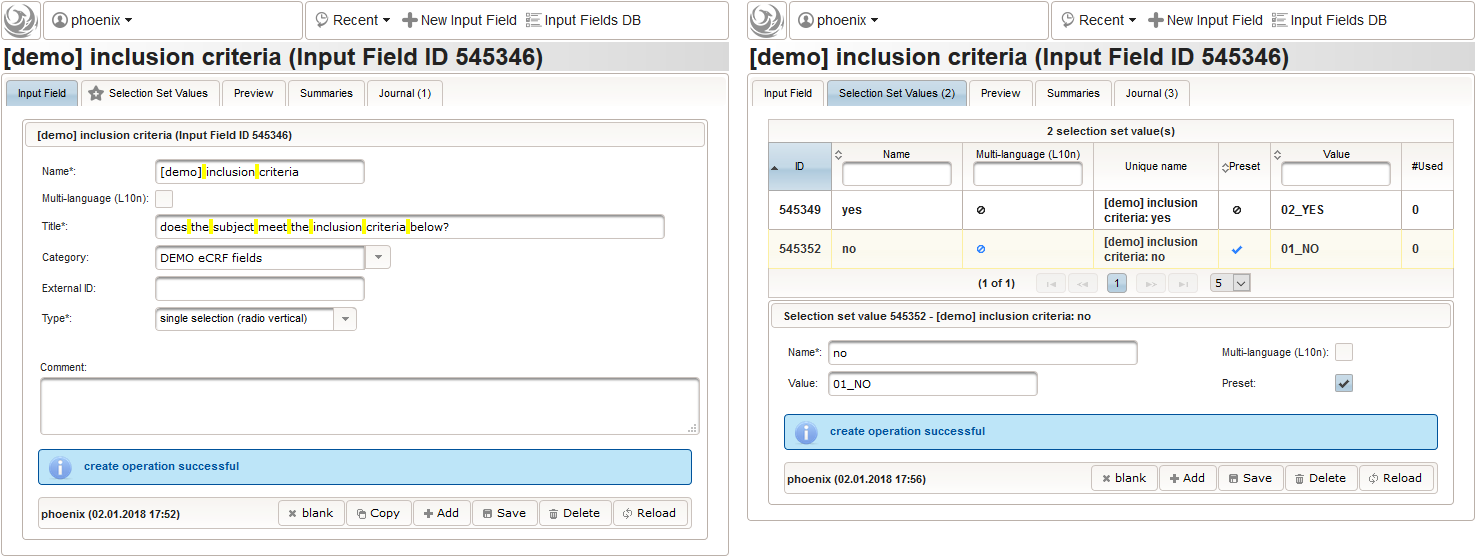
- For the ethnicity form input, a single selection input field type is required. After creating the input field (1), the option items to choose from can be added (3) in the Selection Set Values tab (2). The option item’s Name is displayed in the UI forms, while the Value is used in data exports and preferred to check for in Javascript expressions. The item order is given by the sort order of Values, and can be controlled with numerical, fixed-length prefixes such as “01”, “02” and so on (see also eCRF section prefixes).
Medical History
Collecting medical history typically comes down to a list of diagnoses and/or medical procedures the subject encountered, with the onset and end date each.
| illness/surgery | date of onset | recovery | ongoing |
|---|---|---|---|
| hypertension | 2009 | yes | |
| appendectomy | June 1999 | n/a | no |
| flu | 03.04.2017 | 07.04.2017 | no |
In Phoenix CTMS, entering lists or tabular data in general is possible using eCRF sections that allow repeated data entry (series). Series sections do not require an expected maximum limit of rows plus the application response time for load/save operations is constant – which is what makes the system usable especially for a big volume of rows. The next eCRF section “02 – medical history” will be the first series section. Each of its form inputs will therefore have the Series checkbox checked.
- The eCRF section “02 – medical history” will be designed to represent a row of the medical history list. Since we plan to lookup diagnoses/procedures names from the corresponding catalogues, we start with a selection wether the entry describes a diagnosis or a medical procedure.
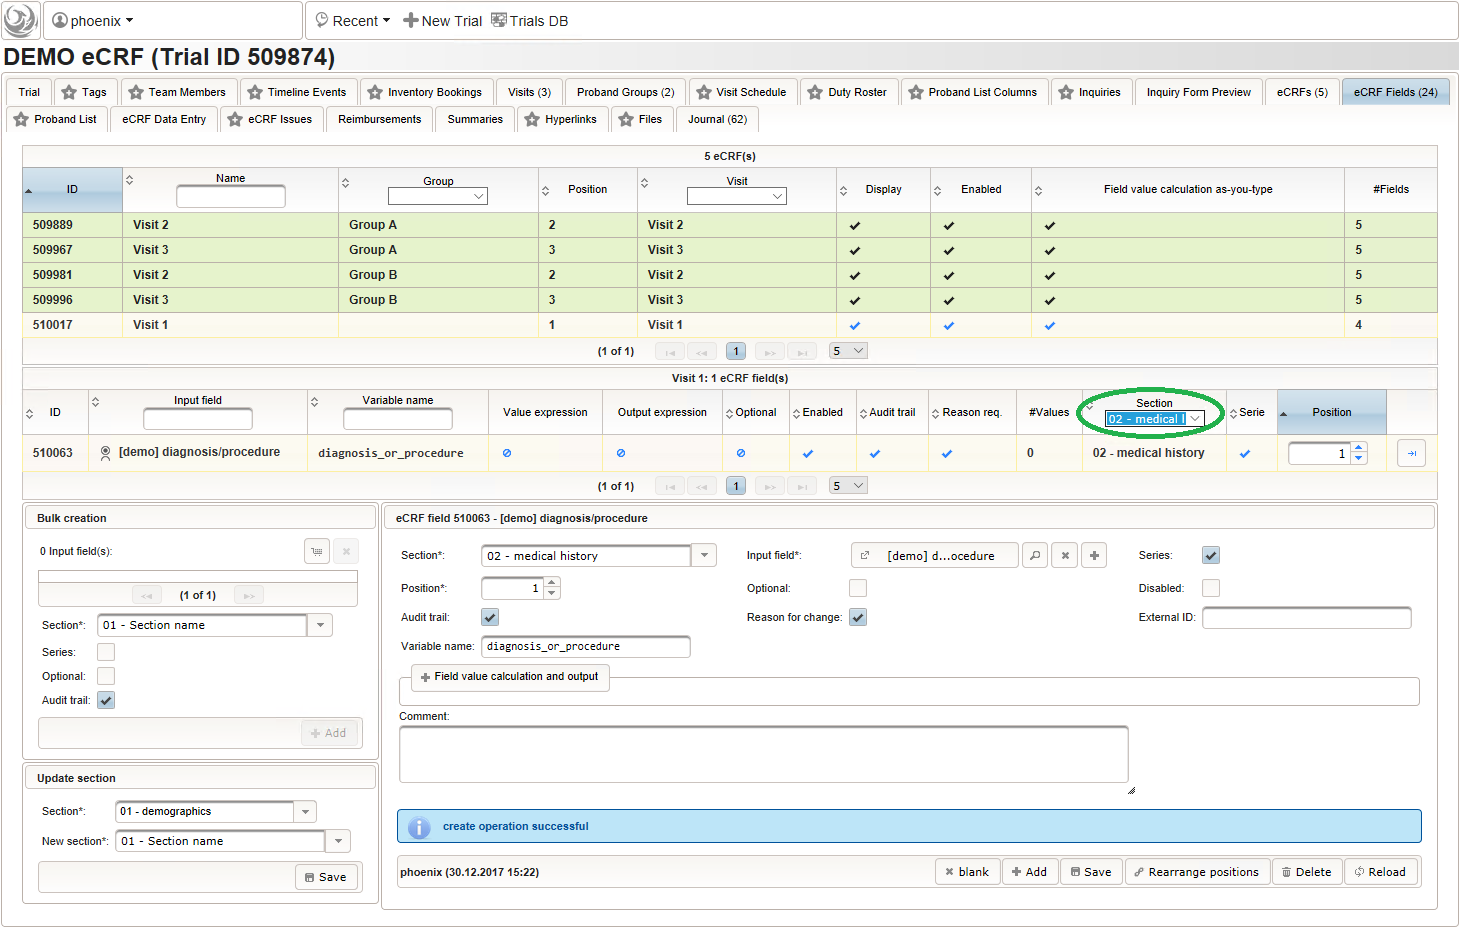 Note that although neither a Value expression nor a Output expression is needed, a variable name “diagnosis_or_procedure” is given. This will allow to use the selected value (“01_DIAGNOSIS” or “02_PROCEDURE”) in expressions of other form inputs to come.
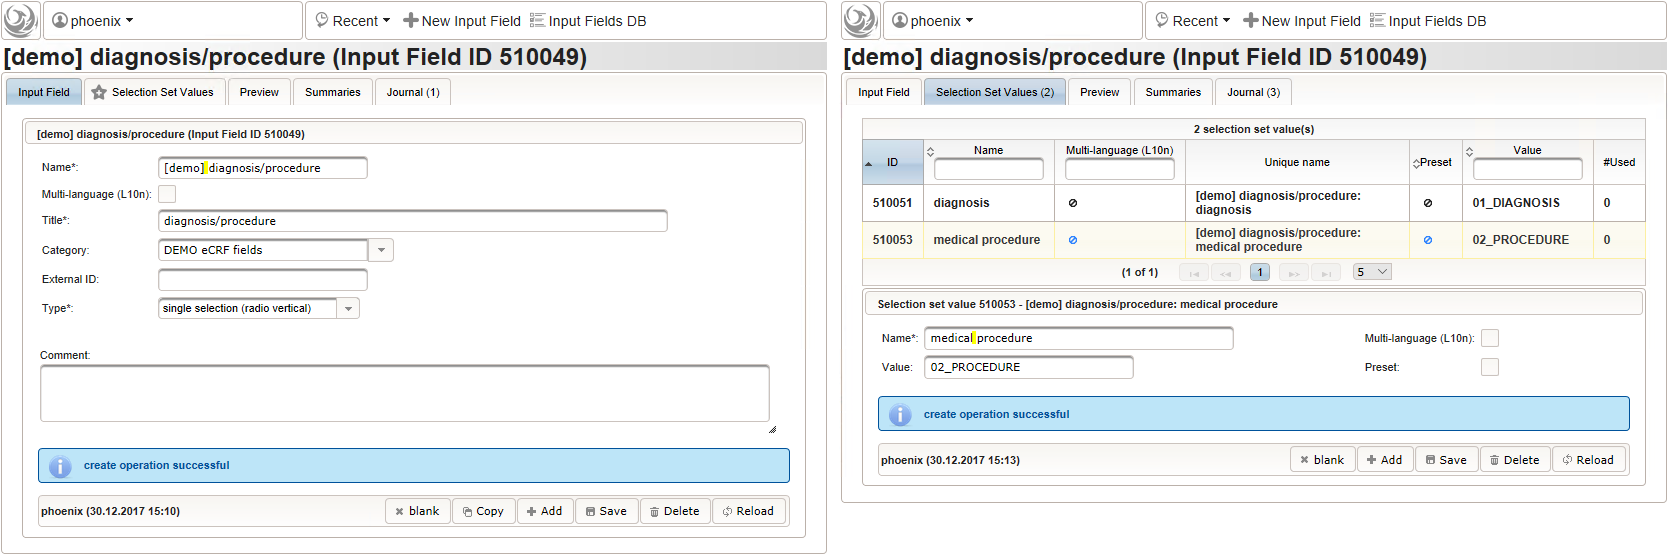
- The next element is going to be the actual diagnosis or procedure name. It is a single-line text input, which basically allows to enter eg. an illness name like “flu” without any restrictions.
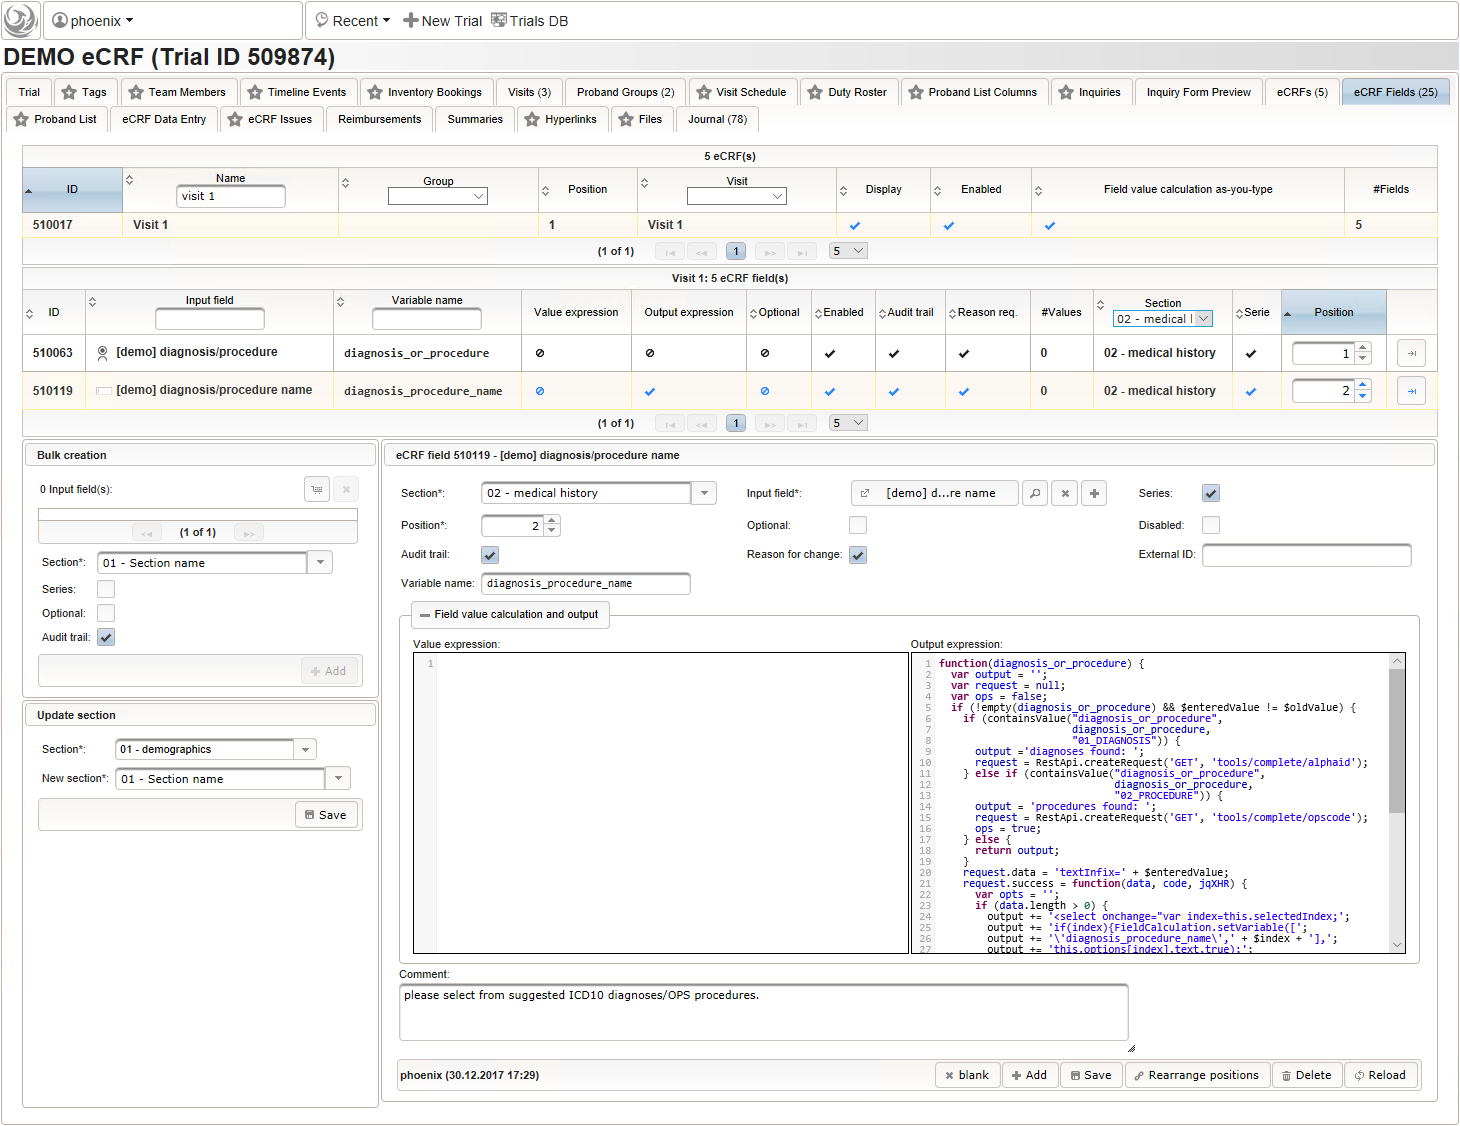
 The plan is to provide an aide to enter names according to a standardized terminology (aka coding) by displaying a list of suggested names to select from. One possibility to achieve this would be an autocomplete input element, with a long list of standardized names set up. Another way to produce the suggestions is by looking up matching records in the catalogues, the Phoenix CTMS comes pre-loaded with. The latter approach is demonstrated and will use the Output expression below to generate markup for displaying a dynamic dropdown. It will show matching catalogue records by requesting the REST API‘s ICD10 and OPS (the german ICPM) rails, using the entered name as a search string. The user can finally select from the suggestion dropdown to have the entered name replaced by the complete name. At the same time, additional form inputs can be populated with details of the selected catalogue record, such as the ICD10 code.
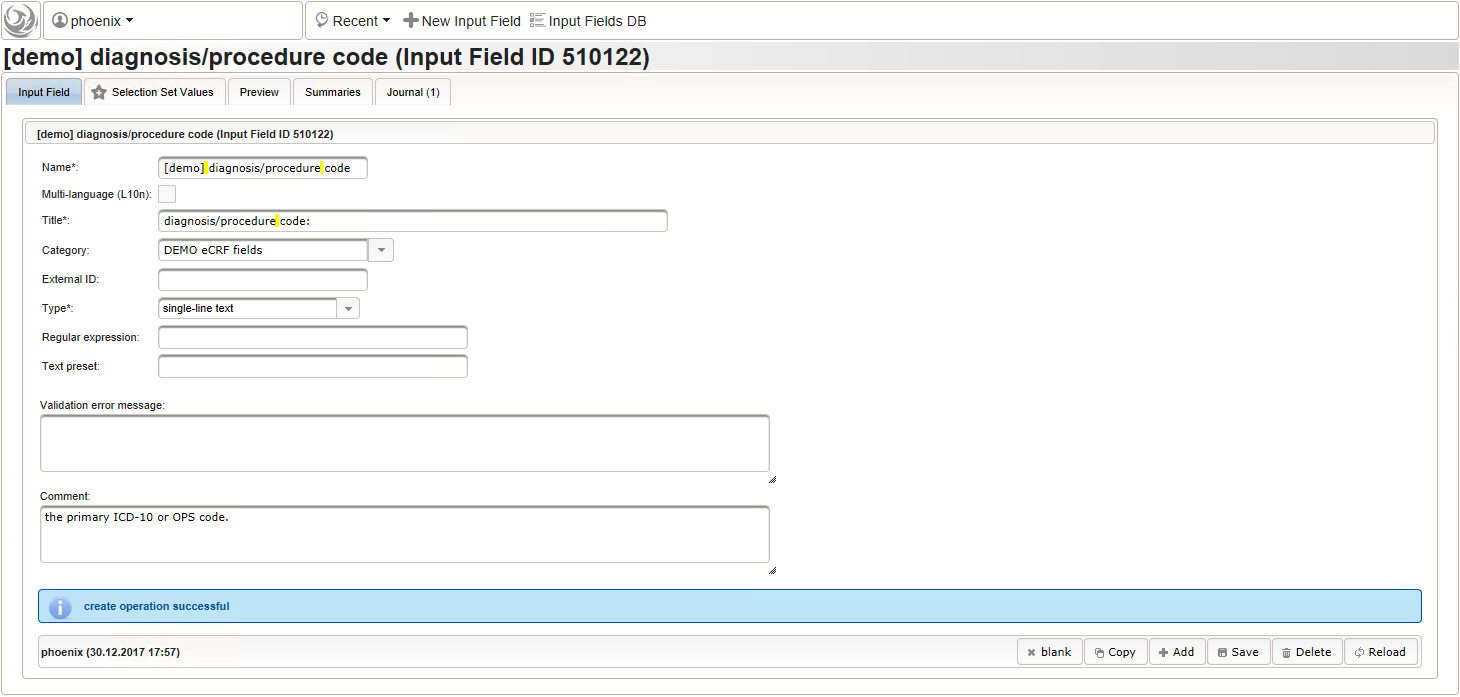
function(diagnosis_or_procedure) { var output = ''; var request = null; var ops = false; if (!empty(diagnosis_or_procedure) && $enteredValue != $oldValue) { if (containsValue("diagnosis_or_procedure", diagnosis_or_procedure, "01_DIAGNOSIS")) { output ='diagnoses found: '; request = RestApi.createRequest('GET', 'tools/complete/alphaid'); } else if (containsValue("diagnosis_or_procedure", diagnosis_or_procedure, "02_PROCEDURE")) { output = 'procedures found: '; request = RestApi.createRequest('GET', 'tools/complete/opscode'); ops = true; } else { return output; } request.data = 'textInfix=' + $enteredValue; request.success = function(data, code, jqXHR) { var opts = ''; if (data.length > 0) { output += '<select onchange="var index=this.selectedIndex;'; output += 'if(index){FieldCalculation.setVariable(['; output += '\'diagnosis_procedure_name\',' + $index + '],'; output += 'this.options[index].text,true);'; output += 'var codes=[];codes[0]=\'\';'; for (var i = 0; i < data.length; i++) { if (ops || data[i].valid) { opts += '<option>' + data[i].text + '</option>'; output += 'codes[' + (i + 1) + ']=\''; output += quoteJs(data[i].code) + '\';'; } } output += 'FieldCalculation.setVariable(['; output += '\'diagnosis_procedure_code\',' + $index + '],'; output += 'codes[index],true);}"><option></option>'; output += opts + '</select>'; } else { output += 'no matching records'; } setOutput(['diagnosis_procedure_name',$index],output); }; RestApi.executeRequest(request); return output; } else { return $output; } } - The code snippet above will also populate a “diagnosis_procedure_code” variable, which is prepared next. It is a single-line text field to hold the selected ICD10/OPS record’s primary code. In case the user cannot find a matching record, there will be no code as well, hence this field should be left optional.

- The date of onset is the manifestation date of the illness or the date a medical procedure was performed or started. This information will come from patient interviews, so it’s unlikely that exact dates (year, month and day) will be known, especially for events long time ago. If the day or day and month date parts are missing (NA)/not known (NK)/not done (ND), the date is a partial date, for which a single-line text input is needed rather than the regular date input field type.
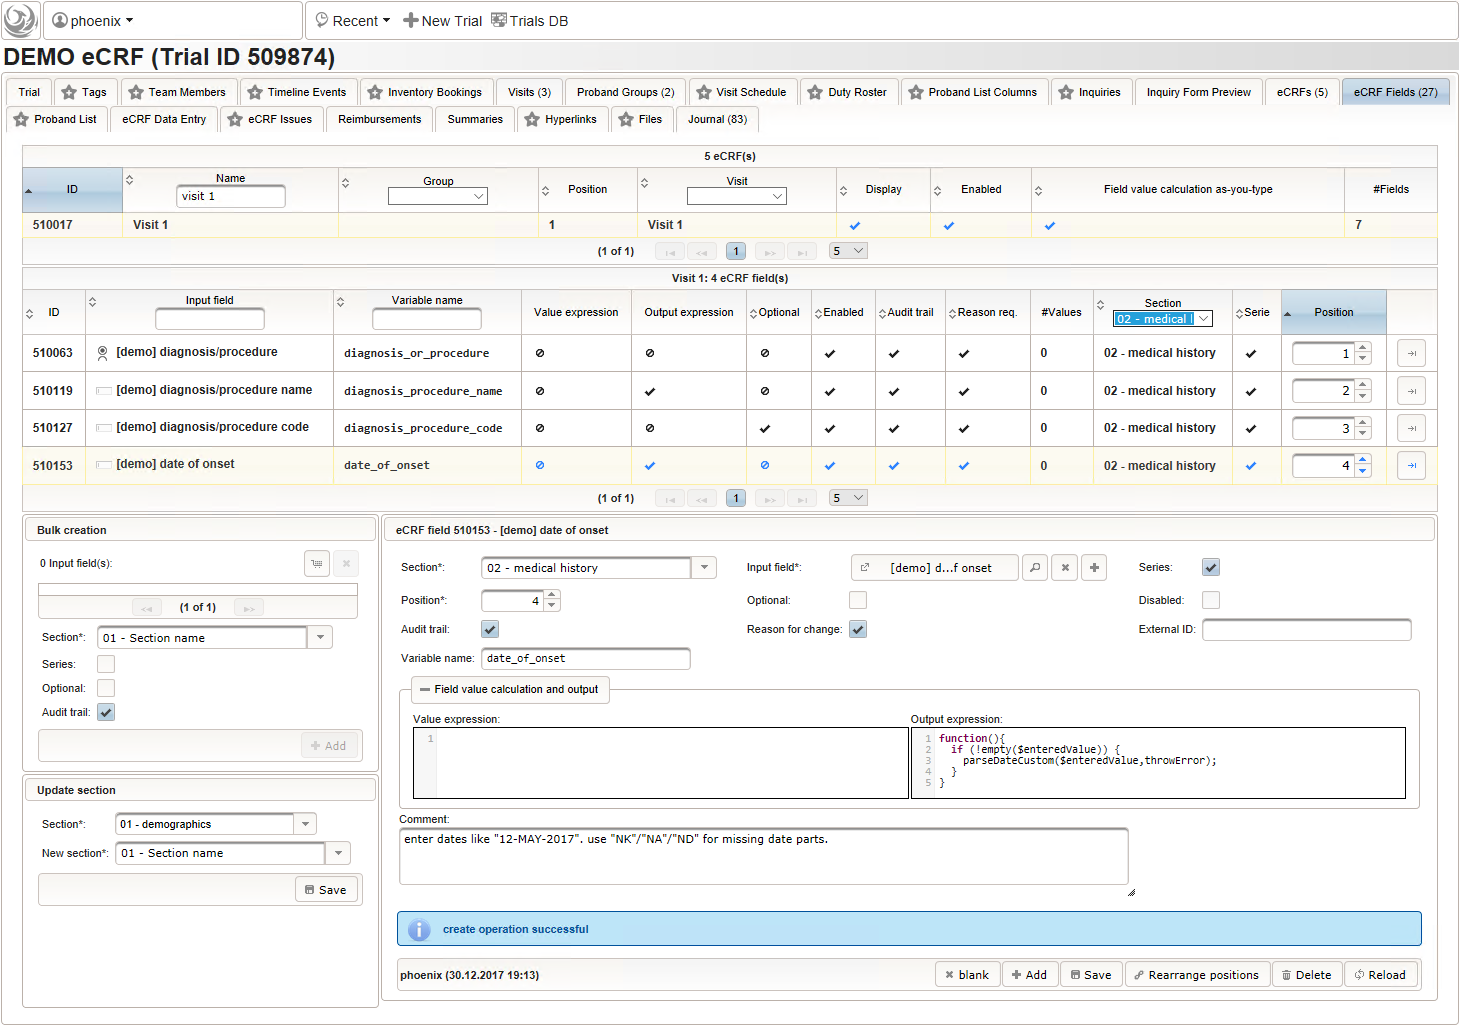
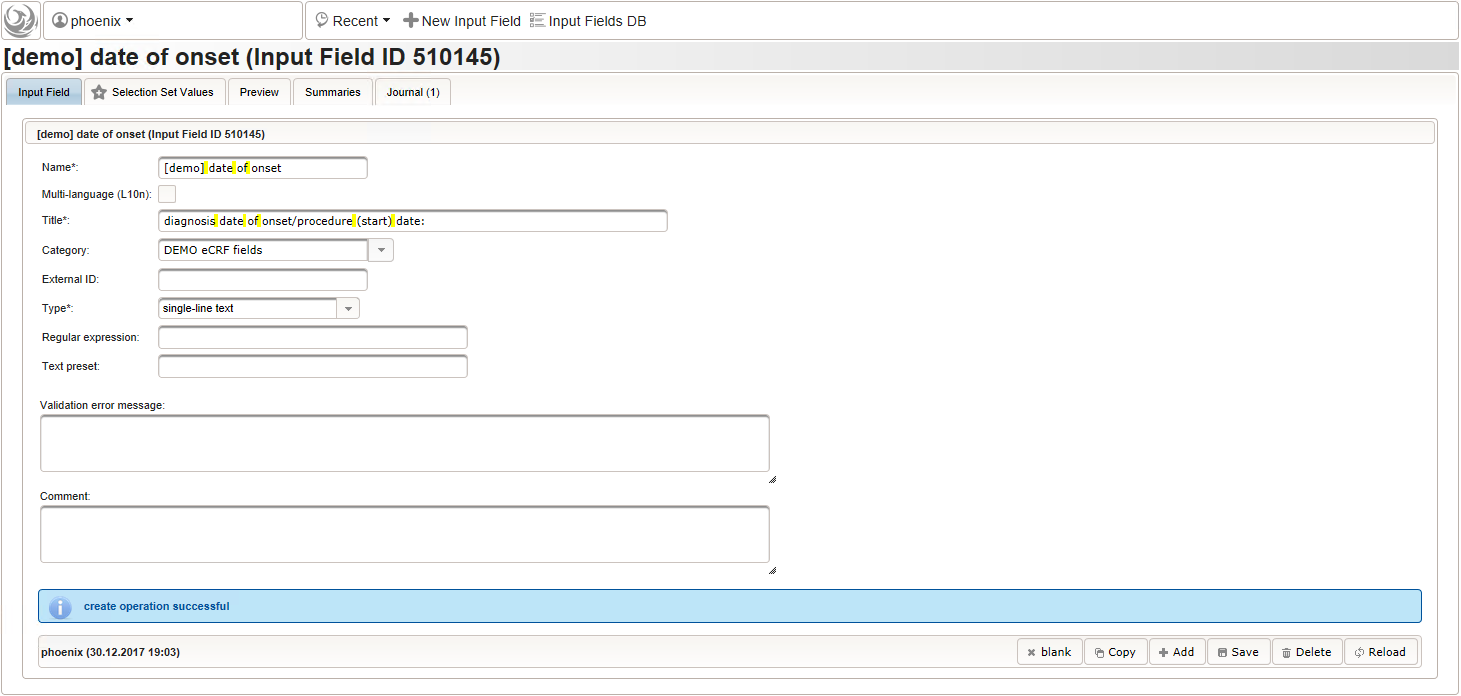 The form scripting framework comes with convenient utilities to parse strings representing partial dates, presuming a predefined DD-MMM-YYYY format.
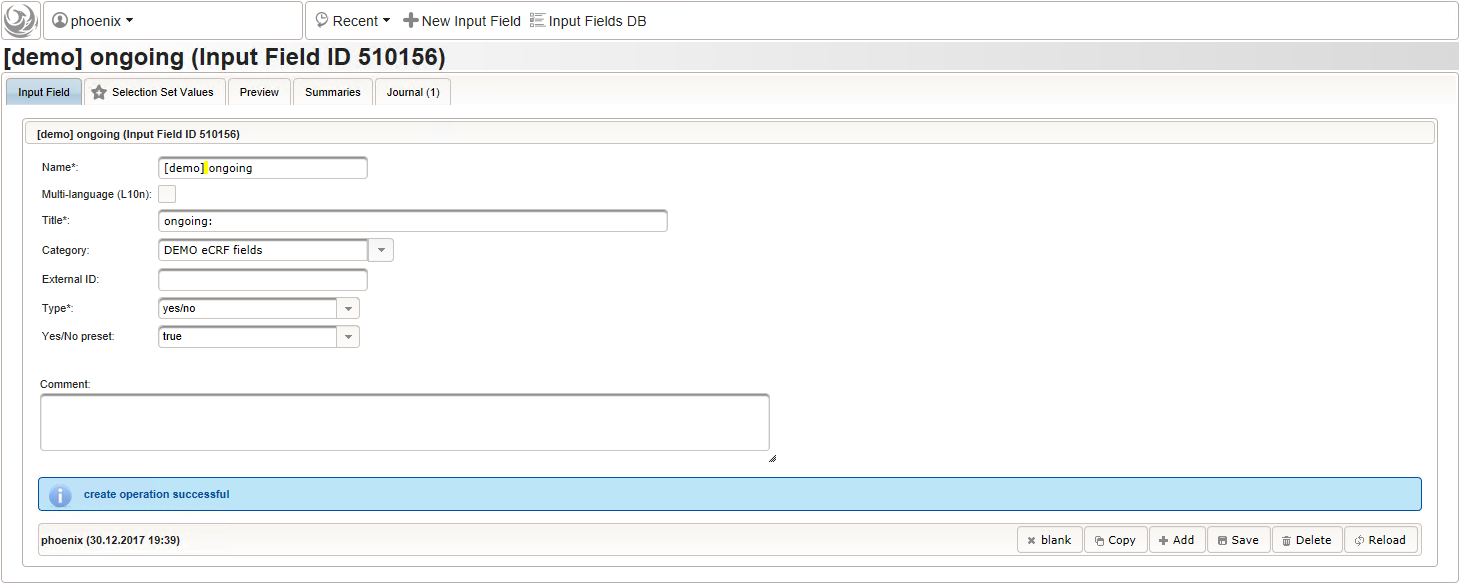
function(){ if (!empty($enteredValue)) { parseDateCustom($enteredValue,throwError); } } - A yes/no form field (checkbox) will be used to mark if the illness or procedure is still ongoing. To avoid confusion, it is checked by default to not trigger the empty check for the stop field (added in the next step) of the blank index section for appending medical history data during data entry.
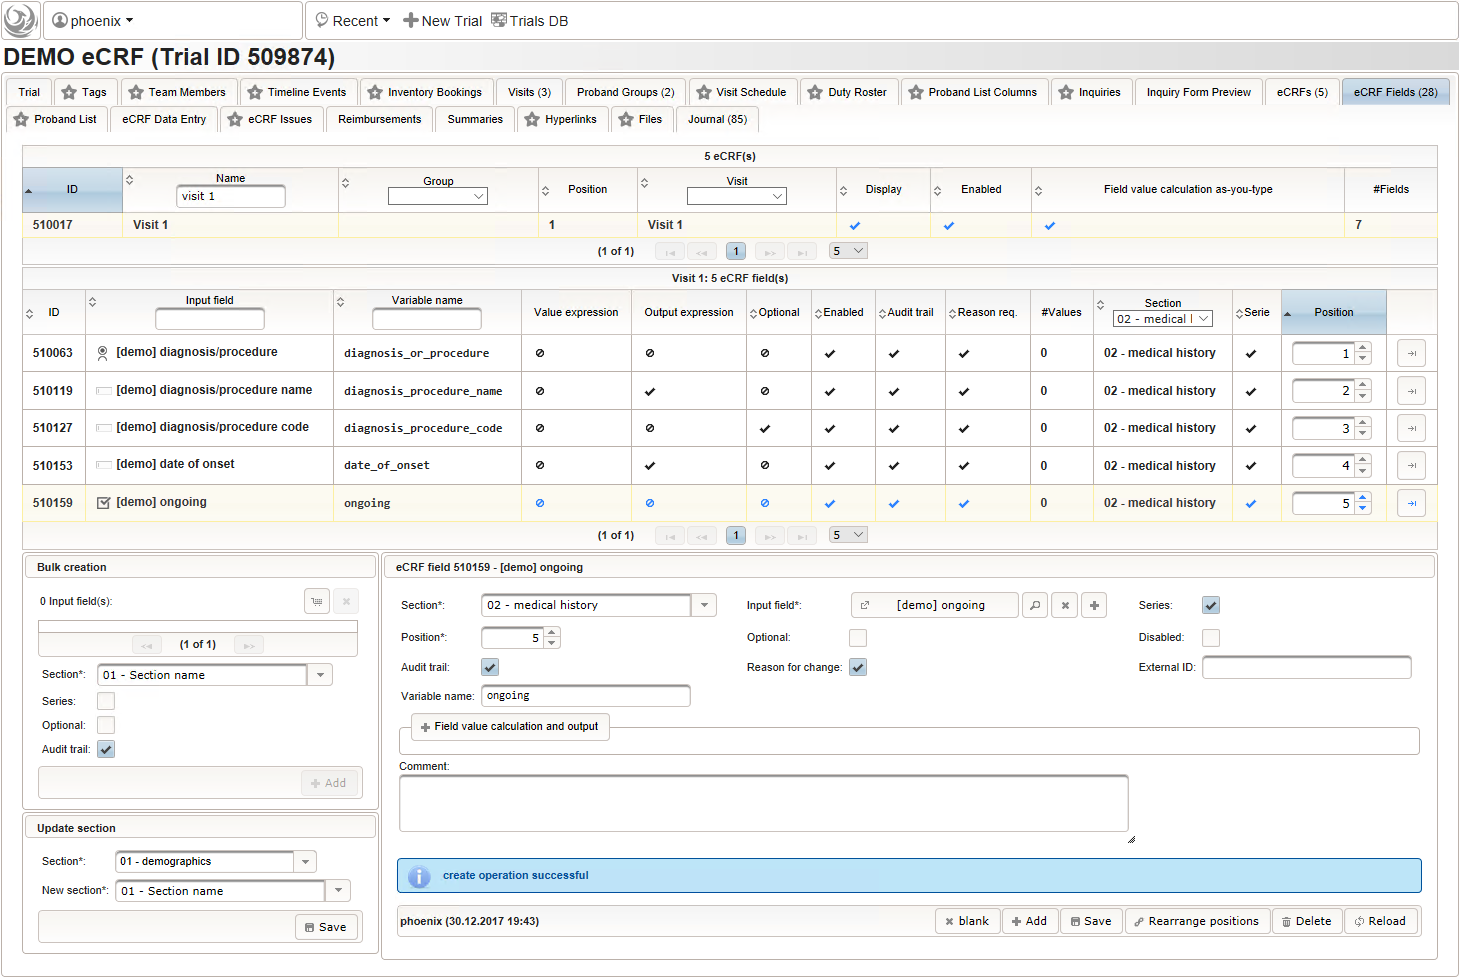
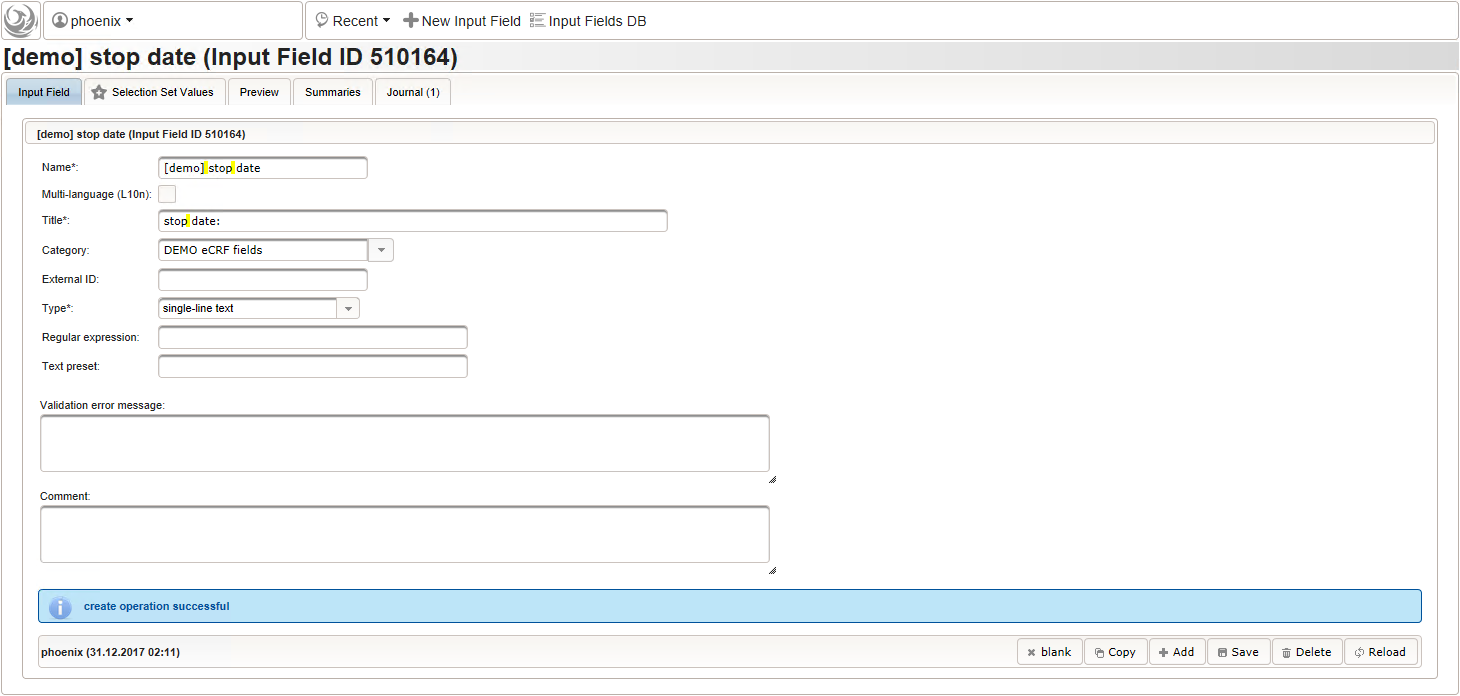
- The stop date is the date when the subject recovered from the illness or the date a medical procedure was over. It is another partial date, which basically will be empty if the “ongoing” checkbox is checked. It therefore must be set Optional to allow storing empty values.
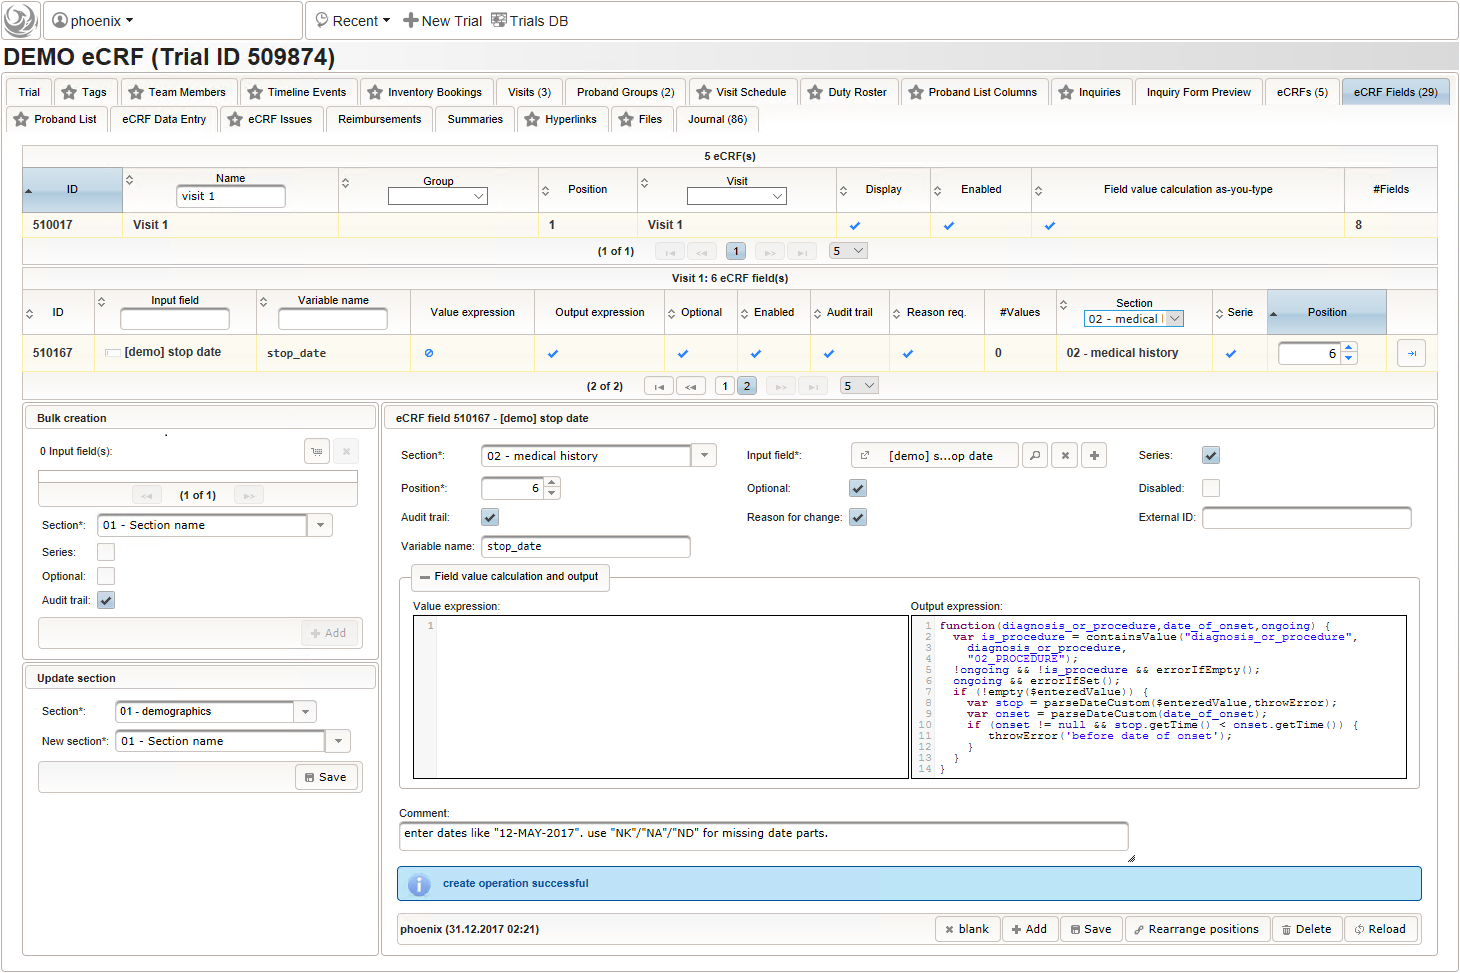
 The stop date must not be empty if the “ongoing” checkbox is un-checked. For one-time medical procedures however, we allow to omit the stop date even if ongoing is un-checked. If provided, the stop date must be equal to or after the date of onset.
function(diagnosis_or_procedure,date_of_onset,ongoing) {
  var is_procedure = containsValue("diagnosis_or_procedure",
    diagnosis_or_procedure,
    "02_PROCEDURE");
  !ongoing && !is_procedure && errorIfEmpty();
  ongoing && errorIfSet();
  if (!empty($enteredValue)) {
    var stop = parseDateCustom($enteredValue,throwError);
    var onset = parseDateCustom(date_of_onset);
    if (onset != null && stop.getTime() < onset.getTime()) {
      throwError('before date of onset');
    }
  }
}
Concomitant Medication
For each entry of the medical history, prescribed medications (before and during the clinical trial) are recorded in the concomitant medication list. A single row will contain infos like the product name, dose and total daily dose (TDD).
| trade name | dose | frequency | TDD | medical history entry |
|---|---|---|---|---|
| Beloc 50 mg - Tabletten | 50mg | 1-0-1 | 100mg | hypertension |
| Piperacillin/Tazobactam 4 g/0,5 g | 4g/0.5g | 1-1-1-1 | 16g/2g | appendectomy |
| Novalgin Tropfen | 1drops | 30x3 | 90drops | appendectomy |
| Aspirin 500 mg Tabletten | 500mg | 4x1 | 2000mg | flu |
This tabular data is going to be covered in our next eCRF section “03 – concomitant medication”. It will be another series section, so each of its form inputs will have the Series checkbox checked.
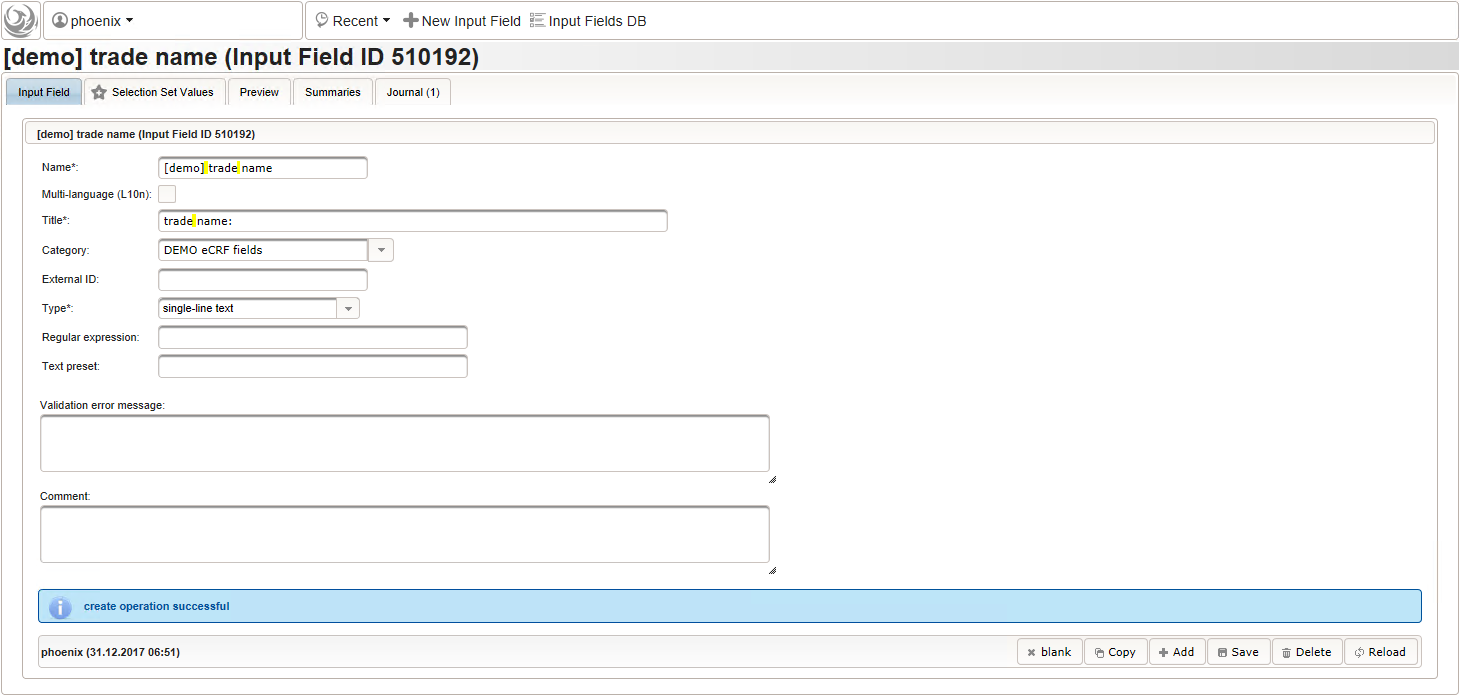
- The trade name is the first form field required. The same approach as for entering coded diagnoses/procedures will be used here again. A single-line text input is the starting point, which basically allows to enter eg. “aspirin” without any restrictions.
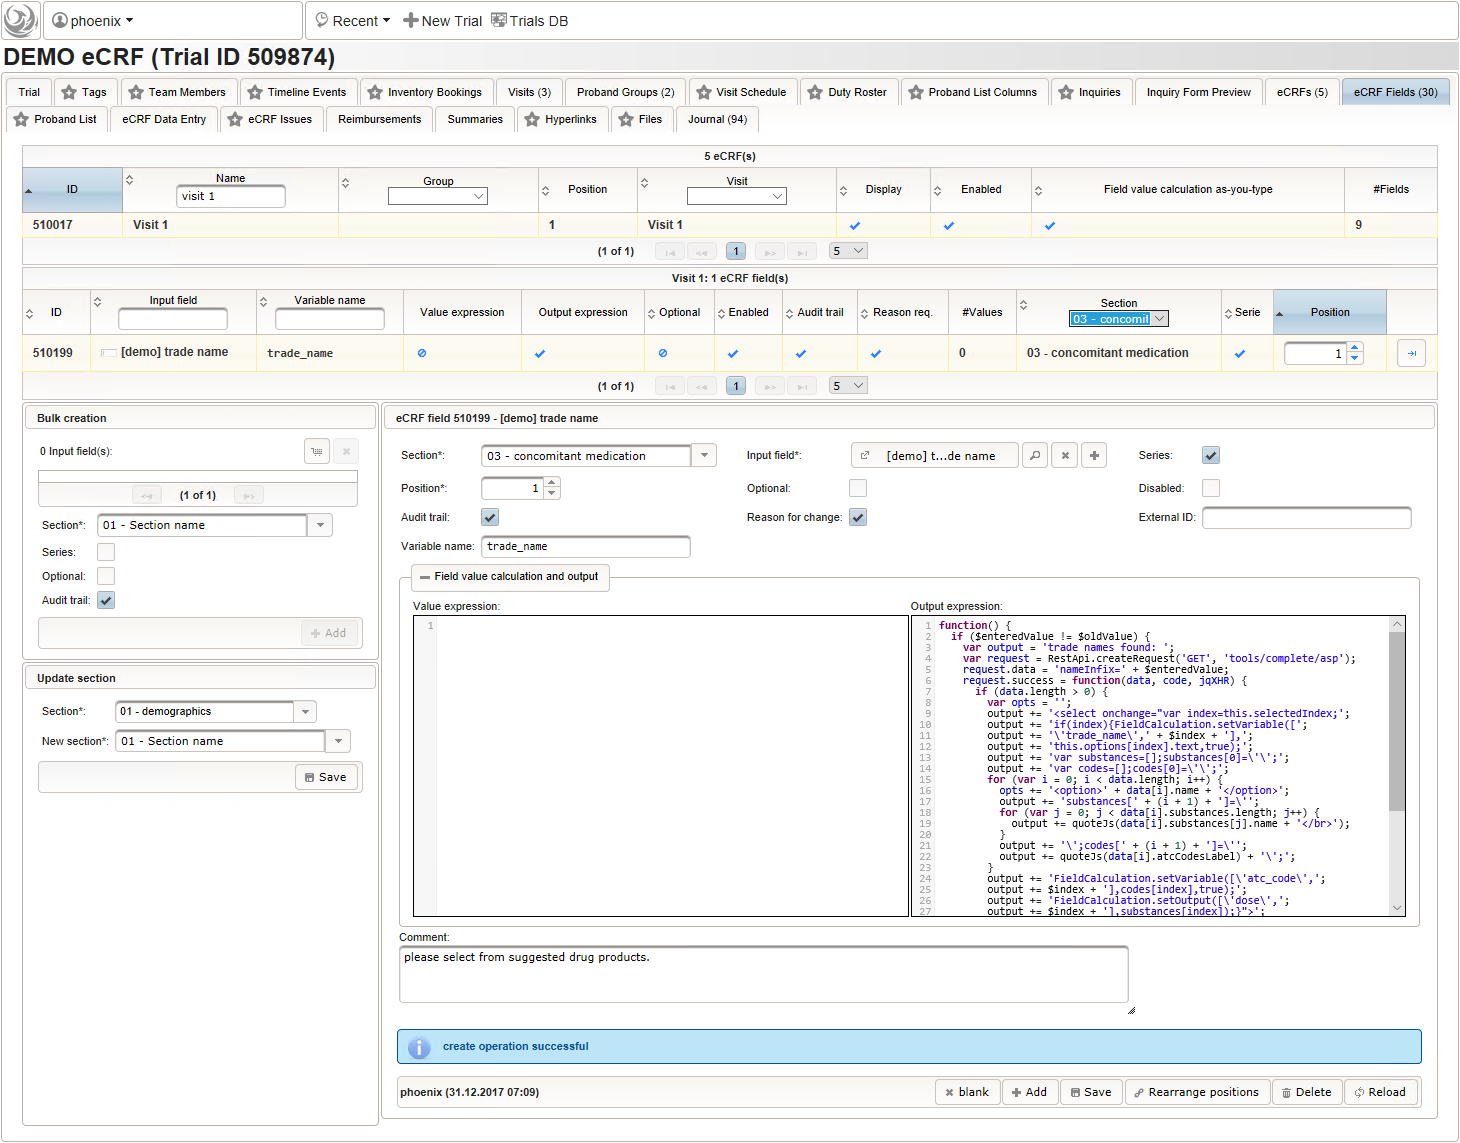
 The Output expression below returns markup for displaying a dynamic dropdown. It will show matching records by querying the REST API‘s rails of the built-in ATC catalogue, using the entered name as a search string. The user can select from the suggestion dropdown to have the entered name replaced by the complete name. At the same time, additional form inputs can be populated with details of the selected catalogue record, such as the contained substances or the ATC code.
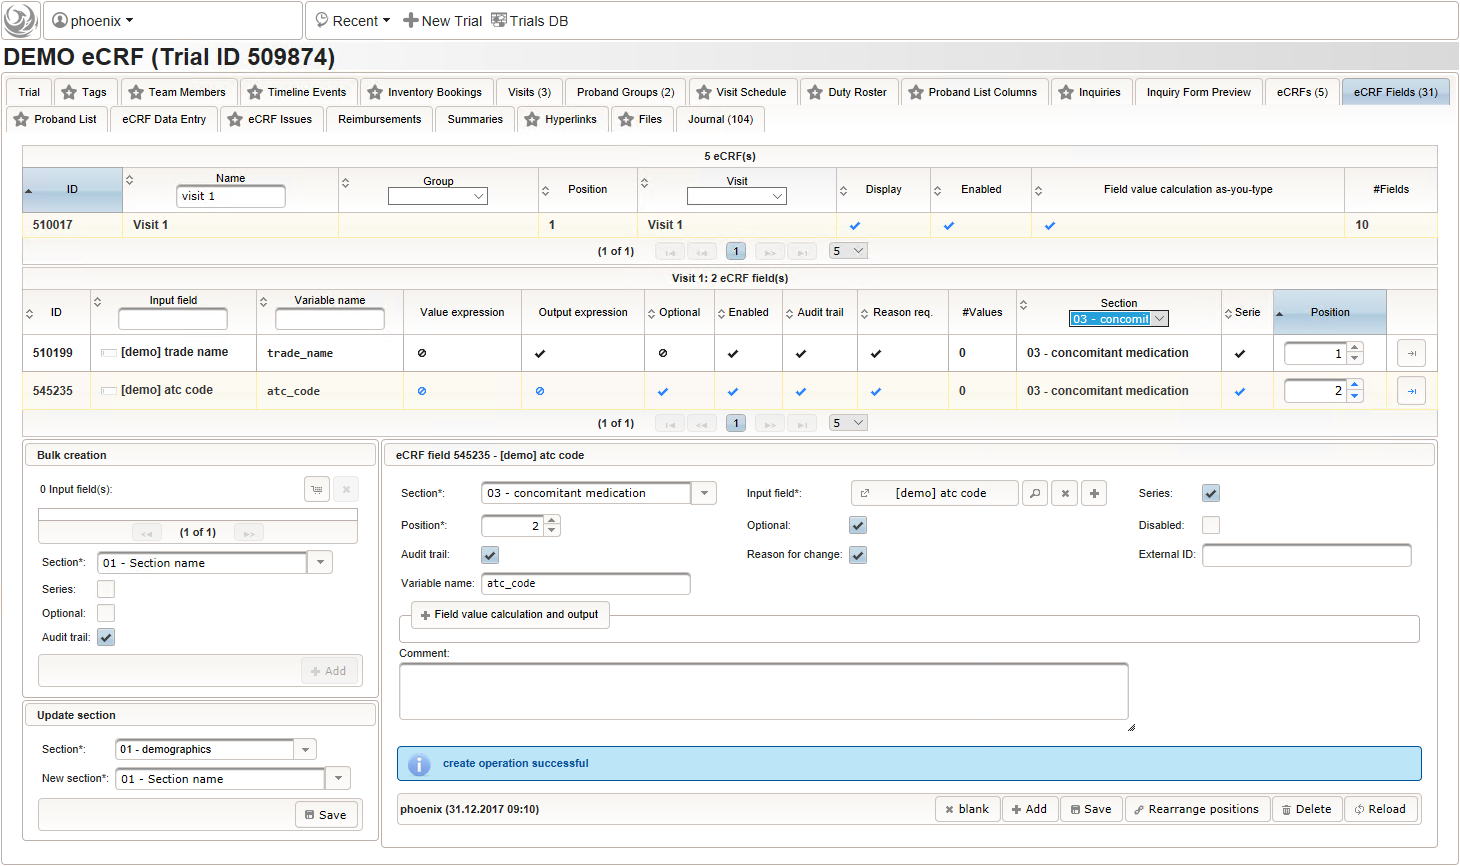
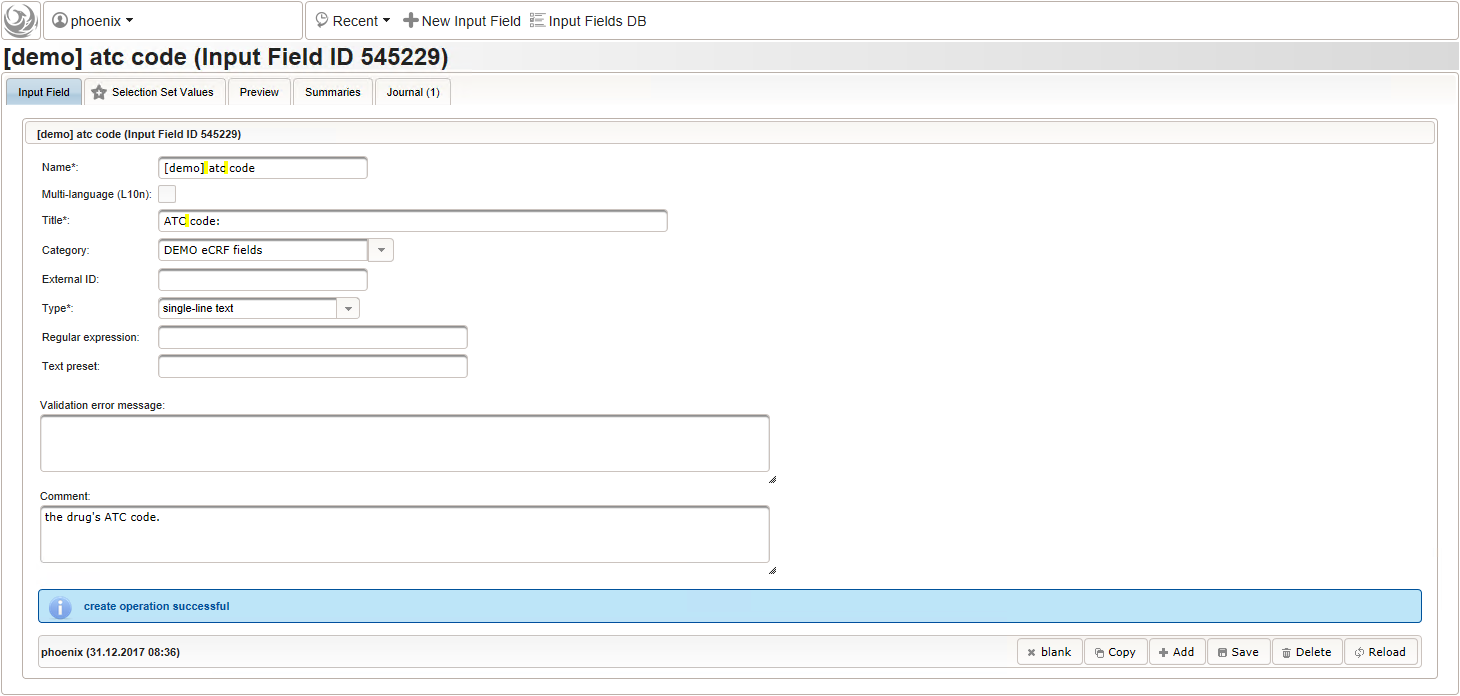
function() { if ($enteredValue != $oldValue) { var output = 'trade names found: '; var request = RestApi.createRequest('GET', 'tools/complete/asp'); request.data = 'nameInfix=' + $enteredValue; request.success = function(data, code, jqXHR) { if (data.length > 0) { var opts = ''; output += '<select onchange="var index=this.selectedIndex;'; output += 'if(index){FieldCalculation.setVariable(['; output += '\'trade_name\',' + $index + '],'; output += 'this.options[index].text,true);'; output += 'var substances=[];substances[0]=\'\';'; output += 'var codes=[];codes[0]=\'\';'; for (var i = 0; i < data.length; i++) { opts += '<option>' + data[i].name + '</option>'; output += 'substances[' + (i + 1) + ']=\''; for (var j = 0; j < data[i].substances.length; j++) { output += quoteJs(data[i].substances[j].name + '</br>'); } output += '\';codes[' + (i + 1) + ']=\''; output += quoteJs(data[i].atcCodesLabel) + '\';'; } output += 'FieldCalculation.setVariable([\'atc_code\','; output += $index + '],codes[index],true);'; output += 'FieldCalculation.setOutput([\'dose\','; output += $index + '],substances[index]);}">'; output += '<option></option>'; output += opts + '</select>'; } else { output += 'no matching records'; } setOutput(['trade_name',$index],output); }; RestApi.executeRequest(request); return output; } else { return $output; } } - The code snippet above will also populate a “atc_code” variable, which is prepared next. It is a single-line text field to hold the selected drug’s ATC code. In case the user cannot find a matching record, there will be no code as well, hence this field should be left optional.
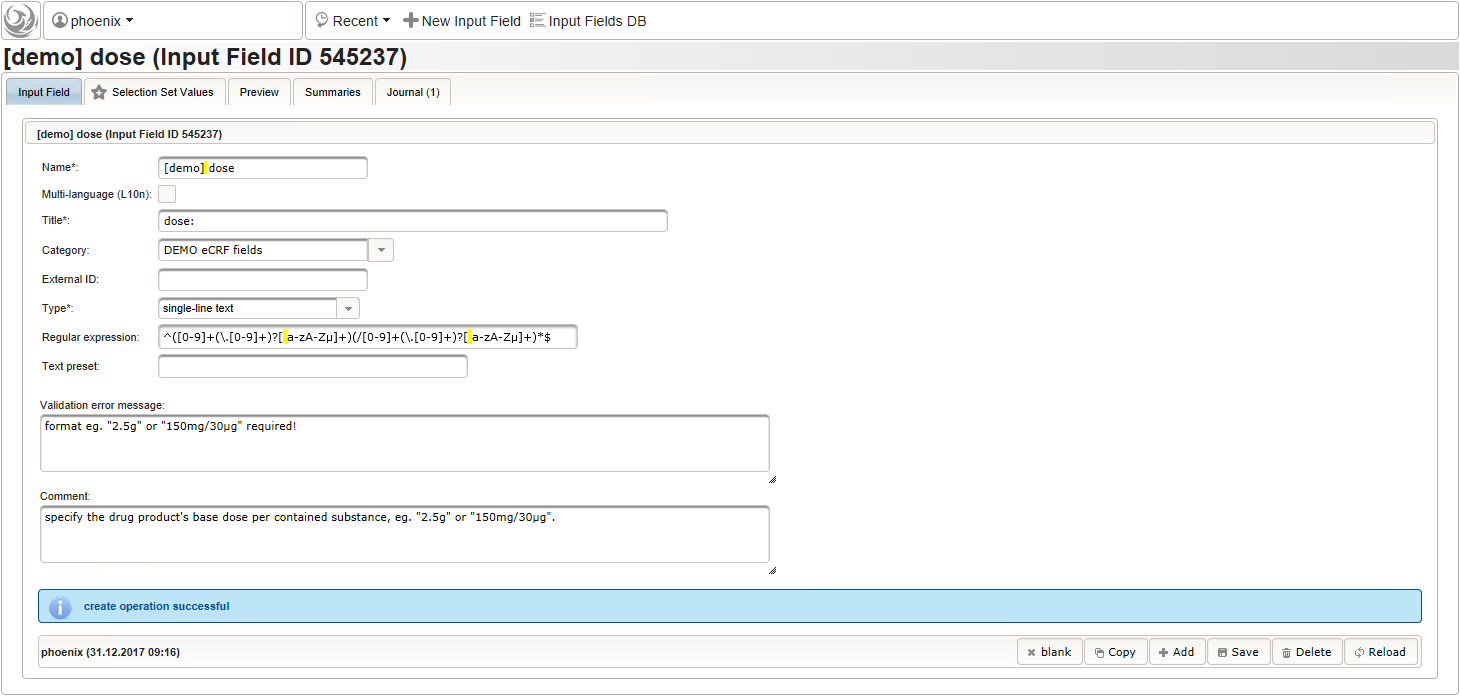
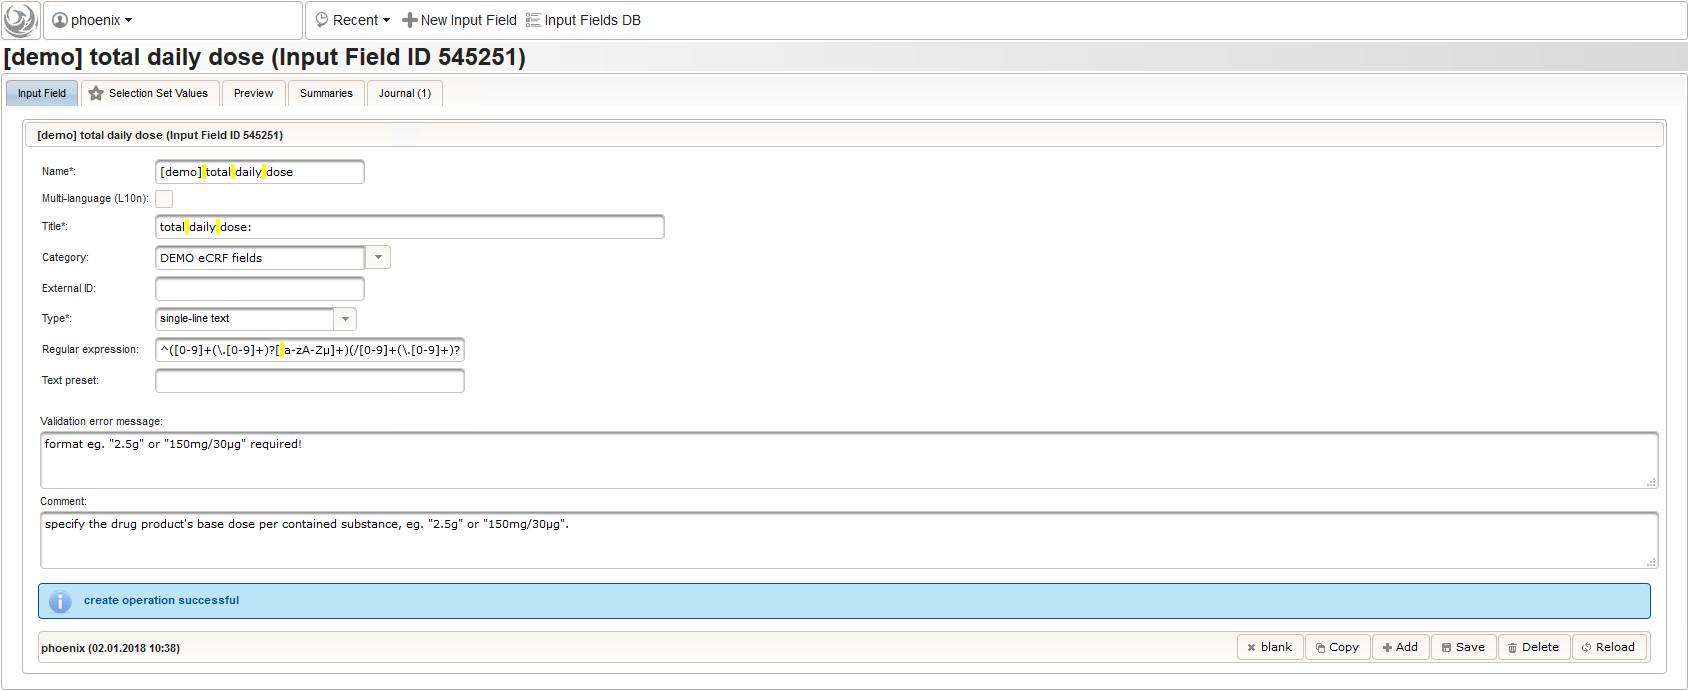
- After identifiying the drug, the dose information is to be captured. The proposed concept is to first provide the basic dose or unit according to the product (eg. “500mg”, “1pills”), then the frequency of intake over the day (eg. “1-0-1”, “3×1”). Given these two parameters, the total daily dose can be calculated using form scripting. Some drug product names already include dose information (eg. “Aspirin 500 mg”). The user entering data is supposed to extract this into the dedicated “dose” single-line text field.
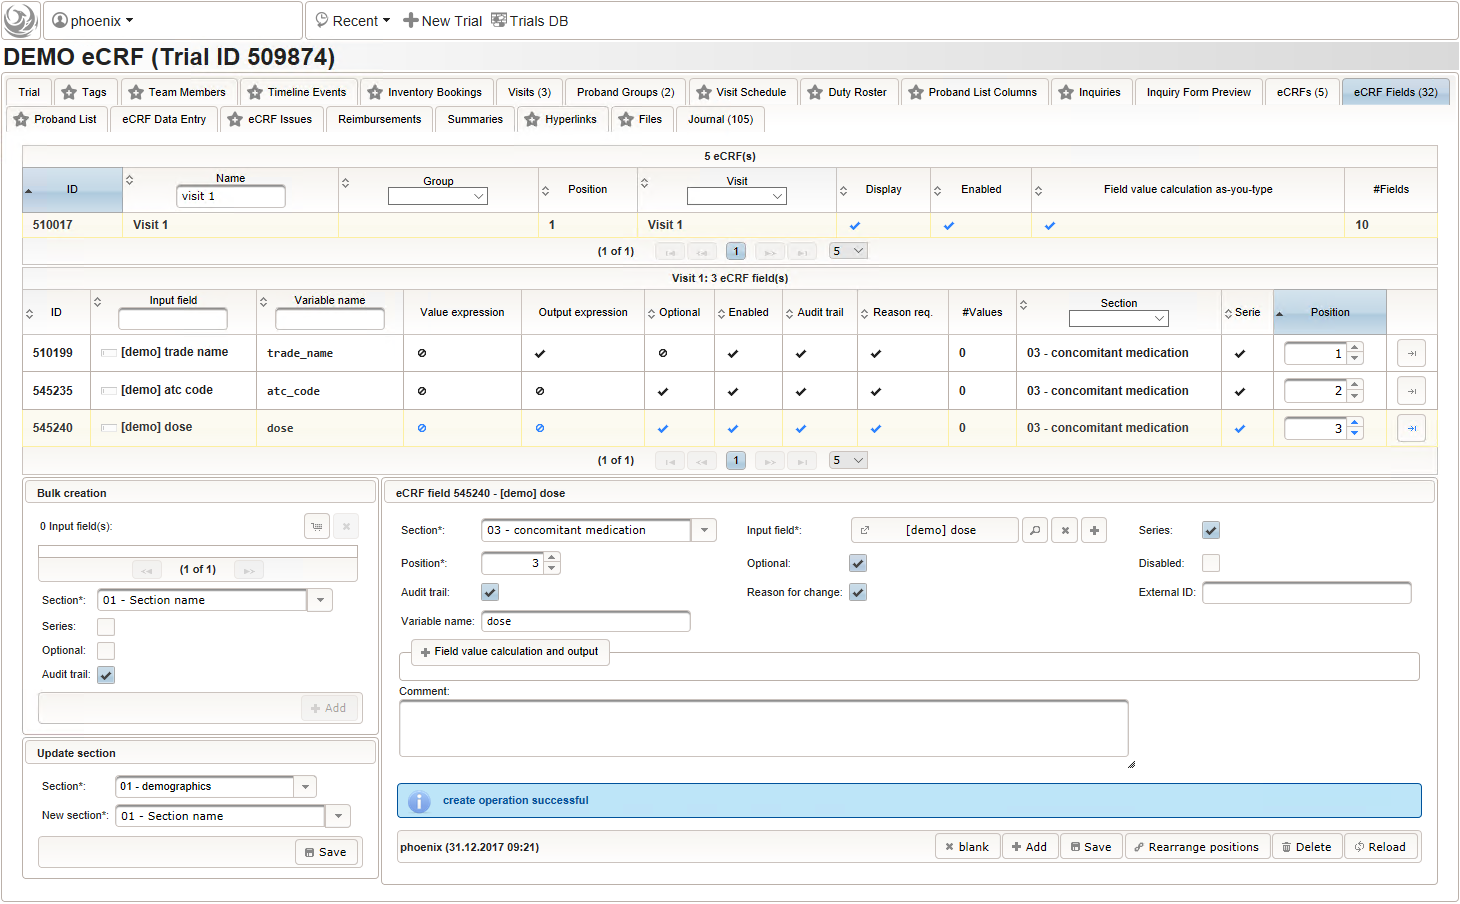 The expected format is a decimal number followed by one or more letters for the unit. If the drug contains a combination of substances (displayed when selecting a drug), multiple dose strings can be concatenated using “/” (eg. “1g/5µg”). While we decide to enforce the format when saving values using the regular expression below, all dose-related fields will be optional.
^([0-9]+(\.[0-9]+)?[ a-zA-Zµ]+)(/[0-9]+(\.[0-9]+)?[ a-zA-Zµ]+)*$
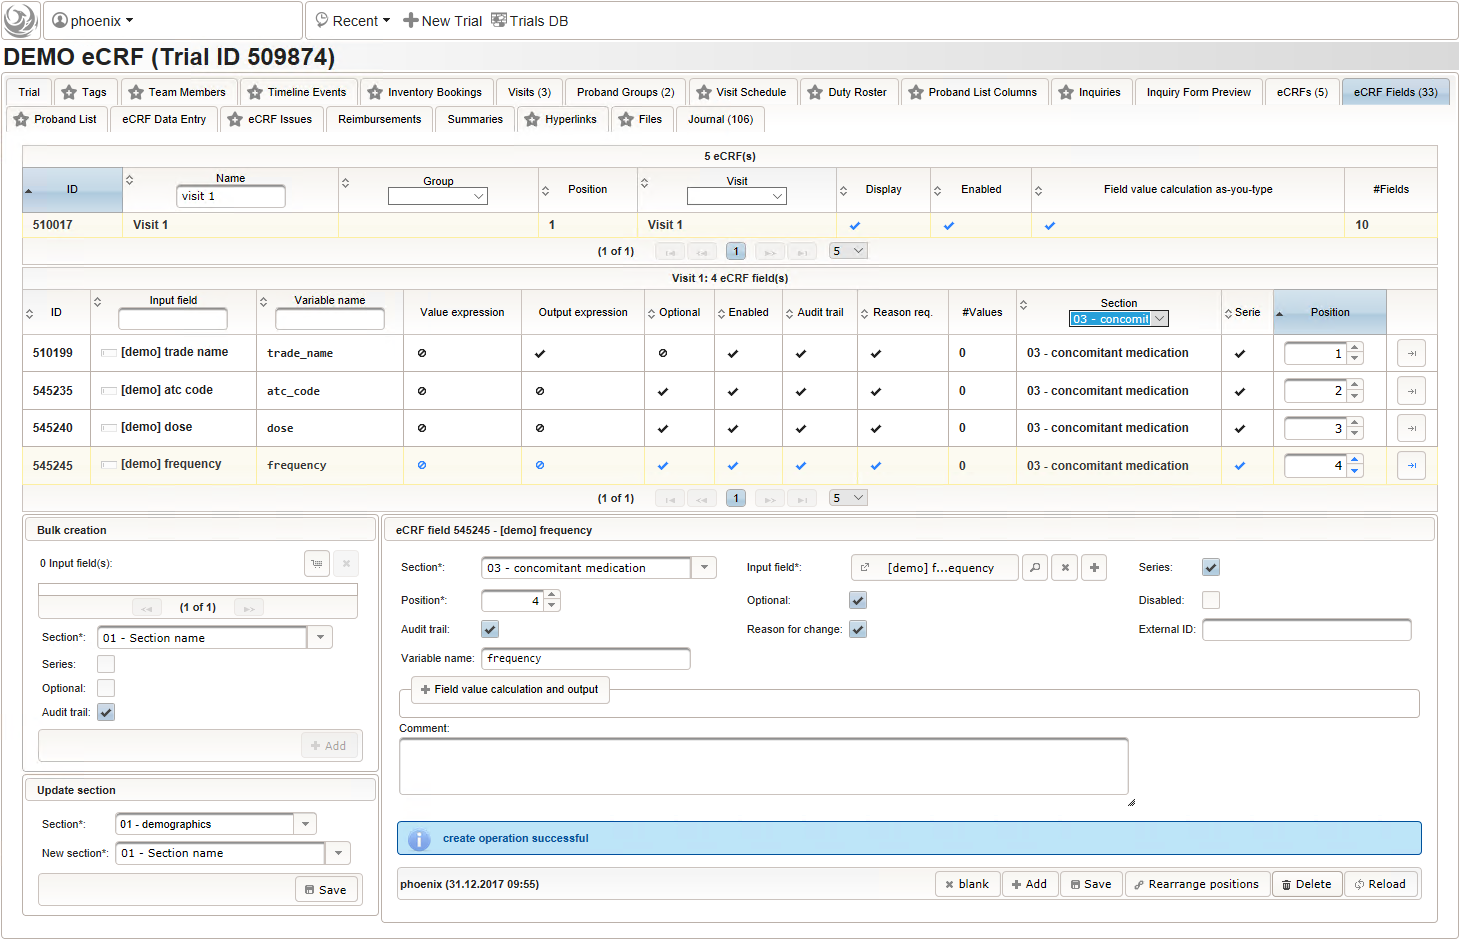
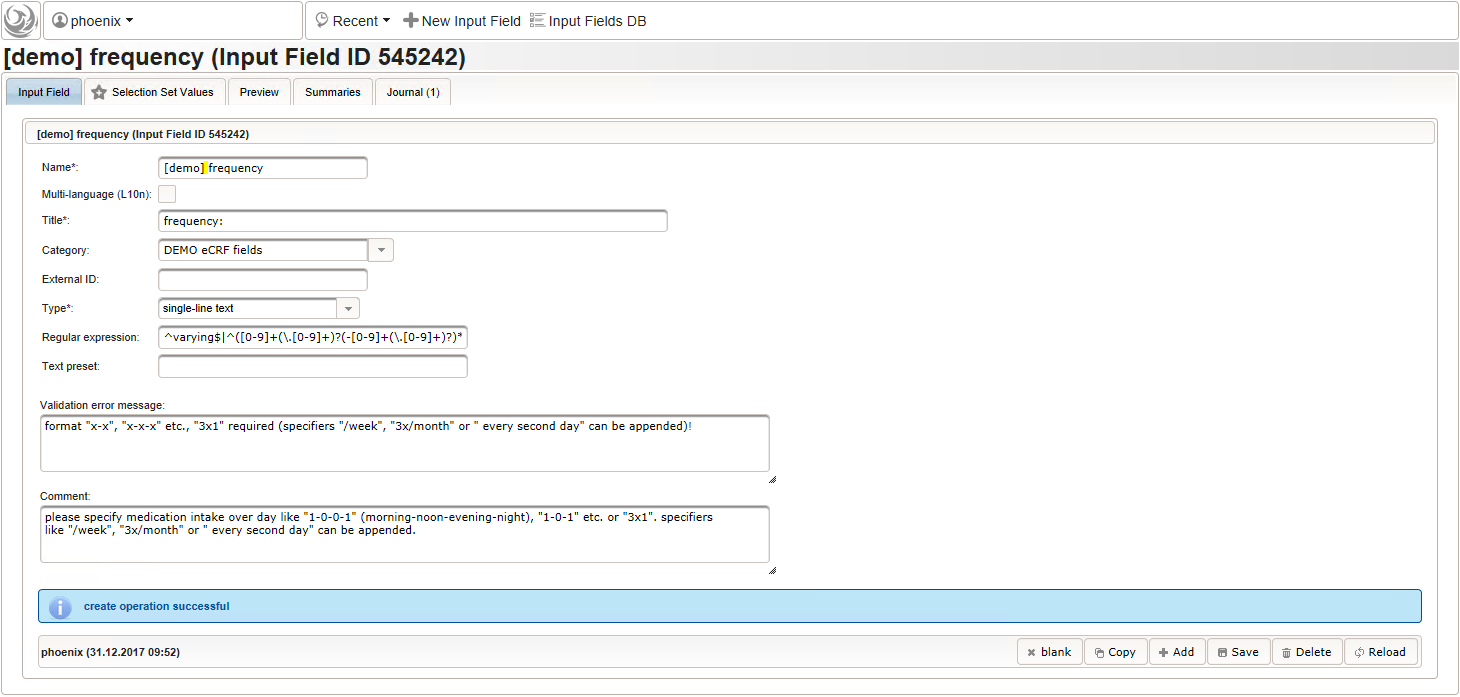
- The intake frequency field will be another single-line text input expecting a string in a defined format like “1-0-0-1” (morning-noon-evening-night), “1-0-1” etc. or “3×1”. The regular expression below extends this format by allowing to append specifiers like “/week”, “3x/month” or ” every 3rd day”.
^varying$|^([0-9]+(\.[0-9]+)?(-[0-9]+(\.[0-9]+)?)*|^[0-9]+(\.[0-9]+)?x([0-9]+(\.[0-9]+)?)?)((( every (second|other|2nd|third|3rd|[0-9]th) )|(( [0-9]+x?)?/))(hour|day|week|month))?$
- The total daily dose field is identical to the base dose input field. It could therefore be reused, but since the prompt label should be different (“total daily dose:” instead of “dose:”), we create a separate input field.
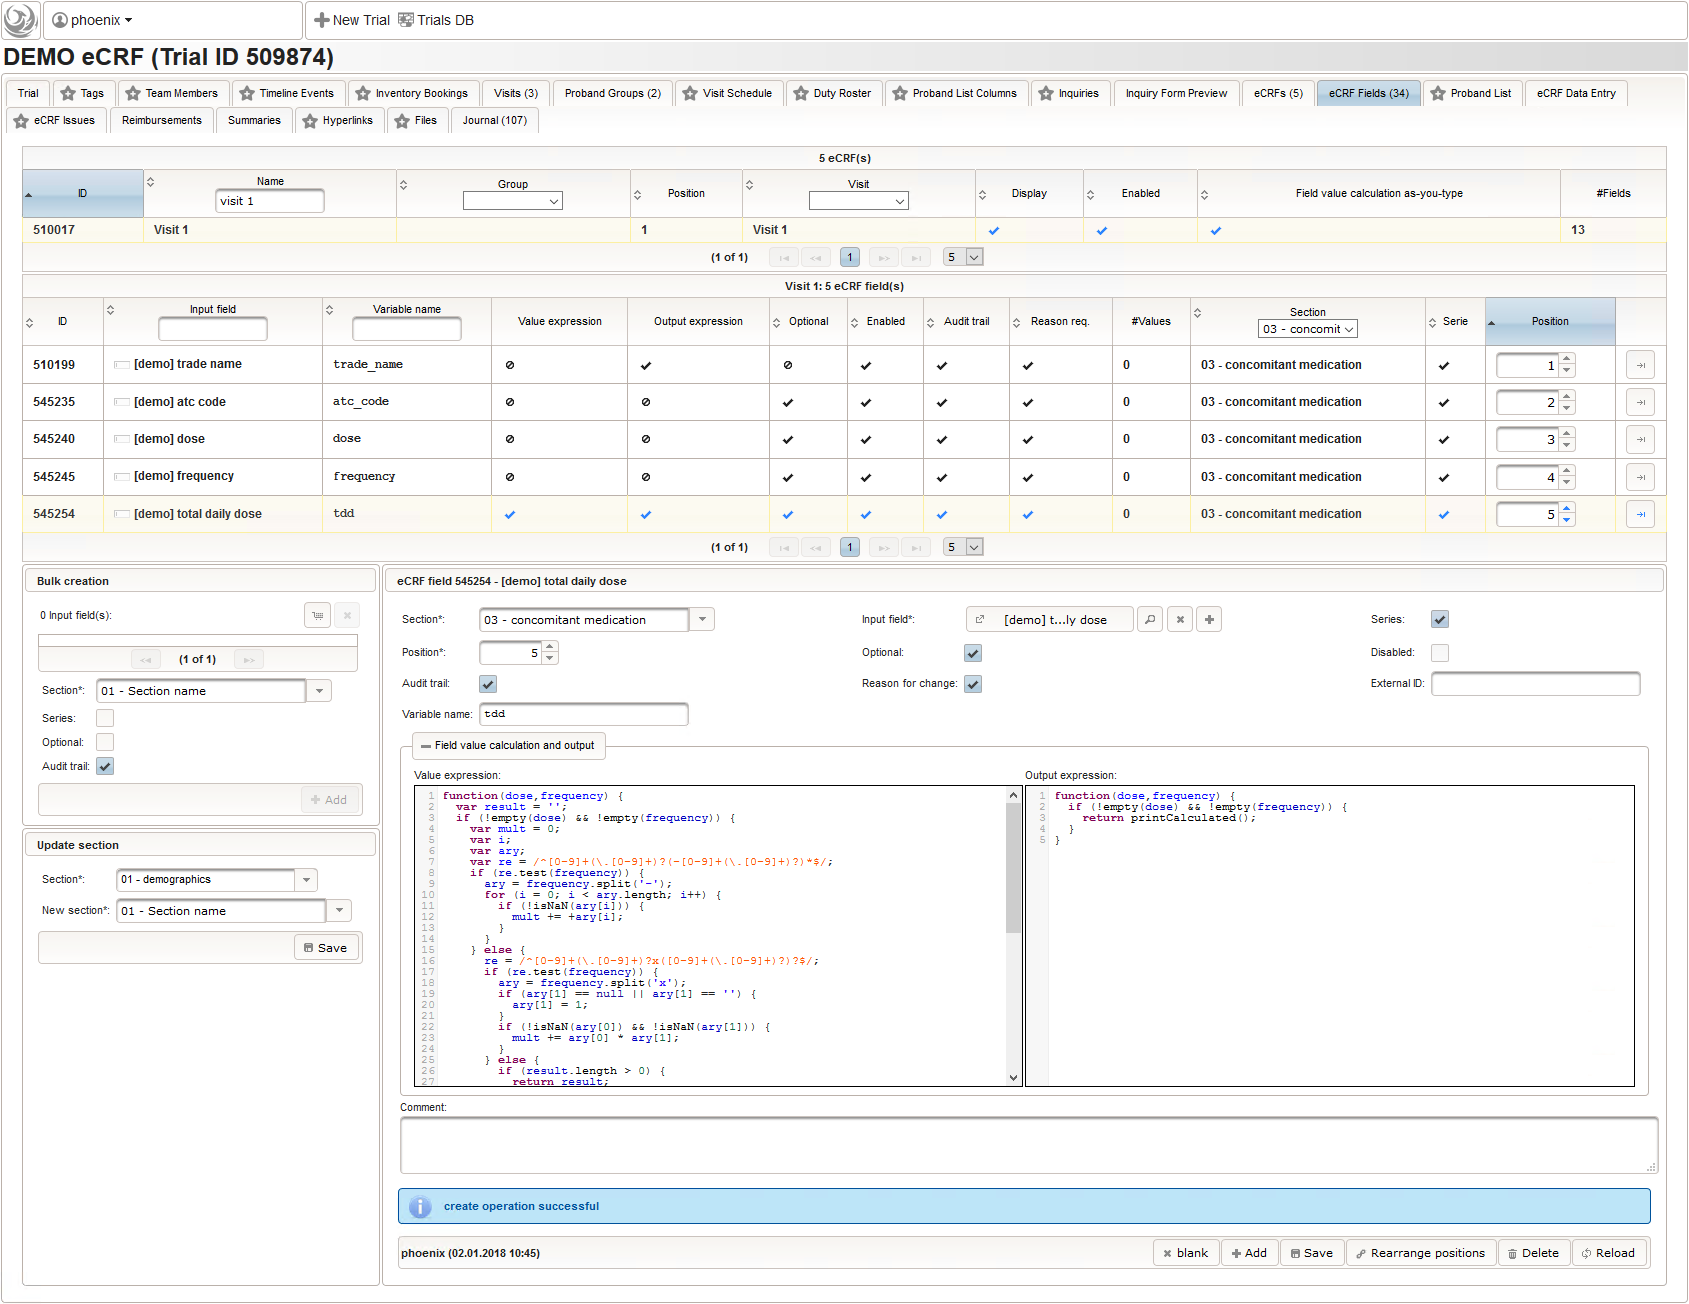
 To simplify, the total daily dose calculation will support the strict frequency formats “1-0-0-1” and “2×1” only. For a dose of “500mg”, the latter examples will result in a total daily dose string of “1000mg” each. Unless the user enters both the base dose and frequency, entering anything for the total daily dose is allowed. In that case no value is calculated but the entered string is returned instead. This means there can’t be a delta between entered and calculated value, hence neither an edit check message is shown nor discrepancy raised.
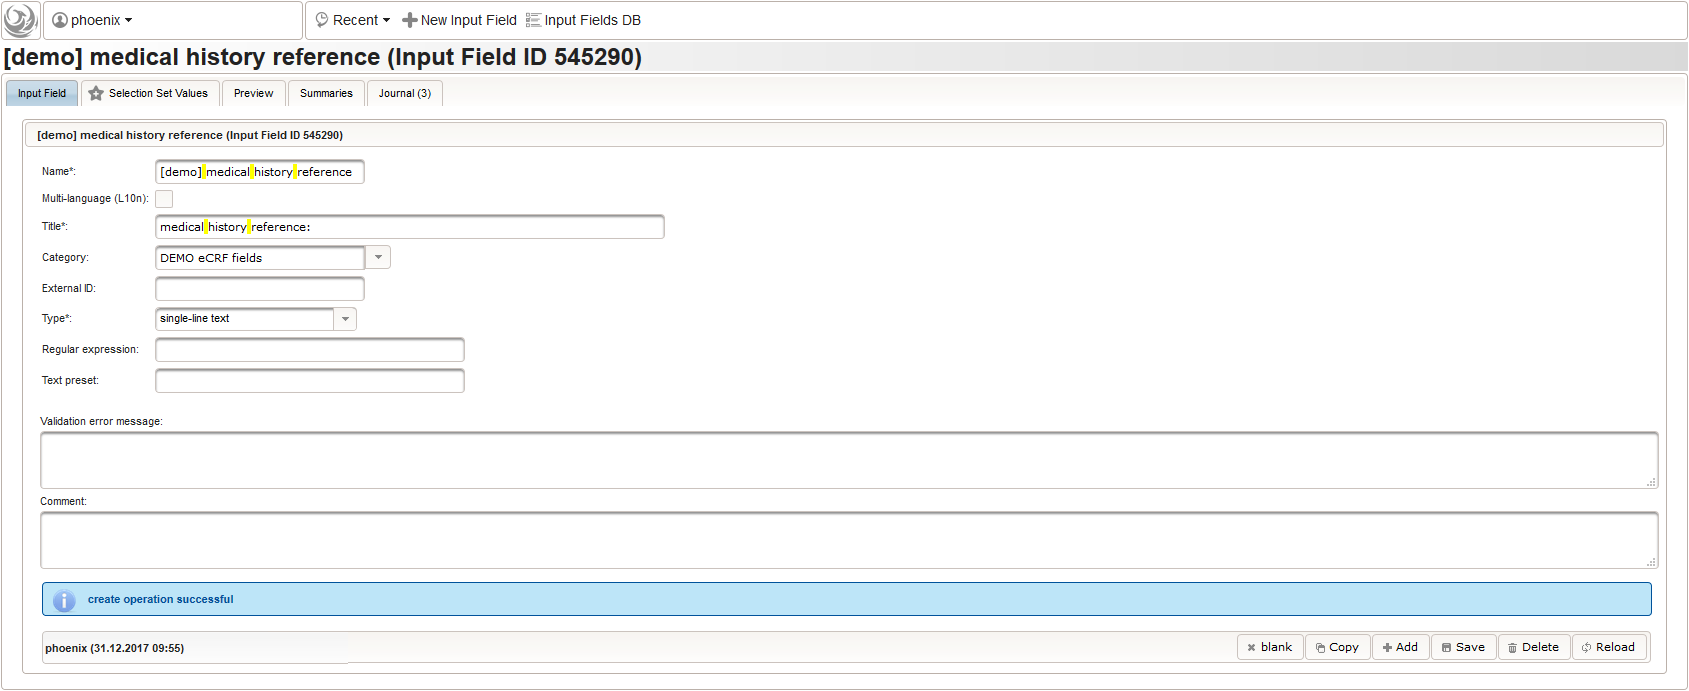
function(dose,frequency) { var result = ''; if (!empty(dose) && !empty(frequency)) { var mult = 0; var i; var ary; var re = /^[0-9]+(\.[0-9]+)?(-[0-9]+(\.[0-9]+)?)*$/; if (re.test(frequency)) { ary = frequency.split('-'); for (i = 0; i < ary.length; i++) { if (!isNaN(ary[i])) { mult += +ary[i]; } } } else { re = /^[0-9]+(\.[0-9]+)?x([0-9]+(\.[0-9]+)?)?$/; if (re.test(frequency)) { ary = frequency.split('x'); if (ary[1] == null || ary[1] == '') { ary[1] = 1; } if (!isNaN(ary[0]) && !isNaN(ary[1])) { mult += ary[0] * ary[1]; } } else { if (result.length > 0) { return result; } else { return $enteredValue; } } } ary = dose.split('/'); for (i = 0; i < ary.length; i++) { re = /^([0-9.]+)([ a-zA-Zµ]+)$/; var matches = re.exec(ary[i]); if (matches != null && matches[1] != null && matches[2] != null && !isNaN(matches[1])) { if (result.length > 0) { result += '/'; } result += matches[1] * mult + matches[2]; } } } if (result.length > 0) { return result; } else { return $enteredValue; } } - Finally, the diagnosis/medical procedure the concomitant medication belongs should be provided. A single-line text will be used for referring the medical history record.
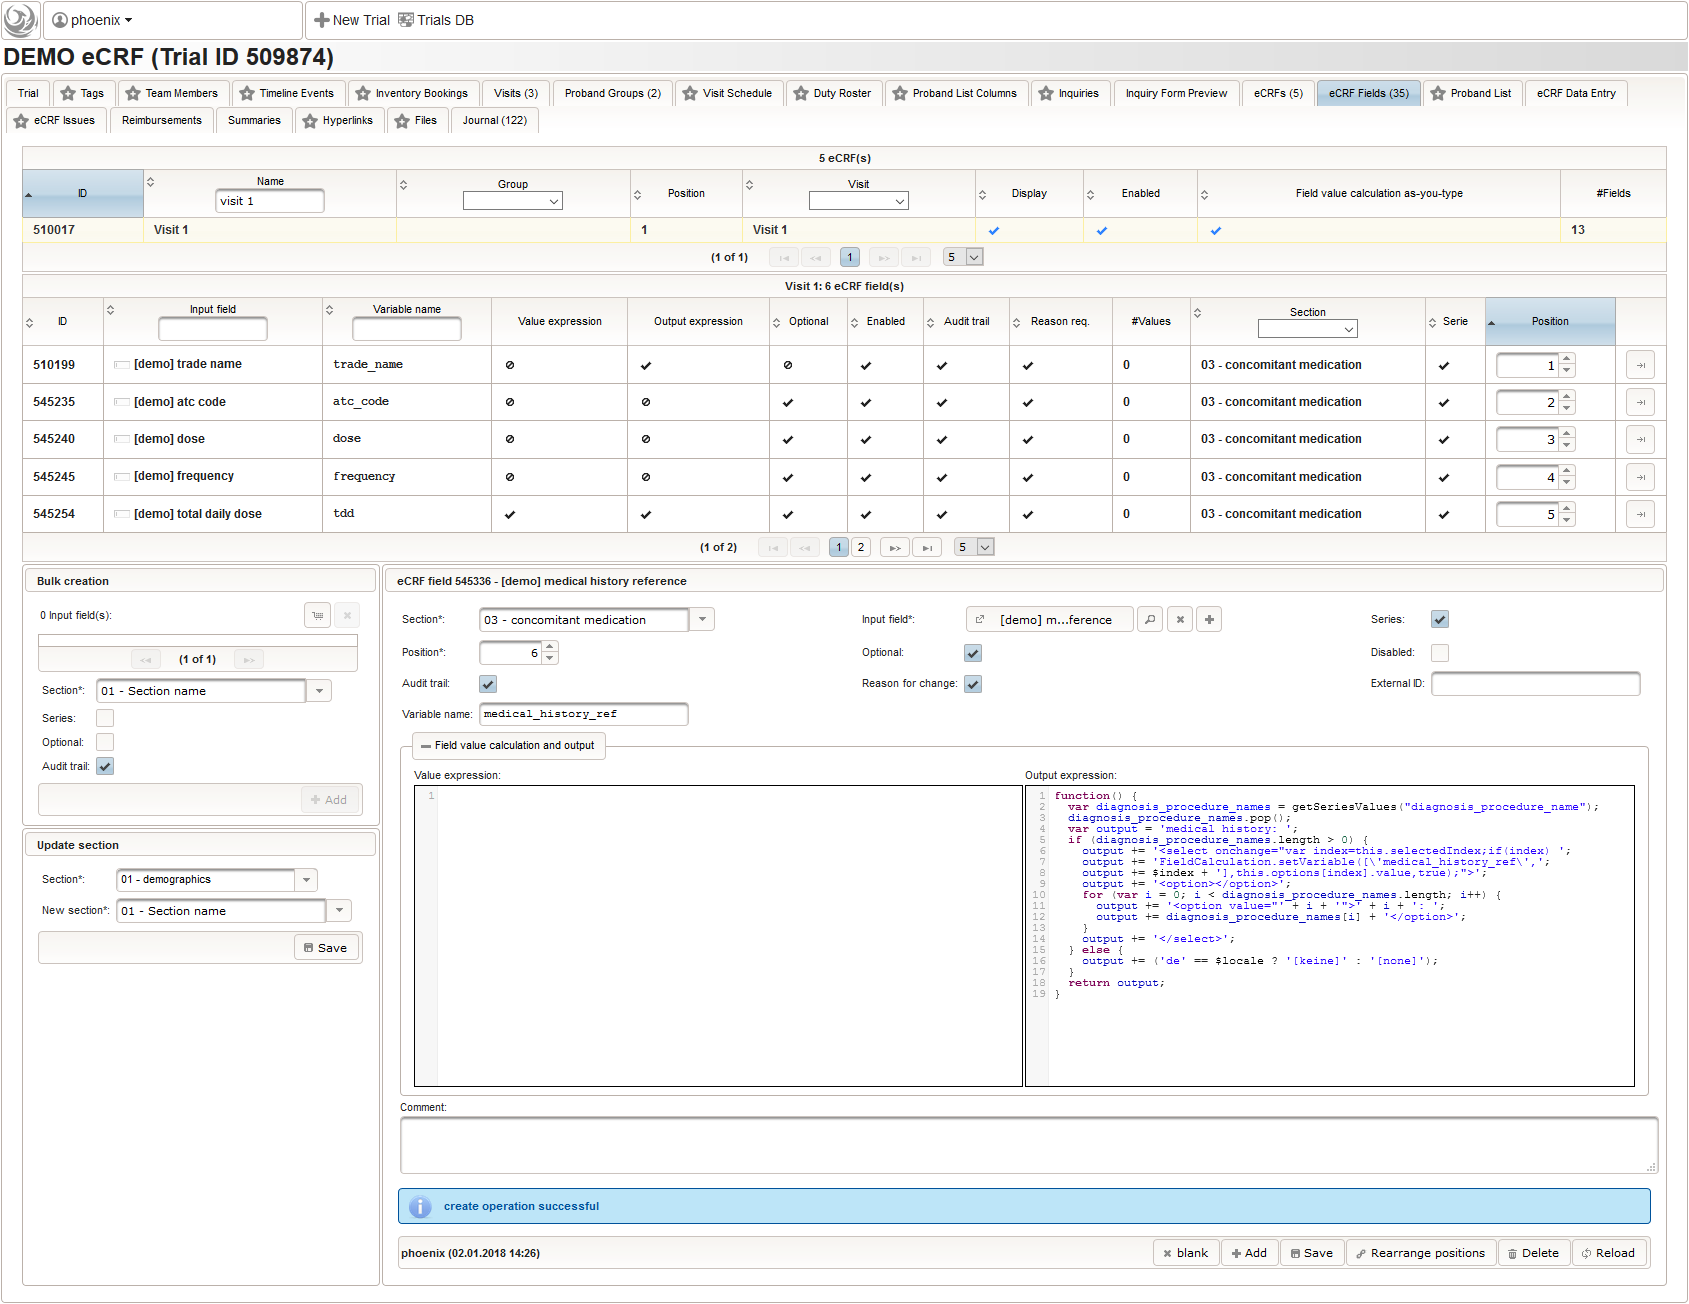
 The Output expression below will display a dropdown showing all stored diagnosis/procedure names of entries provided in the “02 – medical history” series section. When the user will select the desired item, the corresponding section index of “02 – medical history” will be copied.
function() {
  var diagnosis_procedure_names = getSeriesValues("diagnosis_procedure_name");
  diagnosis_procedure_names.pop();
  var output = 'medical history: ';
  if (diagnosis_procedure_names.length > 0) {
    output += '<select onchange="var index=this.selectedIndex;if(index) ';
    output += 'FieldCalculation.setVariable([\'medical_history_ref\',';
    output += $index + '],this.options[index].value,true);">';
    output += '<option></option>';
    for (var i = 0; i < diagnosis_procedure_names.length; i++) {
      output += '<option value="' + i + '">' + i + ': ';
      output += diagnosis_procedure_names[i] + '</option>';
    }
    output += '</select>';
  } else {
    output += ('de' == $locale ? '[keine]' : '[none]');
  }
  return output;
}
Eligibility
The section “04 – eligibility” covers fields to record the answers for the subject’s inclusion and exclusion criteria. It should demonstratrate how form scripting is used with selection input field types.
- We create an input field of single selection type for a “yes” or “no” response. It can be reused for inclusion criteria, each of which formulated as a true/false statement (eg. “The subject is older than 5 years.”), to be placed in the form field’s Comment. The “no” Preset will require the user to explicitly switch to “yes”. Enumerated variable names (ic1, ic2, …) will allow to access each response value.
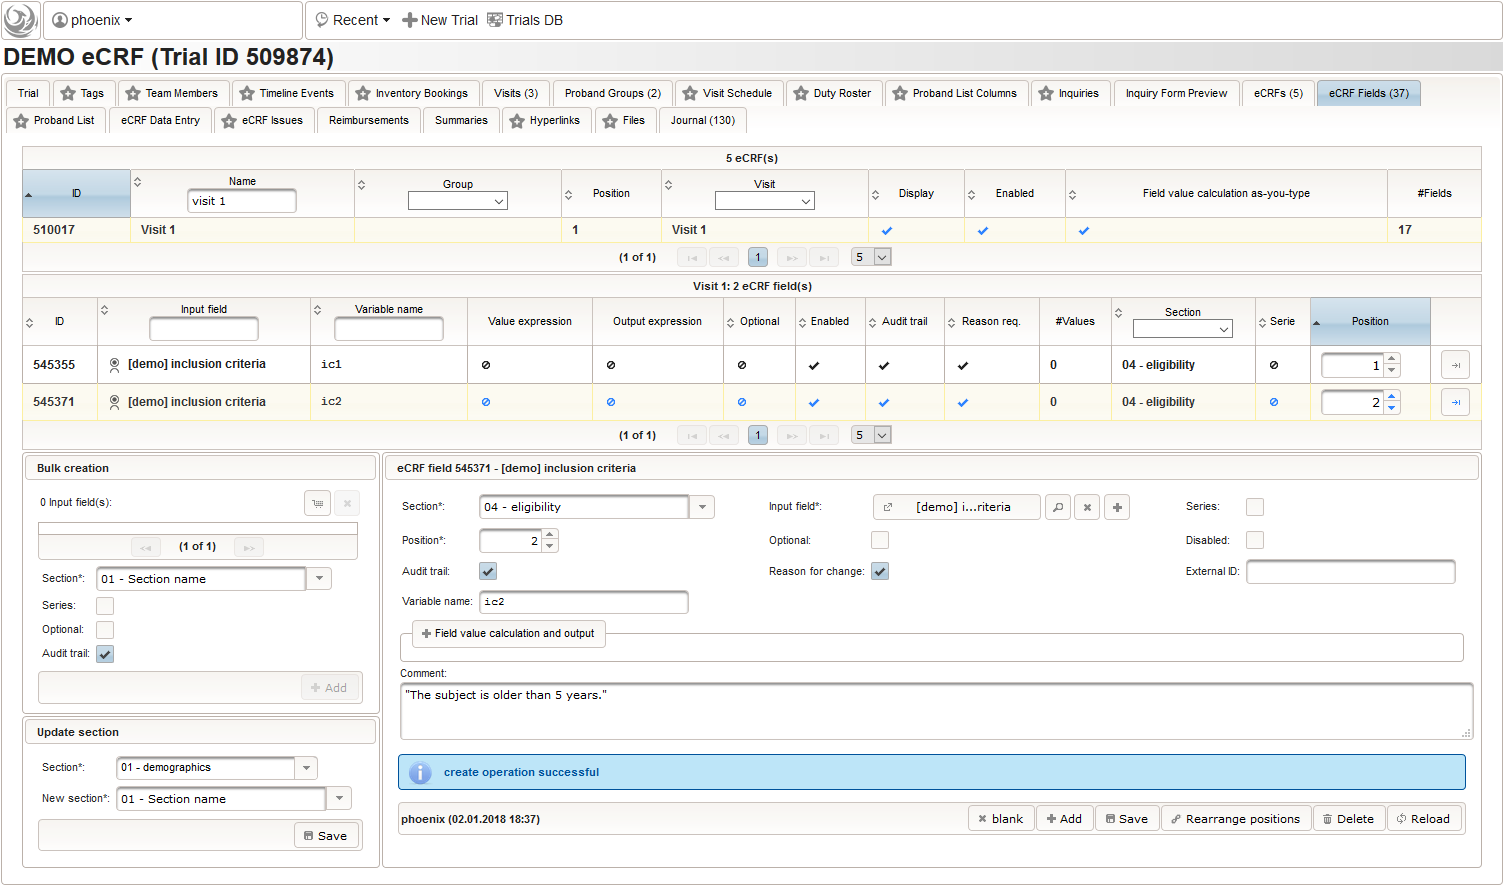
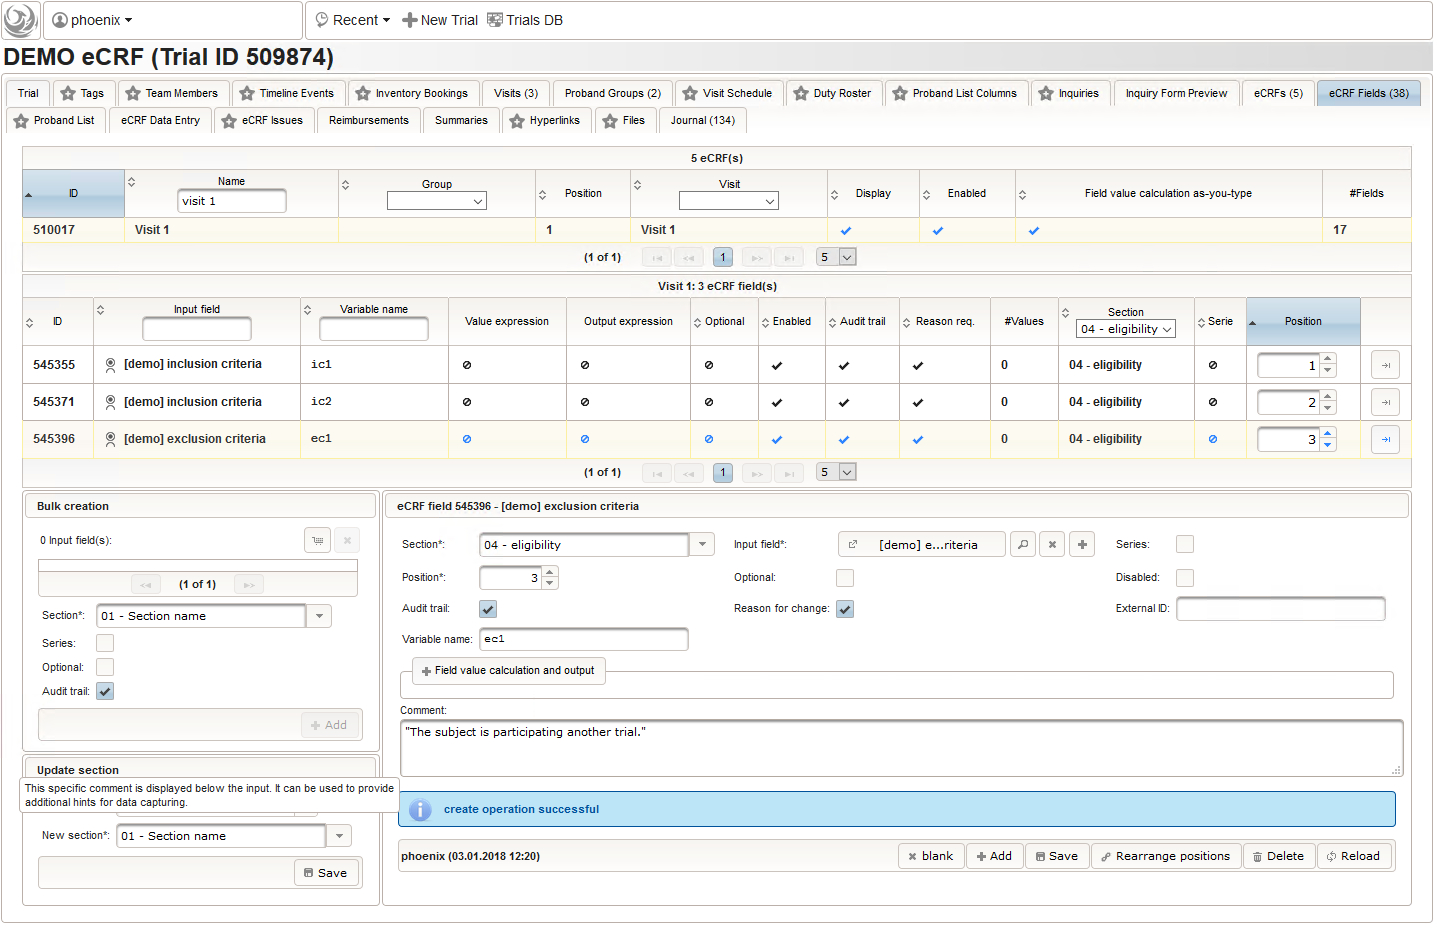
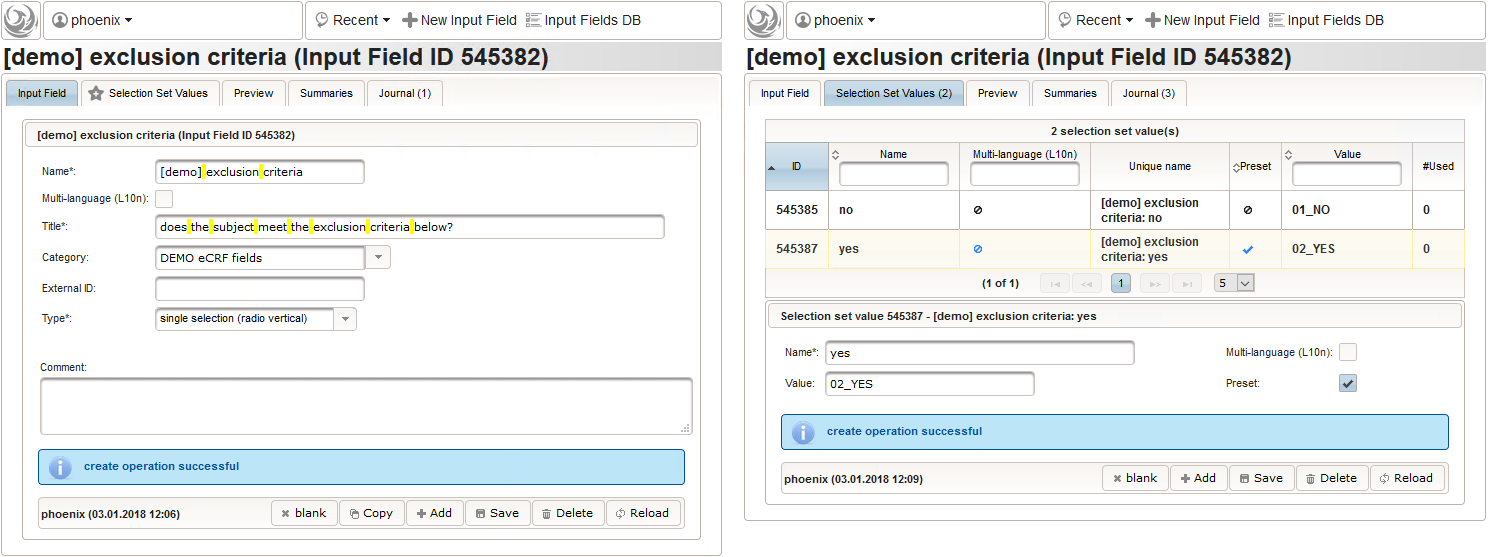
- Another input field of single selection type for a “yes” or “no” response will be used for exclusion criteria, each of which formulated as a true/false statement (eg. “The subject is participating another trial.”), to be placed in the form field’s Comment. This time the “yes” Preset will require the user to explicitly switch to “no”. Enumerated variable names (ec1, ec2, …) will allow to access each response value.
- Another single selection input is prepared for the final screening result (screening ok/screening failure).
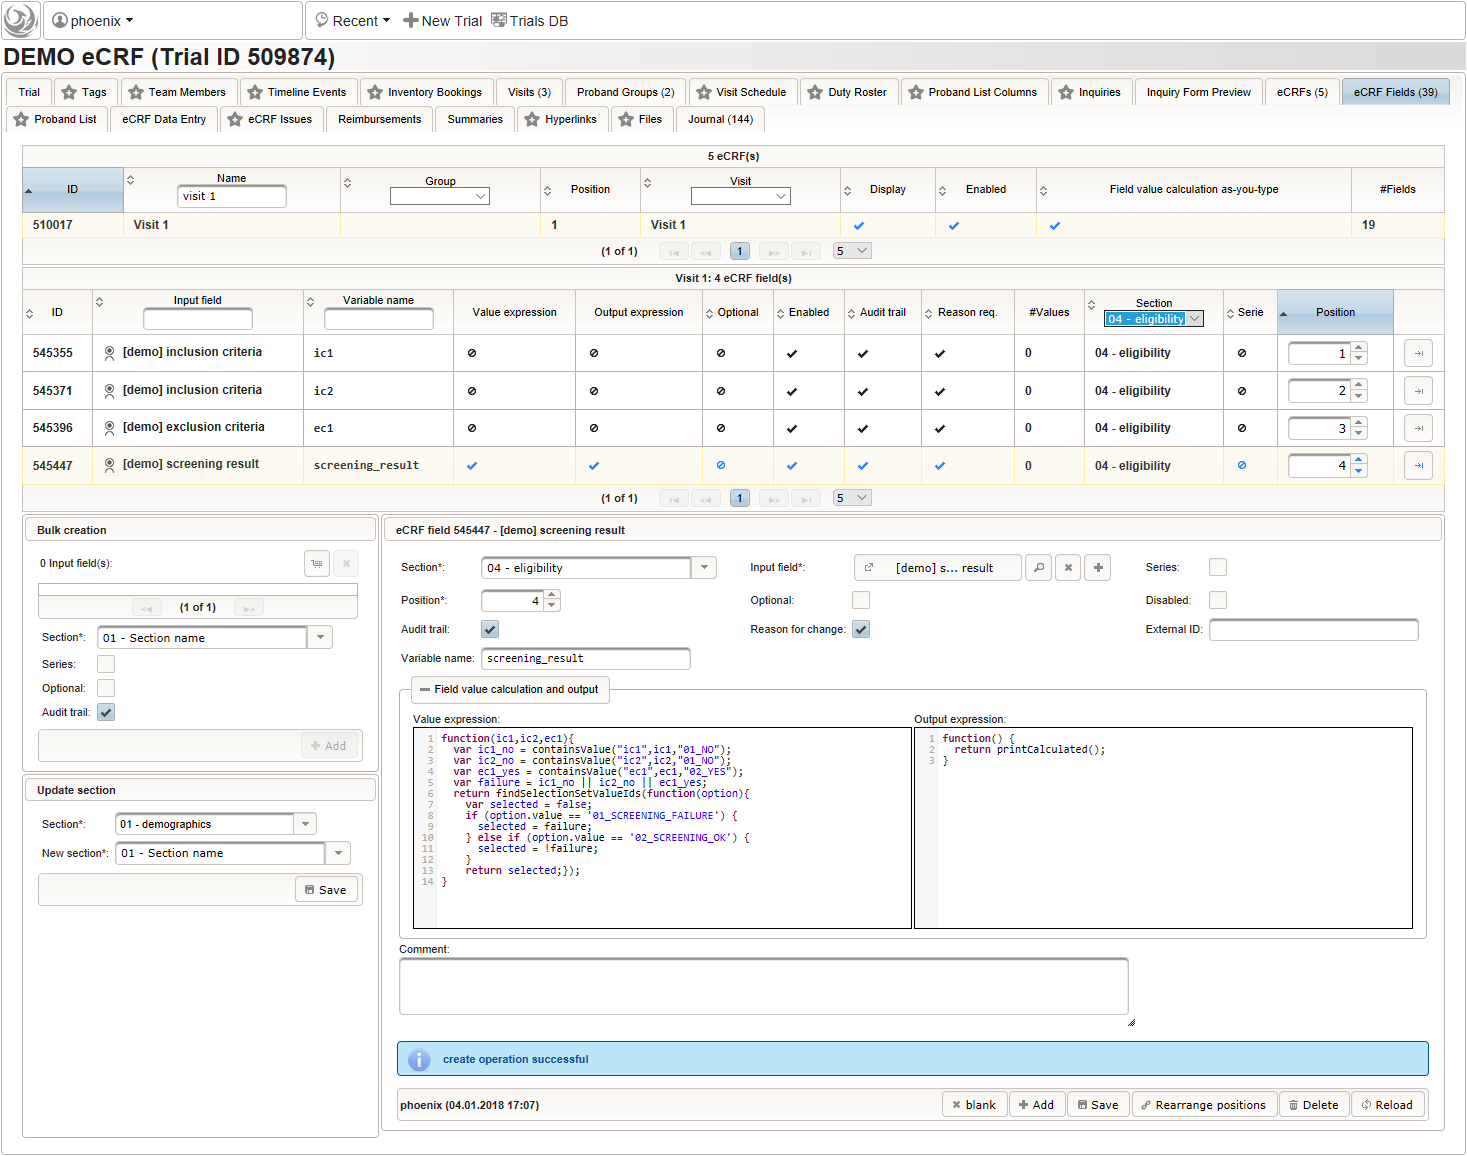
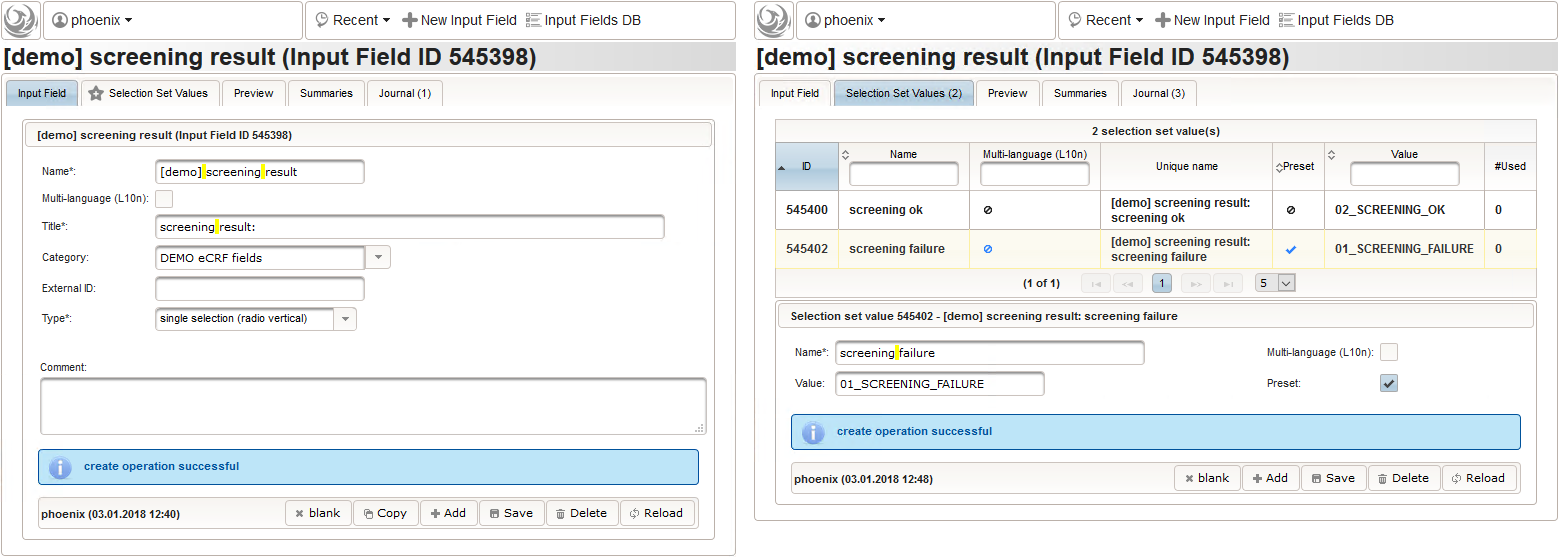 The Value expression below will calculate the expected screening result for confirmation. It is positive (screening ok) only if all inclusion criterions were answered with yes and all exclusion criteria answered with no.
function(ic1,ic2,ec1){
  var ic1_no = containsValue("ic1",ic1,"01_NO");
  var ic2_no = containsValue("ic2",ic2,"01_NO");
  var ec1_yes = containsValue("ec1",ec1,"02_YES");
  var failure = ic1_no || ic2_no || ec1_yes;
  return findSelectionSetValueIds(function(option){
    var selected = false;
    if (option.value == '01_SCREENING_FAILURE') {
      selected = failure;
    } else if (option.value == '02_SCREENING_OK') {
      selected = !failure;
    }
    return selected;});
}
Randomization
Randomization is the random assignment of an enrolled subject to one of the branches/groups. For blinded trials the information wether the subject receives the control intervention or intervention under test is kept secret. The randomization process and result can therefore be provided by the sponsor (shipping labelled doses and envelopes for emergency unblinding) or an external service such as randomizer.at (shipping a stack of envelopes with randomization results for unblinded staff to pick from). Open-label trials do not considery secrecy of randomization results from subjects and/or staff, but still need a method for a proper (ie. balanced) random assignment. This is considered for our example trial to show a simple and integrated randomization implementation using form scripting. Note that newer Phoenix version come with a built-in randomisation feature to randomize proband groups or an output field (text/selection), with different modes each (coin, adaptive, stratified).
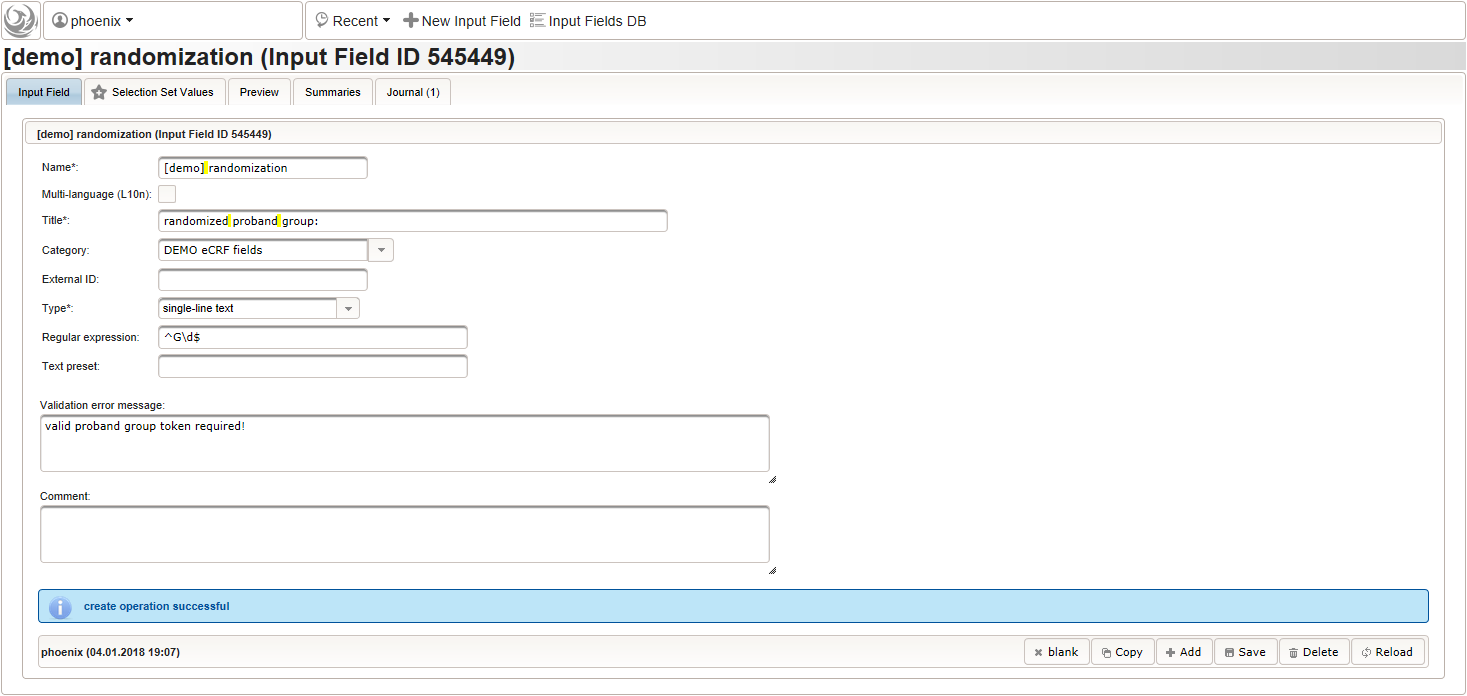
The randomization result will be reflected by a single-line text field for the proband group the subject is to be assigned to. It will be the only field in the last section “05 – randomization” of our screening eCRF.
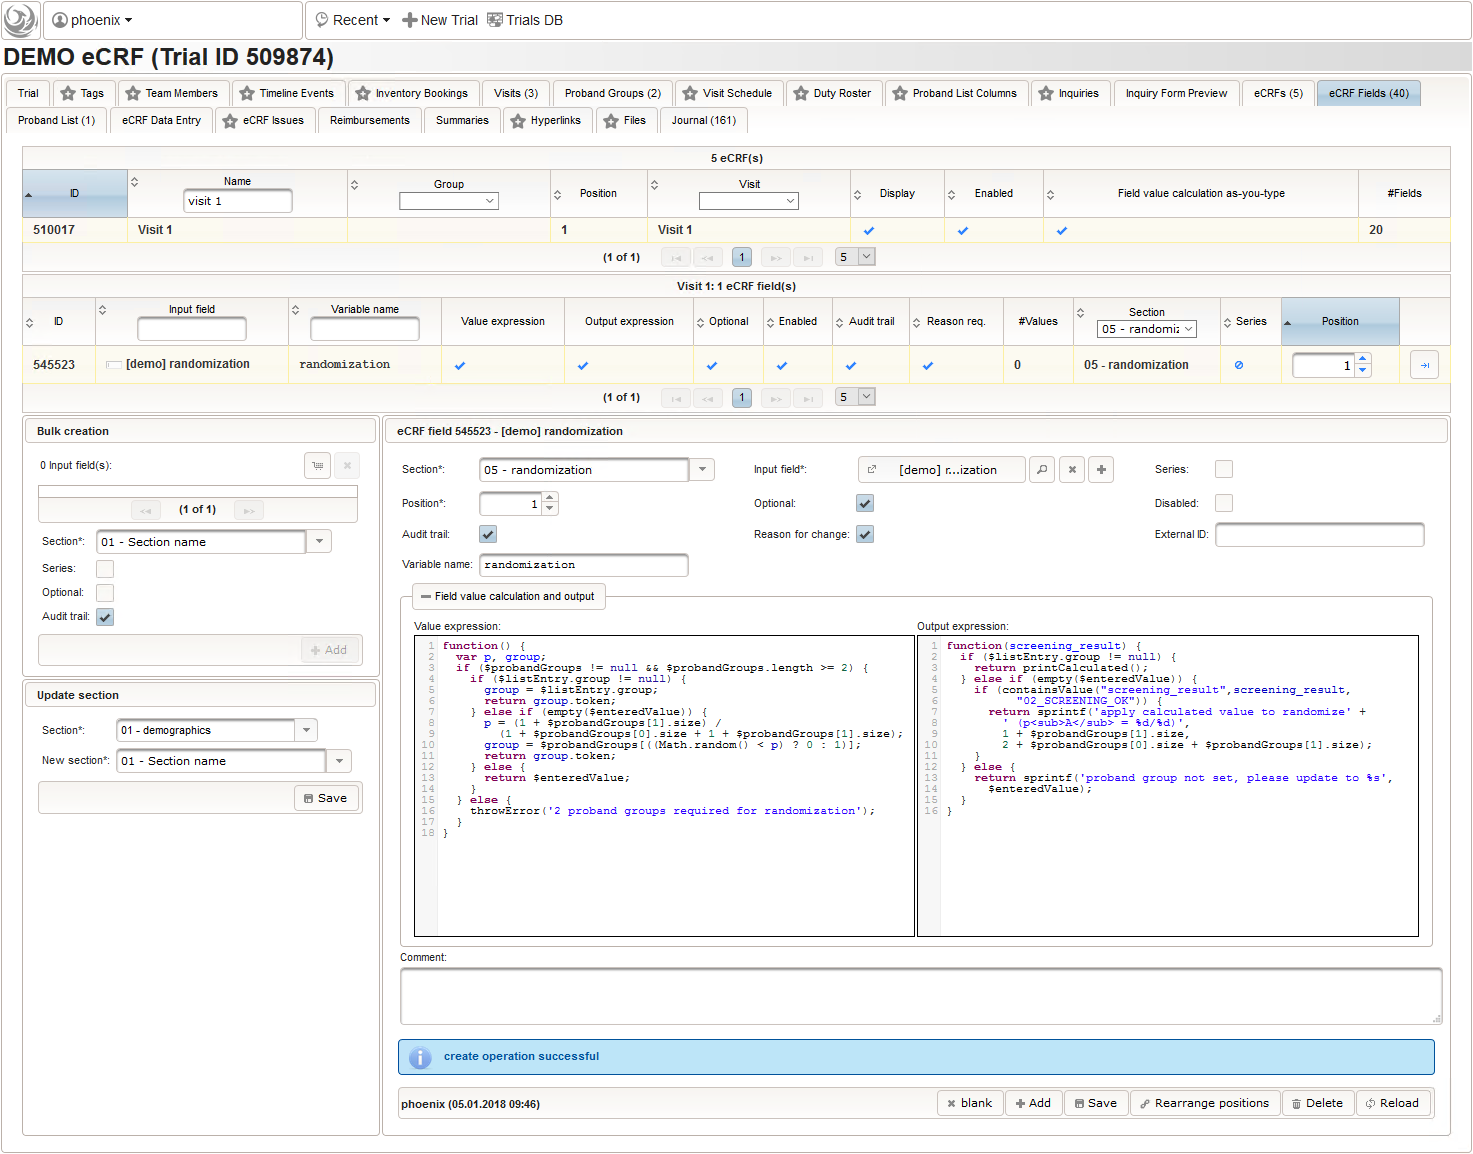
The field remains Optional, since only subjects with positive screening results have to be randomized to proceed with the trial. The proband group’s token (“G1, “G2”) is expected, which we can restrict to using a regular expression.
^G\d$
The Value expression below is used to implement an adaptive randomization for two groups.
function() {
  var p, group;
  if ($probandGroups != null && $probandGroups.length >= 2) {
    if ($listEntry.group != null) {
      group = $listEntry.group;
      return group.token;
    } else if (empty($enteredValue)) {
      p = (1 + $probandGroups[1].size) /
        (1 + $probandGroups[0].size + 1 + $probandGroups[1].size);
      group = $probandGroups[((Math.random() < p) ? 0 : 1)];
      return group.token;
    } else {
      return $enteredValue;
    }
  } else {
    throwError('2 proband groups required for randomization');
  }
}
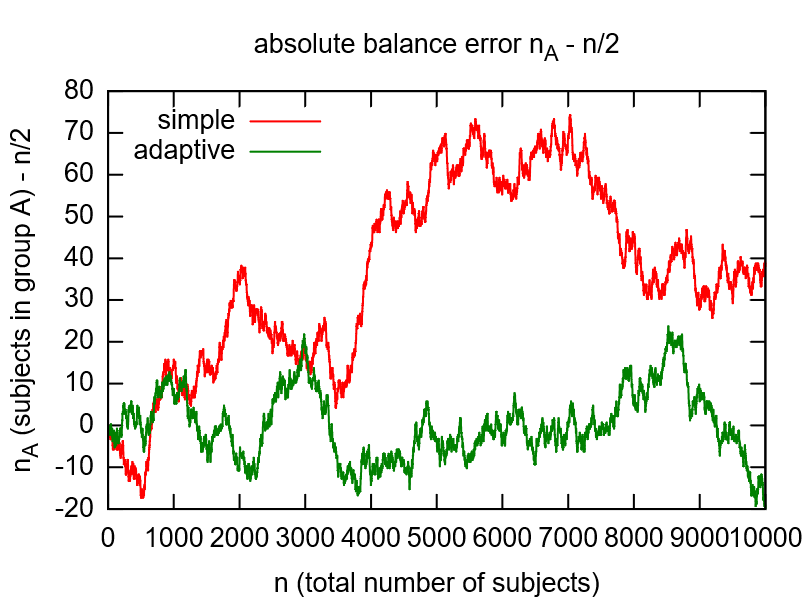
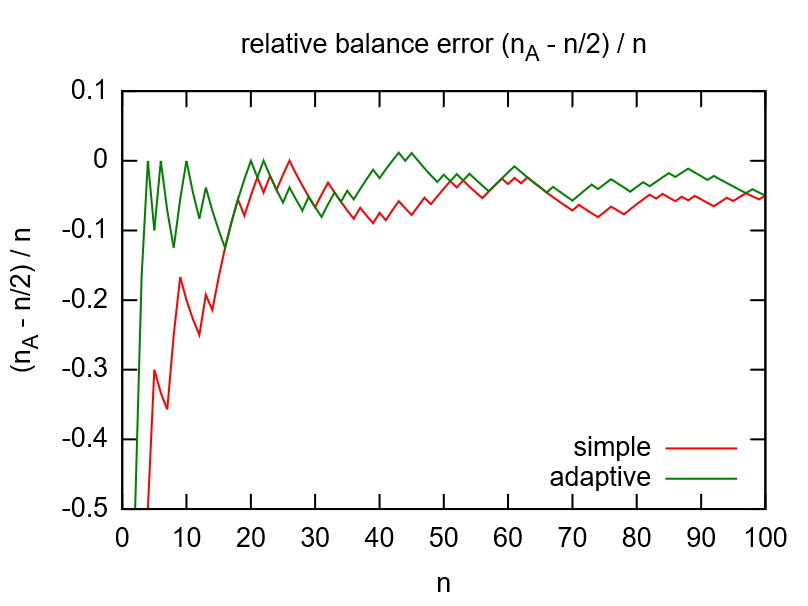
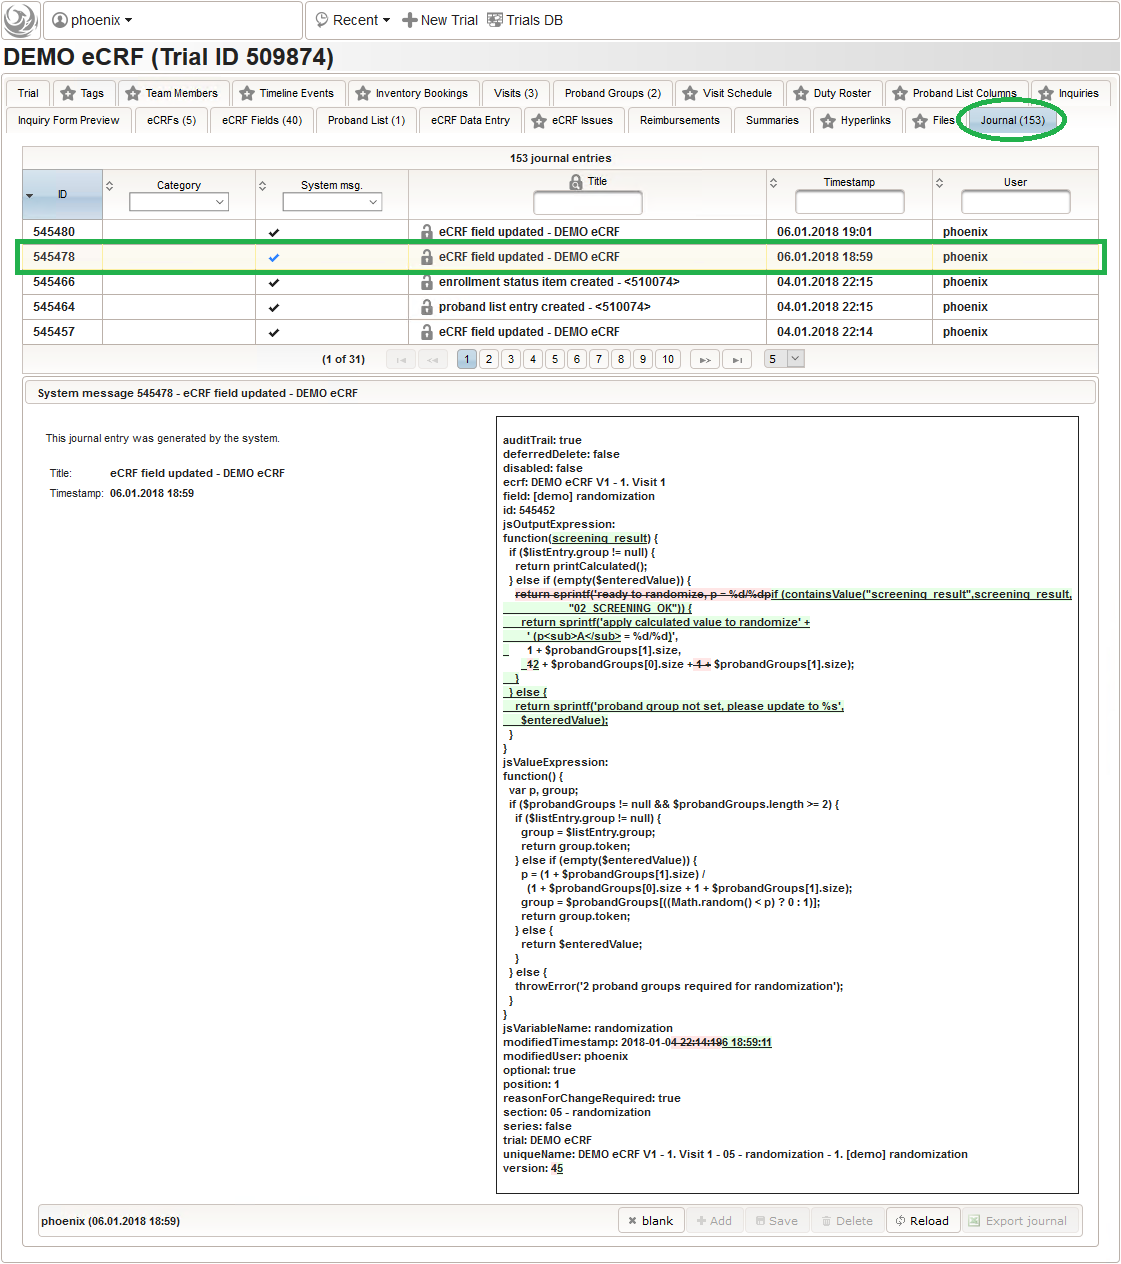
While flipping a coin would be the simple option to randomize, the adaptive randomization dynamically adjusts the probability (\(p_A=1/2\)) according to current group sizes. This compensates shortcomings of the random number generator (see left image below) and gives more balanced distributions for smaller numbers of subjects (see right image below).
Note that the adaptive method will only work if the subject is assigned to the randomized group manually in the enrollment UI, otherwise the reported group sizes the algorithm relies on do not change. To remind the user, the Output expression will print a hint if the enrollment record does not show an assigned group yet.
function(screening_result) {
  if ($listEntry.group != null) {
    return printCalculated();
  } else if (empty($enteredValue)) {
    if (containsValue("screening_result",screening_result,
                      "02_SCREENING_OK")) {
      return sprintf('apply calculated value to randomize' +
        ' (p<sub>A</sub> = %d/%d)',
        1 + $probandGroups[1].size,
        2 + $probandGroups[0].size + $probandGroups[1].size);
    }
  } else {
    return sprintf('proband group not set, please update to %s',
      $enteredValue);
  }
}
Import/Export eCRF Setups
We showed how to set up eCRFs with the browser using the webapplication’s UI. Apart from this, Phoenix CTMS also supports the approach to define eCRFs by importing a well-formatted .xls file. The entire eCRF definitions of a trial can be exported and imported, which can be used to transfer them between trials or server instances.
Export
To export the eCRF setup created so far, we run the dbtool‘s -export_ecrfs mode from the Phoenix CTMS server console. The .xls output filename is given as the option value. Aside options to pass application user credentials (-u and -p), the id of the trial whose eCRFs to dump has to be specified using the -id option (509874 according to our screenshots):
phoenix@phoenix:~$ sudo mkdir /ctsms/ecrf
[sudo] password for phoenix:
phoenix@phoenix:~$ sudo chmod 777 /ctsms/ecrf -R
phoenix@phoenix:~$ sudo -u ctsms /ctsms/dbtool.sh -export_ecrfs /ctsms/ecrf/demo_ecrf.xls -u phoenix -p 123456 -id 509874
CTSMS_PROPERTIES: /ctsms/properties
2018-01-06 11:49:18: starting...
Phoenix Clinical Trial Management System
version: 1.6.0
instance: phoenix/localhost
jvm: 1.6.0_45
task: export eCRFs, eCRF fields, input fields and selection set values
writing to file /ctsms/ecrf/demo_ecrf.xls
5 rows exported
2018-01-06 11:49:36: done - execution time: 17 seconds
While the above will write to a local output file on the server file system (/ctsms/ecrf/demo_ecrf.xls), the command below invokes the Bulk Processor Framework to directly add the generated file for online access using the integrated DMS (document management system) capabilities:
phoenix@phoenix:~$ sudo -u ctsms /ctsms/ecrfdataexport.sh --task=publish_ecrfs_xls -id 509874
Bulk Processing Framework 1.6.2 (Phoenix CTMS) [phoenix]
application path: /ctsms/bulk_processor/CTSMS/BulkProcessor/
working path: /ctsms/bulk_processor/output/ecrf_exporter/
2 cpu(s), multithreading disabled
master config file /ctsms/bulk_processor/CTSMS/BulkProcessor/Projects/ETL/EcrfExporter/config.cfg loaded
INFO - config file /ctsms/bulk_processor/CTSMS/BulkProcessor/Projects/ETL/EcrfExporter/settings.yml loaded
INFO - config file /ctsms/bulk_processor/CTSMS/BulkProcessor/Projects/ETL/EcrfExporter/settings.yml loaded
INFO - starting task: 'publish_ecrfs_xls'
CTSMS_PROPERTIES: /ctsms/properties
2018-04-22 14:17:42: starting...
Phoenix Clinical Trial Management System
version: 1.6.1
instance: phoenix/localhost
jvm: 1.7.0_80
task: export eCRFs, eCRF fields, input fields and selection set values
writing to file /ctsms/bulk_processor/output/ecrf_exporter/output/ecrf_setup_20180422141742.xls
5 rows exported
2018-04-22 14:17:59: done - execution time: 17 seconds
INFO - /ctsms/dbtool.sh executed
INFO - Trial eCRF export/data aggregation:

- file 'ecrf_setup_20180422141742.xls' added to the 'DEMO eCRF' trial

Visit http://192.168.0.28/trial/trial.jsf?trialid=509874 to download files.

time elapsed: 00:00:19
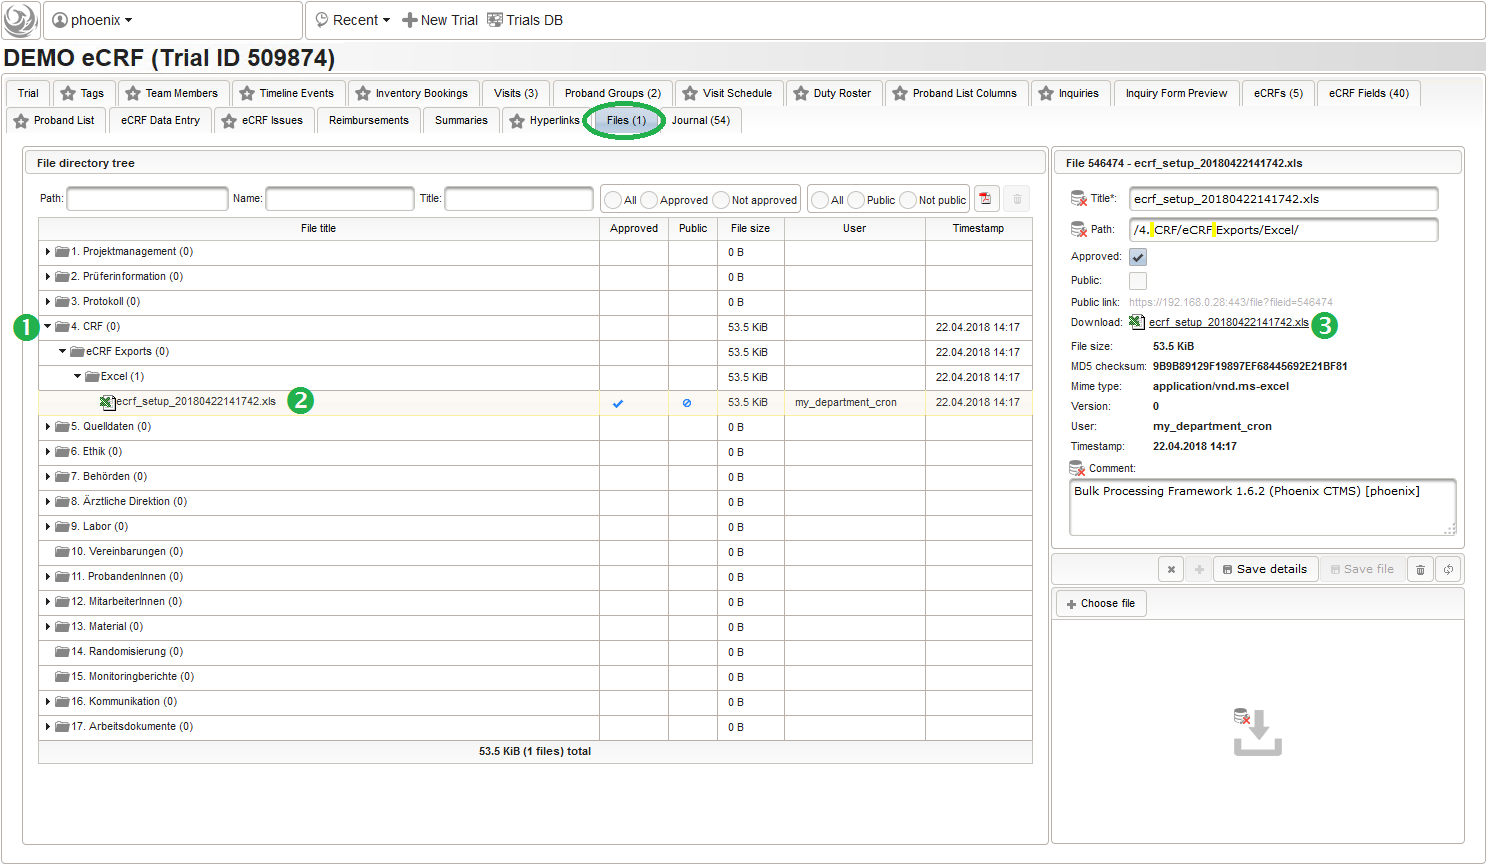
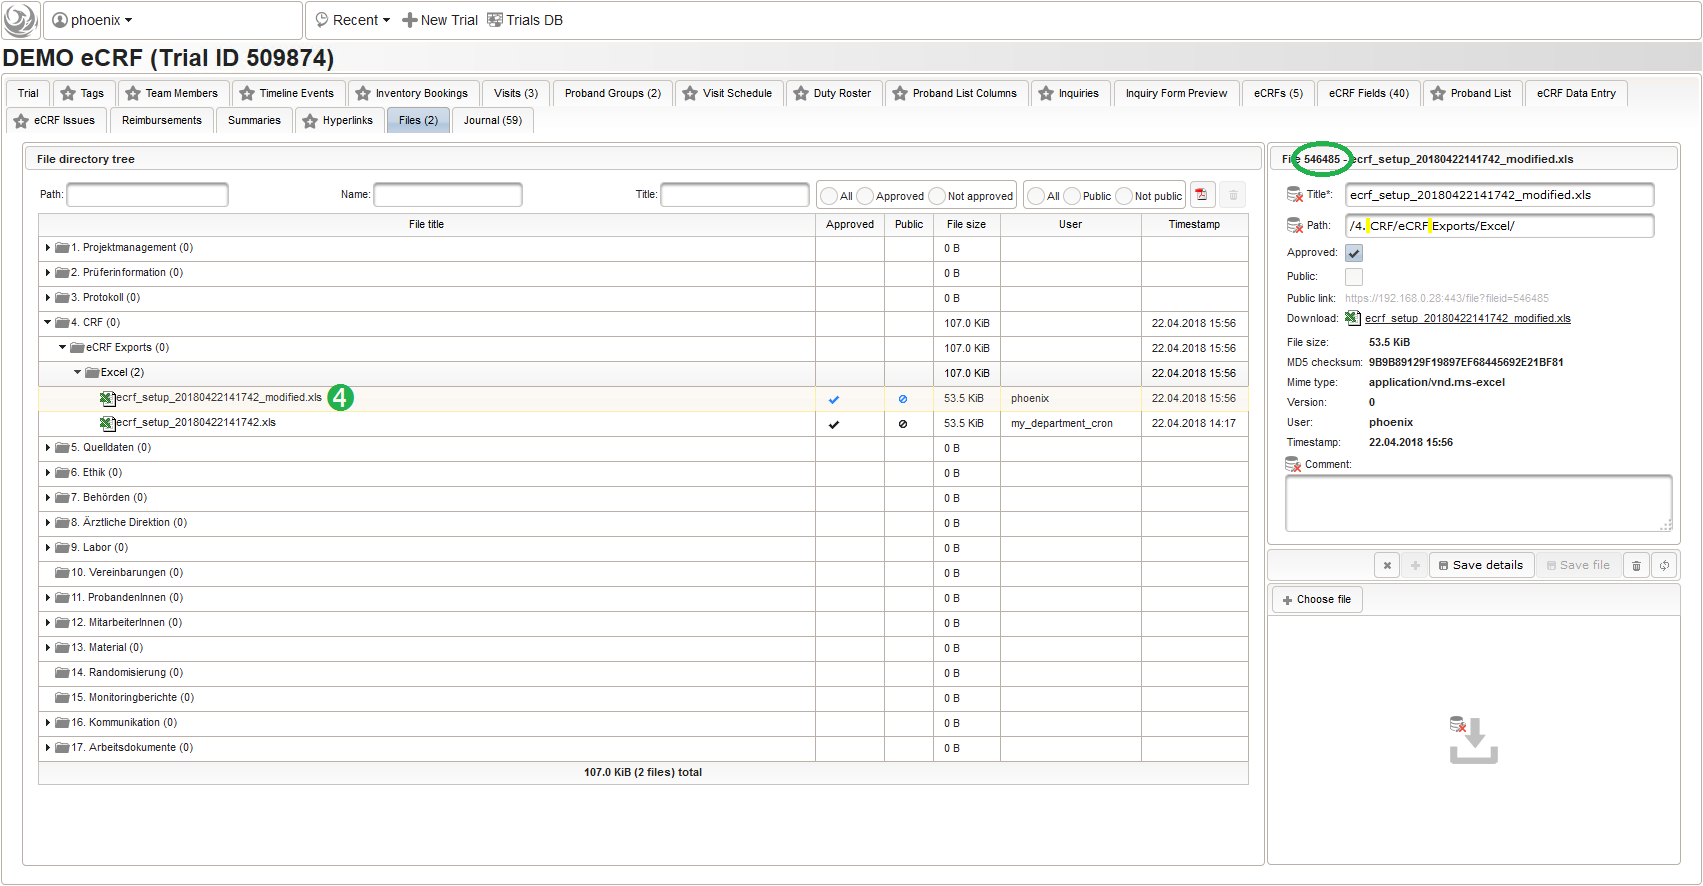
The DMS feature resides in the trial’s Files tab, where you now can navigate (1) and select (2) the file to download it (3) using the browser:
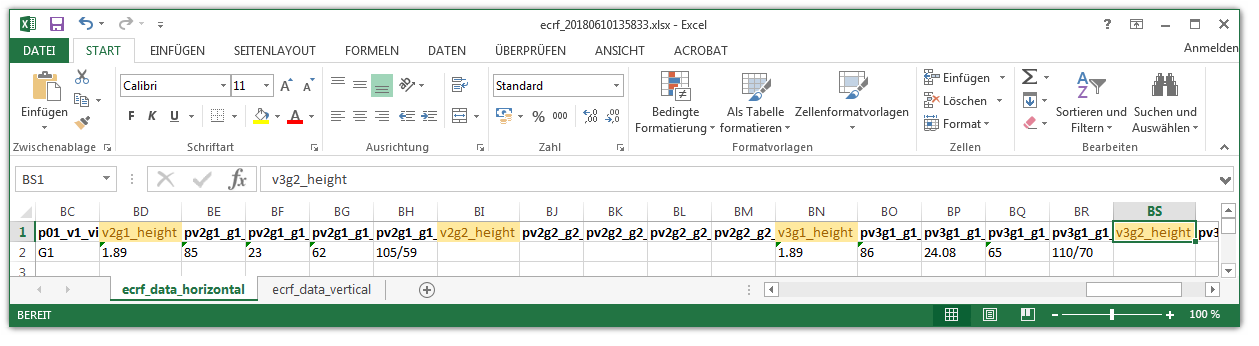
When looking into the exported eCRF setup .xls file, it shows a worksheet containing all eCRF setup records as rows in four spreadsheets:
- ecrfs
- ecrffields
- inputfields
- selectionsetvalues
There are no formulas or macros. Below is a detailed description of the spreadsheet columns.
| spreadsheet | column | column description | example value | key |
|---|---|---|---|---|
| ecrf | A | token of the eCRF's proband group | G1 | yes |
| ecrf | B | eCRF position | 2 | yes |
| ecrf | C | token of the eCRF's visit | V2 | |
| ecrf | D | display eCRF | true | |
| ecrf | E | enable browser-side form scripting (as-you-type) | true | |
| ecrf | F | eCRF external id | G1_V2 | |
| ecrf | G | eCRF name | Visit 2 | |
| ecrf | H | eCRF title | first intervention visit | |
| ecrf | I | eCRF description | body mass index, heart rate, blood pressure | |
| ecrf | J | enrollment status (eg. "ic_signed", "dropped_out", "completed", ...) to switch the subject to when changing the eCRF status | ongoing | |
| ecrffields | A | token of the eCRF's proband group | G1 | yes |
| ecrffields | B | eCRF position | 2 | yes |
| ecrffields | C | eCRF section | 01 - body mass index | yes |
| ecrffields | D | eCRF field position (within the section) | 3 | yes |
| ecrffields | E | eCRF field external id | 3_BMI | |
| ecrffields | F | input field name | [demo] body mass index | |
| ecrffields | G | eCRF field comment | click "apply calculated" to fill in the calculated bmi value | |
| ecrffields | H | eCRF series section | false | |
| ecrffields | I | optional (allow saving empty values) | true | |
| ecrffields | J | disabled (field cannot be edited) | false | |
| ecrffields | K | audit trail (store history of the saved value when the eCRF is in a review status) | true | |
| ecrffields | L | reason for change required (users must provide a reason text to save the value when the eCRF is in review status) | true | |
| ecrffields | M | form scripting variable name | bmi | |
| ecrffields | N | form scripting value expression | function(height,weight) { return weight / Math.pow(height,2); } | |
| ecrffields | O | form scripting output expression | function() { errorIfEmpty(); if ($enteredValue < 15.0 || $enteredValue > 30.0) { throwError('exceeds normal range (15-30kg/m²)'); } } | |
| ecrffields | P | notify eCRF issue | false | |
| inputfields | A | input field name | [demo] subject id | yes |
| inputfields | B | input field title/prompt | subject id: | |
| inputfields | C | localized (display eg. language-specific titles/prompts from ctsms-inputfieldtitles.properties etc.) | false | |
| inputfields | D | input field category | DEMO eCRF fields | |
| inputfields | E | input field external id | SUBJECT_ID | |
| inputfields | F | input field type: DATE, TIME, TIMESTAMP, FLOAT, INTEGER, SINGLE_LINE_TEXT, MULTI_LINE_TEXT, CHECKBOX, SELECT_ONE_DROPDOWN, SELECT_ONE_RADIO_H, SELECT_ONE_RADIO_V, AUTOCOMPLETE, SELECT_MANY_H, SELECT_MANY_V, SKETCH | SINGLE_LINE_TEXT | |
| inputfields | G | input field comment | ||
| inputfields | H | preset value (DATE, TIME, TIMESTAMP, FLOAT, INTEGER, SINGLE_LINE_TEXT, MULTI_LINE_TEXT, CHECKBOX) | ||
| inputfields | I | range validation error message text | three-digit number required! | |
| inputfields | J | regular expression (SINGLE_LINE_TEXT, MULTI_LINE_TEXT) or "learn" (AUTOCOMPLETE) or lower bound (DATE, TIME, TIMESTAMP, FLOAT, INTEGER) or minimum number of selected items (SELECT_MANY_H, SELECT_MANY_V, SKETCH) | ^[0-9]{3,3}$ | |
| inputfields | K | "strict" (AUTOCOMPLETE) or upper bound (DATE, TIME, TIMESTAMP, FLOAT, INTEGER) or minimum number of selected items (SELECT_MANY_H, SELECT_MANY_V, SKETCH) | ||
| inputfields | L | width in pixels (SKETCH) | ||
| inputfields | M | height in pixels (SKETCH) | ||
| inputfields | N | background image filename/file id (SKETCH) | ||
| selectionsetvalues | A | input field name | [sometrial] visual analogue scale | yes |
| selectionsetvalues | B | option name | area for 10% - 20% | |
| selectionsetvalues | C | option value | VAS_15 | yes |
| selectionsetvalues | D | localized (display language-specific option names from ctsms-inputfieldselectionsetvalues.properties) | false | |
| selectionsetvalues | E | selected by default (preset) | false | |
| selectionsetvalues | F | region UUID (SKETCH) | 4a40b3af-08b0-4f5c-8533-561127701062 | |
| selectionsetvalues | G | region object JSON string including SVG paths (SKETCH) | [ { "fill": "#58FF00", "stroke": "#58FF00", "path": "M48,10L86,10L86,50L48,50Z", "stroke-opacity": 0.4, "stroke-width": 2, "stroke-linecap": "round", "stroke-linejoin": "round", "transform": [], "type": "path", "fill-opacity": 0.2, "strokes-id": "4a40b3af-08b0-4f5c-8533-561127701062" } ] |
A leading “#” symbol can be used to skip (comment out) a spreadsheet row. A typical workflow is to modify an exported file for subsequent import, or even create the .xsl file from scratch or template. To entirely avoid dealing with files copied to the server’s local file system, they can also be uploaded via browser using the trial’s File tab. To start adding a new file (1), a desired remote DMS folder to upload to is selected (2).
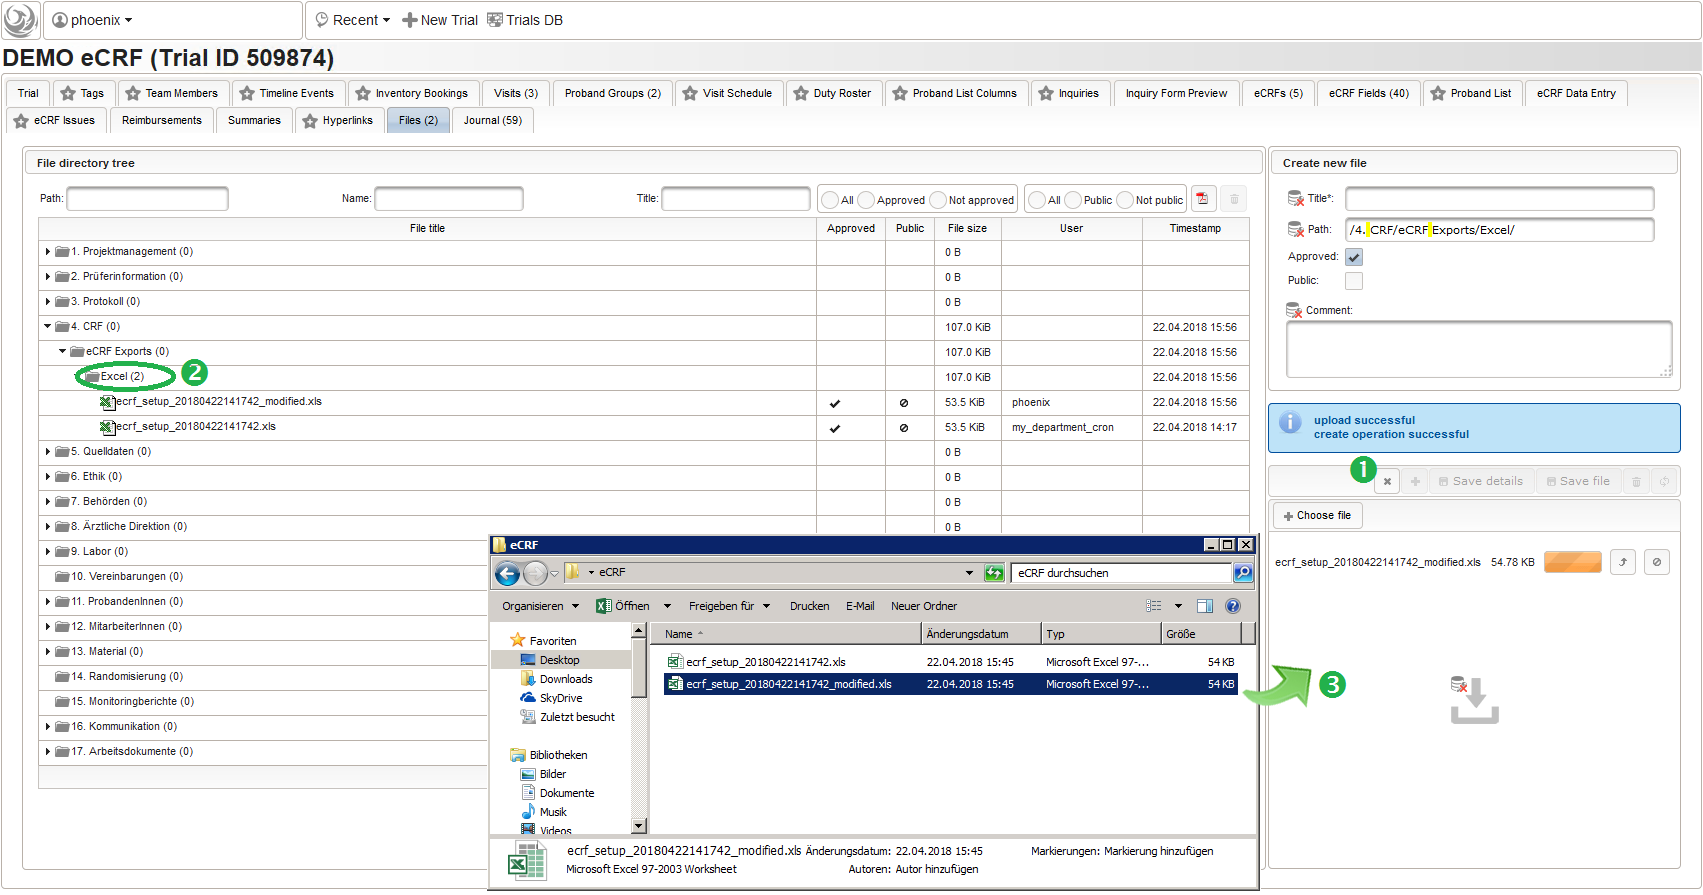
The file can then be uploaded by drag&drop from eg. your desktop folder to the upload area (3). When selecting the file after successful upload (4), details such as the created file record id (eg. 546485 in the screenshot) are shown.
Import
The eCRF setup import works similar to the export by invoking the dbtool‘s -import_ecrfs mode from the Phoenix CTMS server console. The .xls input filename (eg. /ctsms/ecrf/demo_ecrf.xls) or a corresponding file record id (eg. 546485) is given as the option value. Aside options to pass application user credentials (-u and -p), the id of the target trial to load the eCRFs into has to be specified using the -id option. The console output below shows importing the previously exported demo_ecrf.xls file “ontop” the eCRFs present in our existing example trial:
phoenix@phoenix:~$ sudo -u ctsms /ctsms/dbtool.sh -import_ecrfs 546485 -u phoenix -p 123456 -id 509874
CTSMS_PROPERTIES: /ctsms/properties
2018-01-06 19:00:59: starting...
Phoenix Clinical Trial Management System
version: 1.6.0
instance: phoenix/localhost
jvm: 1.6.0_45
task: import eCRFs, eCRF fields, input fields and selection set values
DB will be modified - eCRFs, eCRF fields, input fields and selection set values will be updated!
type 'yes' to proceed:yes
reading from file 546485
file ID 546485 (ecrf_setup_20180422141742_modified.xls)
processing sheet 'selectionsetvalues'
selection set value for field '[demo] ethnicity' added: 01_HISPANIC_OR_LATINO
selection set value for field '[demo] ethnicity' added: 02_NOT_HISPANIC_OR_LATINO
selection set value for field '[demo] diagnosis/procedure' added: 01_DIAGNOSIS
selection set value for field '[demo] diagnosis/procedure' added: 02_PROCEDURE
selection set value for field '[demo] inclusion criteria' added: 01_NO
selection set value for field '[demo] inclusion criteria' added: 02_YES
selection set value for field '[demo] exclusion criteria' added: 01_NO
selection set value for field '[demo] exclusion criteria' added: 02_YES
selection set value for field '[demo] screening result' added: 01_SCREENING_FAILURE
selection set value for field '[demo] screening result' added: 02_SCREENING_OK
10 rows processed
reading from file 546485
file ID 546485 (ecrf_setup_20180422141742_modified.xls)
processing sheet 'inputfields'
input field '[demo] subject id' updated
input field '[demo] date of birth' updated
input field '[demo] ethnicity' updated
input field '[demo] diagnosis/procedure' updated
input field '[demo] diagnosis/procedure name' updated
input field '[demo] diagnosis/procedure code' updated
input field '[demo] date of onset' updated
input field '[demo] ongoing' updated
input field '[demo] stop date' updated
input field '[demo] trade name' updated
input field '[demo] atc code' updated
input field '[demo] dose' updated
input field '[demo] frequency' updated
input field '[demo] total daily dose' updated
input field '[demo] medical history reference' updated
input field '[demo] inclusion criteria' updated
input field '[demo] exclusion criteria' updated
input field '[demo] screening result' updated
input field '[demo] randomization' updated
input field '[demo] body height' updated
input field '[demo] body weight' updated
input field '[demo] body mass index' updated
input field '[demo] heart rate' updated
input field '[demo] blood pressure' updated
24 rows processed
reading from file 546485
file ID 546485 (ecrf_setup_20180422141742_modified.xls)
processing sheet 'ecrffields'
ecrf for proband group <no group>, position 1: field section 01 - demographics, position 1, field '[demo] subject id' added
ecrf for proband group <no group>, position 1: field section 01 - demographics, position 2, field '[demo] date of birth' added
ecrf for proband group <no group>, position 1: field section 01 - demographics, position 3, field '[demo] ethnicity' added
ecrf for proband group <no group>, position 1: field section 02 - medical history, position 1, field '[demo] diagnosis/procedure' added
ecrf for proband group <no group>, position 1: field section 02 - medical history, position 2, field '[demo] diagnosis/procedure name' added
ecrf for proband group <no group>, position 1: field section 02 - medical history, position 3, field '[demo] diagnosis/procedure code' added
ecrf for proband group <no group>, position 1: field section 02 - medical history, position 4, field '[demo] date of onset' added
ecrf for proband group <no group>, position 1: field section 02 - medical history, position 5, field '[demo] ongoing' added
ecrf for proband group <no group>, position 1: field section 02 - medical history, position 6, field '[demo] stop date' added
ecrf for proband group <no group>, position 1: field section 03 - concomitant medication, position 1, field '[demo] trade name' added
ecrf for proband group <no group>, position 1: field section 03 - concomitant medication, position 2, field '[demo] atc code' added
ecrf for proband group <no group>, position 1: field section 03 - concomitant medication, position 3, field '[demo] dose' added
ecrf for proband group <no group>, position 1: field section 03 - concomitant medication, position 4, field '[demo] frequency' added
ecrf for proband group <no group>, position 1: field section 03 - concomitant medication, position 5, field '[demo] total daily dose' added
ecrf for proband group <no group>, position 1: field section 03 - concomitant medication, position 6, field '[demo] medical history reference' added
ecrf for proband group <no group>, position 1: field section 04 - eligibility, position 1, field '[demo] inclusion criteria' added
ecrf for proband group <no group>, position 1: field section 04 - eligibility, position 2, field '[demo] inclusion criteria' added
ecrf for proband group <no group>, position 1: field section 04 - eligibility, position 3, field '[demo] exclusion criteria' added
ecrf for proband group <no group>, position 1: field section 04 - eligibility, position 4, field '[demo] screening result' added
ecrf for proband group <no group>, position 1: field section 05 - randomization, position 1, field '[demo] randomization' added
ecrf for proband group G1, position 2: field section 01 - body mass index, position 1, field '[demo] body height' added
ecrf for proband group G1, position 2: field section 01 - body mass index, position 2, field '[demo] body weight' added
ecrf for proband group G1, position 2: field section 01 - body mass index, position 3, field '[demo] body mass index' added
ecrf for proband group G1, position 2: field section 02 - heart rate, position 1, field '[demo] heart rate' added
ecrf for proband group G1, position 2: field section 03 - blood pressure, position 1, field '[demo] blood pressure' added
ecrf for proband group G2, position 2: field section 01 - body mass index, position 1, field '[demo] body height' added
ecrf for proband group G2, position 2: field section 01 - body mass index, position 2, field '[demo] body weight' added
ecrf for proband group G2, position 2: field section 01 - body mass index, position 3, field '[demo] body mass index' added
ecrf for proband group G2, position 2: field section 02 - heart rate, position 1, field '[demo] heart rate' added
ecrf for proband group G2, position 2: field section 03 - blood pressure, position 1, field '[demo] blood pressure' added
ecrf for proband group G1, position 3: field section 01 - body mass index, position 1, field '[demo] body height' added
ecrf for proband group G1, position 3: field section 01 - body mass index, position 2, field '[demo] body weight' added
ecrf for proband group G1, position 3: field section 01 - body mass index, position 3, field '[demo] body mass index' added
ecrf for proband group G1, position 3: field section 02 - heart rate, position 1, field '[demo] heart rate' added
ecrf for proband group G1, position 3: field section 03 - blood pressure, position 1, field '[demo] blood pressure' added
ecrf for proband group G2, position 3: field section 01 - body mass index, position 1, field '[demo] body height' added
ecrf for proband group G2, position 3: field section 01 - body mass index, position 2, field '[demo] body weight' added
ecrf for proband group G2, position 3: field section 01 - body mass index, position 3, field '[demo] body mass index' added
ecrf for proband group G2, position 3: field section 02 - heart rate, position 1, field '[demo] heart rate' added
ecrf for proband group G2, position 3: field section 03 - blood pressure, position 1, field '[demo] blood pressure' added
40 rows processed
reading from file 546485
file ID 546485 (ecrf_setup_20180422141742_modified.xls)
processing sheet 'ecrfs'
ecrf 'DEMO eCRF V1 - 1. screening visit' updated
ecrf 'DEMO eCRF G1:V2 - 2. first intervention visit' updated
ecrf 'DEMO eCRF G2:V2 - 2. first intervention visit' updated
ecrf 'DEMO eCRF G1:V3 - 3. second intervention visit' updated
ecrf 'DEMO eCRF G2:V3 - 3. second intervention visit' updated
5 rows processed
2018-01-06 19:01:29: done - execution time: 30 seconds
When importing an eCRF setup .xls file in the described format, an “upsert” algorithm is used to support merging. If a row in one of the four spreadsheets from the .xls is found in the Phoenix database by matching the key column values, it tries to update the existing record in the database. Otherwise it tries to insert a new element (eCRF, eCRF field, input field, option item). This method is safe due to extensive checks that will cause the procedure to stop with an error:
- trial_locked: trial id {0} is locked ({1})
- ecrf_position_not_unique: ordinal position not unique
- ecrf_name_not_unique: eCRF name not unique (if enabled only)
- ecrf_field_input_field_changed: input field cannot be changed because values were already entered
- ecrf_field_js_variable_name_required: javascript variable name required if value expression or output expression is specified
- ecrf_field_js_variable_name_invalid: invalid javascript variable name ”{0}”
- ecrf_field_js_variable_name_not_unique: javascript variable name not unique
- ecrf_field_position_not_unique: ordinal position not unique
- ecrf_field_series_flag_inconsistent: series flags inconsistent within section
- ecrf_field_audit_trail_false: providing a reason for change available with audit trail only
- ecrf_field_series_section_with_values: values were already entered for series section ”{0}”
- ecrf_field_series_section_with_status_entries: eCRF issues exist for series section ”{0}”
- ecrf_field_with_values_series_flag_changed: series flag cannot be changed because values were already entered
- ecrf_field_with_status_entries_series_flag_changed: series flag cannot be changed because eCRF issues exist
- ecrf_field_with_values_section_changed: series section cannot be changed because values were already entered
- ecrf_field_with_status_entries_section_changed: series section cannot be changed because eCRF issues exist
- locked_ecrfs: {0}: {1} eCRF(s) with a locked eCRF status
- proband_locked: proband ID {0} is locked ({1})
- input_field_type_changed: input field type cannot be changed from {0} to {1} because of existing data
- selection_set_values_not_for_select: existing selection set values cannot be used with selection inputs
- selection_set_values_not_for_sketch: existing selection set values cannot be used with sketch inputs
- input_field_validation_error_mesasge_required: input field validation error message required
- input_field_validation_error_message_not_null: input field validation error message must be empty
- input_field_min_selection_limit_greater_than_max_selection_limit: if both lower and upper selection limits are defined, upper selection limit must be greater than or equal to lower limit
- input_field_min_integer_limit_greater_than_max_integer_limit: if both lower and upper integer limits are defined, upper limit must be greater than or equal to lower limit
- input_field_min_float_limit_greater_than_max_float_limit: if both lower and upper decimal limits are defined, upper limit must be greater than or equal to lower limit
- input_field_min_date_limit_greater_than_max_date_limit: if both min and max dates are defined, max date must be equal or after min date
- input_field_min_timestamp_limit_greater_than_max_timestamp_limit: if both min and max timestamps are defined, max timestamp must be equal or after min timestamp
- input_field_min_time_limit_greater_than_max_time_limit: if both min and max times are defined, max time must be equal or after min time
- input_field_autocomplete_strict_and_learn_set: strict flag cannot be applied if learn flag is set
- input_field_sketch_width_required: sketch width required
- input_field_sketch_height_required: sketch height required
- input_field_image_size_limit_exceeded: background image file size exceeds limit ({0})
- input_field_image_mime_type_unknown: mime type {0} of background image is unknown
- input_field_image_mime_type_no_image: mime type {0} of background image is not an image
- input_field_image_cannot_read_dimensions: image dimensions cannot be read
- input_field_sketch_width_less_than_or_equal_to_zero: sketch width is less than or equal to 0
- input_field_sketch_height_less_than_or_equal_to_zero: sketch height is less than or equal to 0
- selection_set_value_name_already_exists: name for selection set value already exists
- selection_set_value_value_already_exists: value for selection set value already exists
- selection_set_value_value_required: value for selection set value required
- selection_set_value_multiple_preset_values: only a single preset selection set value possible
- selection_set_value_preset_not_false: ink regions cannot be marked as preset
- selection_set_value_multiple_strokes_ids: ink regions stroke ID already exists
- selection_set_value_strokes_id_required: ink regions stroke ID required
- selection_set_value_ink_region_required: ink data for regions required
The add/update operations are transactional per eCRF and per input field element processed during the import. This means:
- a row from the ecrfs spreadsheet including all related rows form the ecrffields is applied alltogether or not at all
- a row from the inputfields spreadsheet including all related rows form the selectionsetvalues spreadsheet is applied alltogether or not at all
This protects the database from intermediate states eg. due to an aborted import when an error is reported. As with edit operations via the UI, any successful change to the eCRF setup is logged in the journal to maintain a gapless amendment log – no matter how often you re-import and save changes manually in between.
Data Entry
The eCRF forms are prepared at this point and ready for site staff to fill in clinical data from subjects participating the trial. This section will demonstrate the eCRF data entry and the subsequent query resolution workflow using the eCRF examples described in prior steps.
To allow users to start entering data, the eCRF forms first need to be unlocked by switching the trial status from Design to Carrying out. 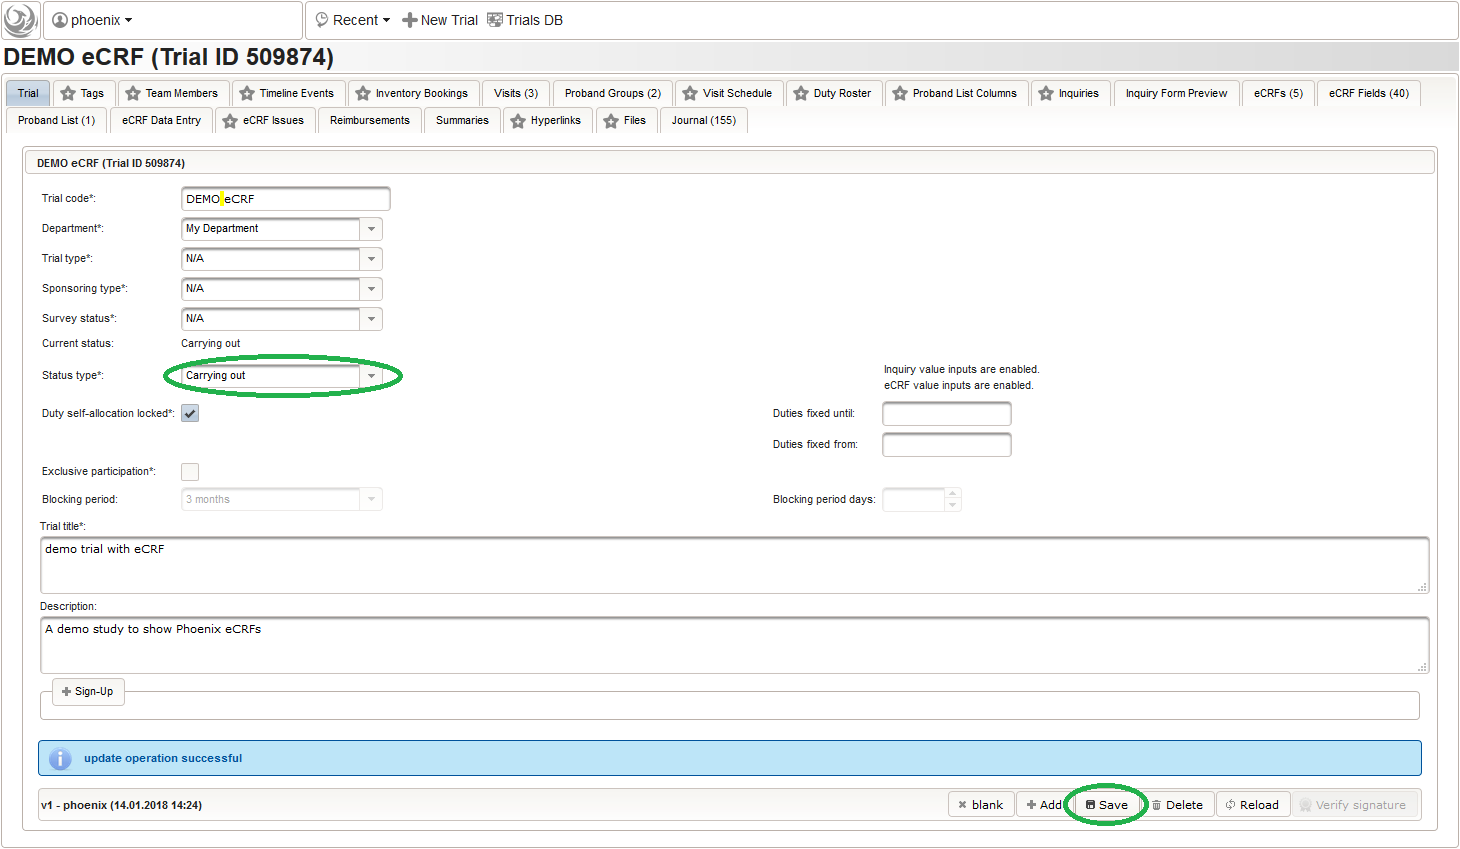
Subject Enrollment
To enter eCRF data for a subject, it has to be created and enrolled for the trial first. When creating probands you need to decide if you are required to collect personal identifiable information (PII). If obligatory, the predefined UI forms presented now should be used instead of defining any related eCRF form fields (eg. person name) on your own. In contrast to eCRFs, the record fields holding PII data are encrypted when persisted. This allows to restrict reading data to site staff only, preventing staff of other sites or even administrators with direct access to the database from viewing a subject’s identity. A proband record without providing any PII is considered as blinded proband in Phoenix CTMS. This means the database will hold data for our form fields only, which can be a regulatory requirement and what we go for in this example.
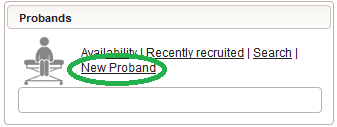
- On the start page, click on the New Proband link to start creating a new subject.
- Another browser tab is opened. Check the Blinded checkbox in order to not provide any PII data fields such as first name, last name or date of birth. A subject Alias (“PAT_01”) can be provided instead as your own anonymous identifier of the person. Without any alias, the numeric Proband ID will be displayed in the UI pages.
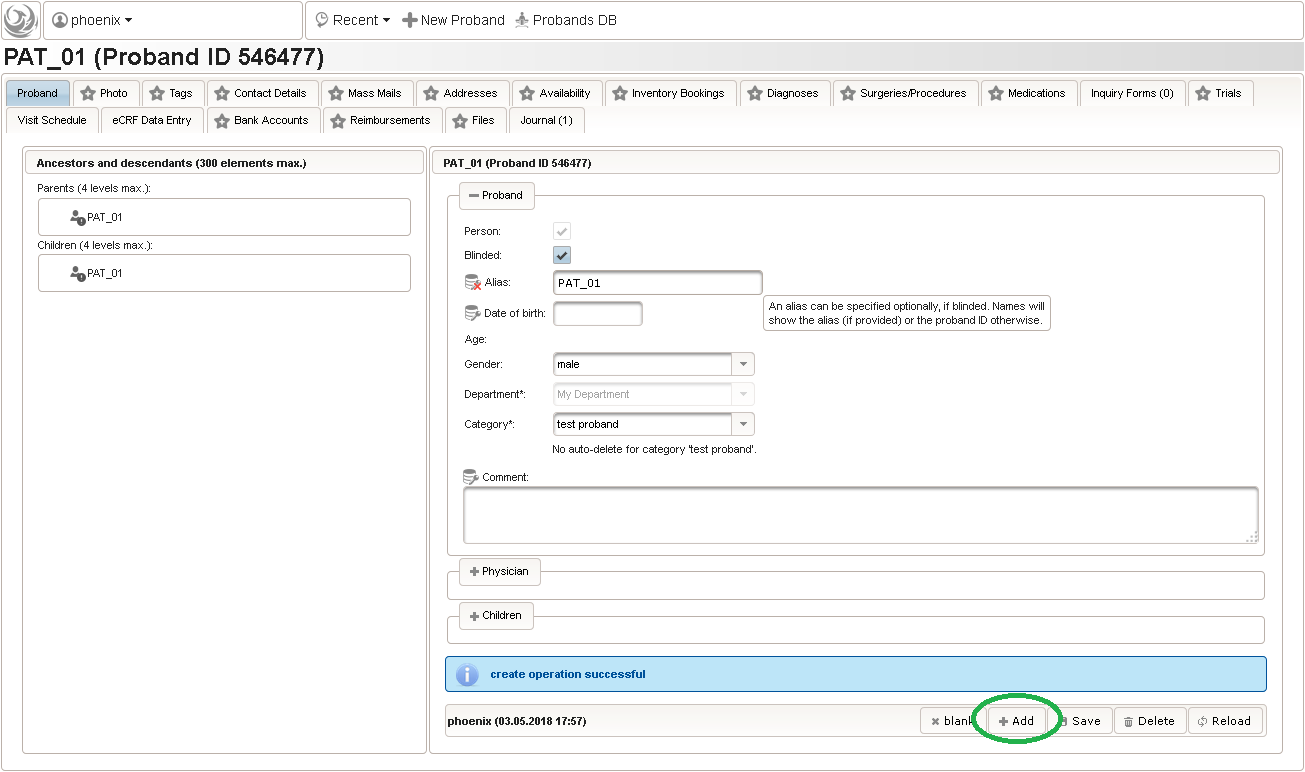
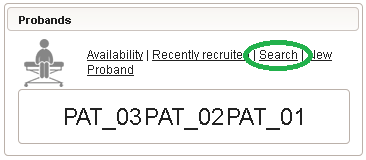
- To create some more test subjects, edit the Alias (eg. “PAT_02”) and click Add again. To view the subjects just created, switch to the browser tab with the start page and click Search from the subject module box to open the subject search.
- The subject query editor is opened in a new browser tab. When doing this for the first time (eg. right after a vanilla installation), there are no search queries defined yet. The most simple search query contains no criteria, which will list all existing subjects. To prepare such once, remove the empty criterion row and click Add after providing a name.
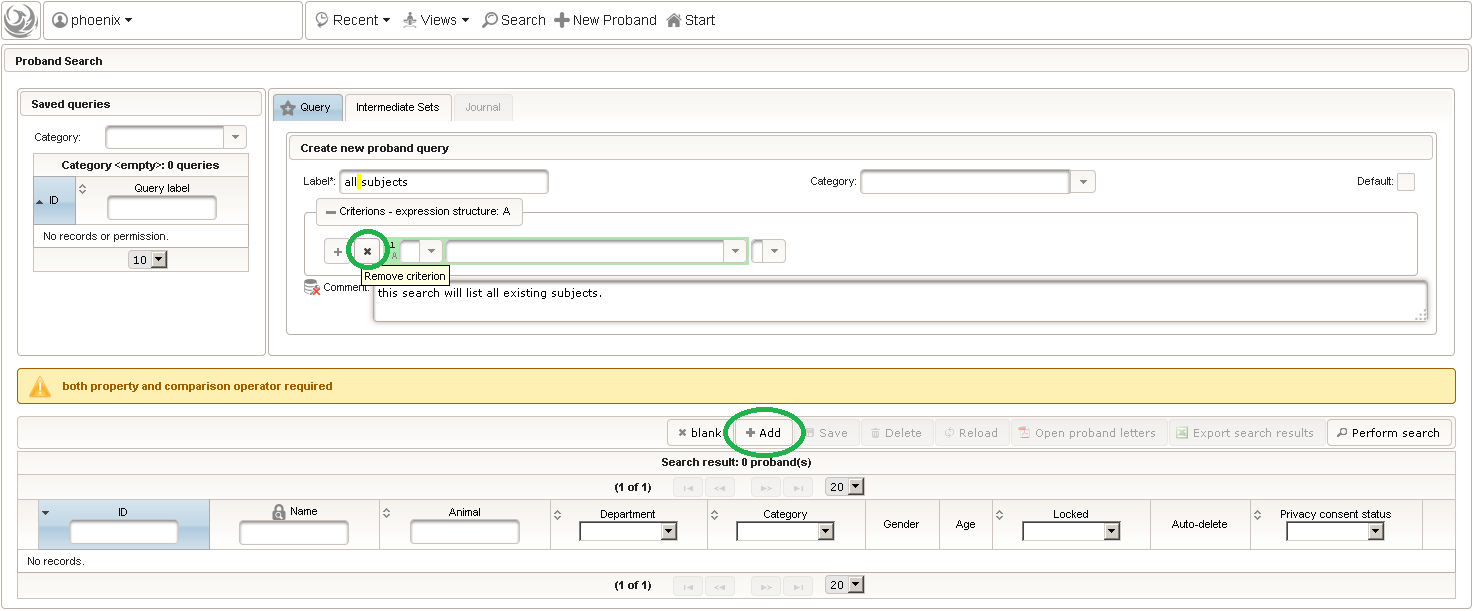
- Now click Perform search to see the search query result list. You can (re-) open a subject in a separate browser tab by clicking the Open Proband button of a row in the result list.

- To literally enroll the created subject for the trial, they simply need to be added to the trial’s Proband List. Therefore, switch back to the browser tab showing our trial. In case you closed it meanwhile, you can search and open it the same way using the trial Search as described for subjects before, or click the trial name in the recently modified items displayed in the trial module box on the start page.
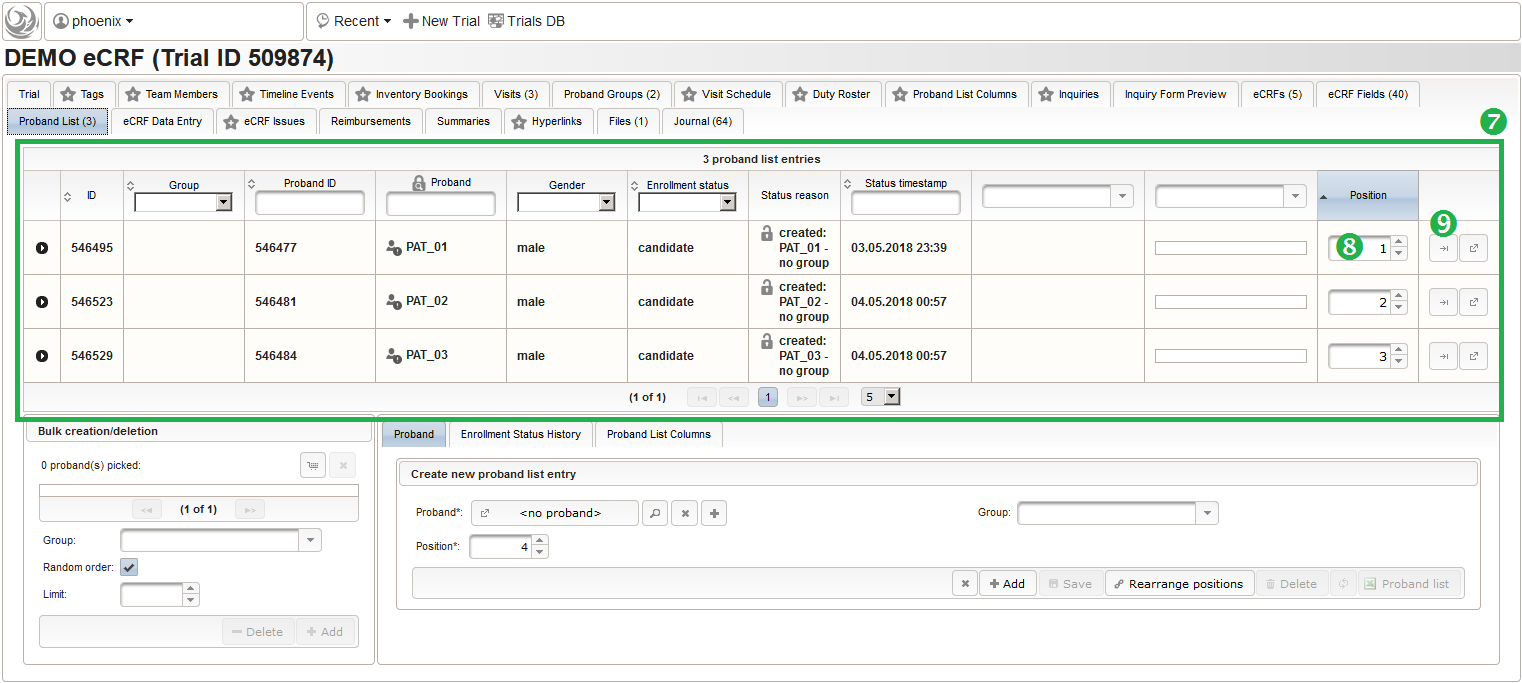
- After switching to the trial’s Proband List tab, click the shopping cart icon (1) in order to pick one or more subjects to add. It will open a pop-up browser window to search and select from the existing subjects matching an ad-hoc or Saved queries (2). Use the Pick button (3) of a result row to select a certain subject, or the Page Picker button (4) to pick all the subjects visible on the current result page. The picked subjects are appended to the intermediate list below the shopping cart button, which can be shuffled and truncated to a given limit (5). The Add button (6) is then used to finally save the chunk of subjects to to the trial’s subject list, which is shown in the datatable above (7).
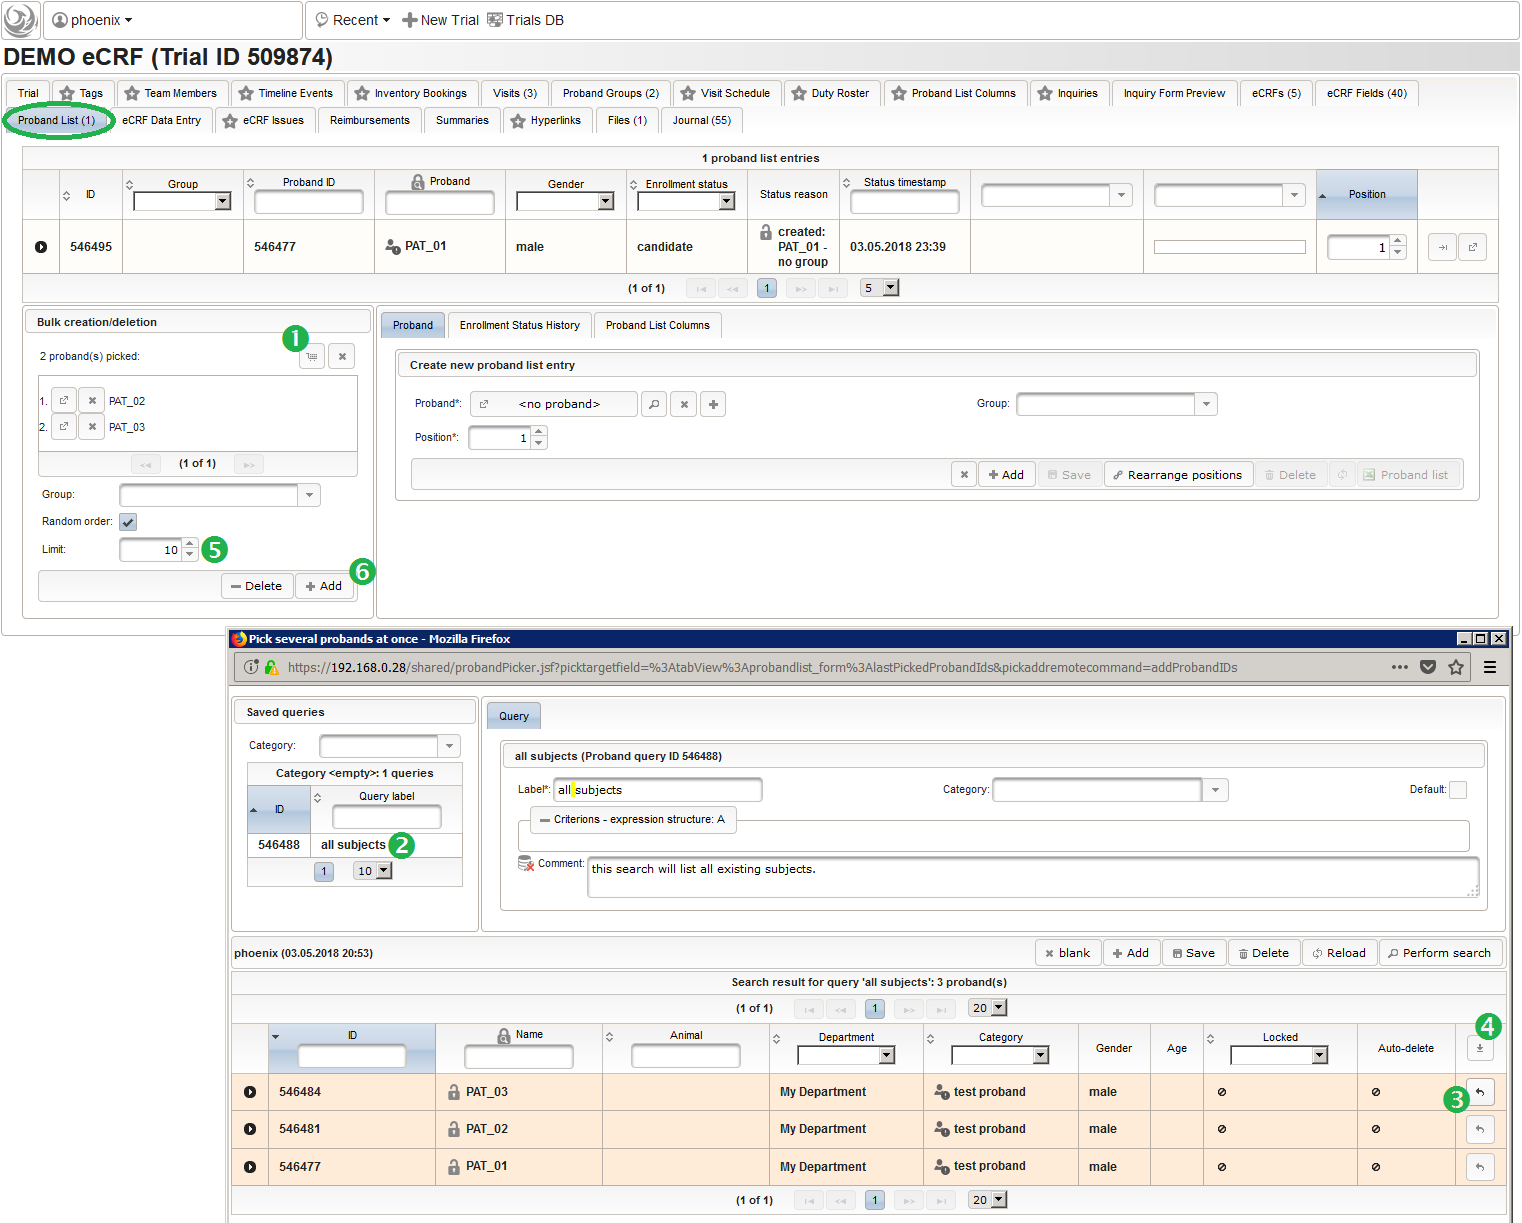
- It is not possible to (accidentially) add the same subject twice. Note that the subjects are not assigned to any of our two subject groups yet. The Enrollment Status starts with candidate and allows to track the recruitment an overall progress, which we don’t cover in more detail in this tutorial. It is possible to configure an eCRF eg. to switch the subject to a drop-out or completed enrollment state when that eCRF is done. The proband list is ordered and each subject therefore has a Position field (8). Since our screening visit eCRF has a subject ID field that uses form scripting to derive the value from this proband list entry position, these positions hould be aligend and kept once set. You can easily arrange subject list entries to a desired position using the Move To button (9).
Form Data Entry
So far a few sample subjects were created and enrolled, for which we now can start filling in the prepared eCRFs. This is covered in the eCRF Data Entry tab, which can be found in both the trial’s tab view and an enrolled subject’s tab view.
- On top, the trial’s eCRF Data Entry tab shows the subject list for browsing the enrolled subject that were added in the previous steps. Click a row (1) to see the eCRF forms available for that subject in the lower datatable. Since the subjects are not assigned to a proband group yet, all Displayed eCRFs will be listed (plus hidden ones, that already contain entered data).
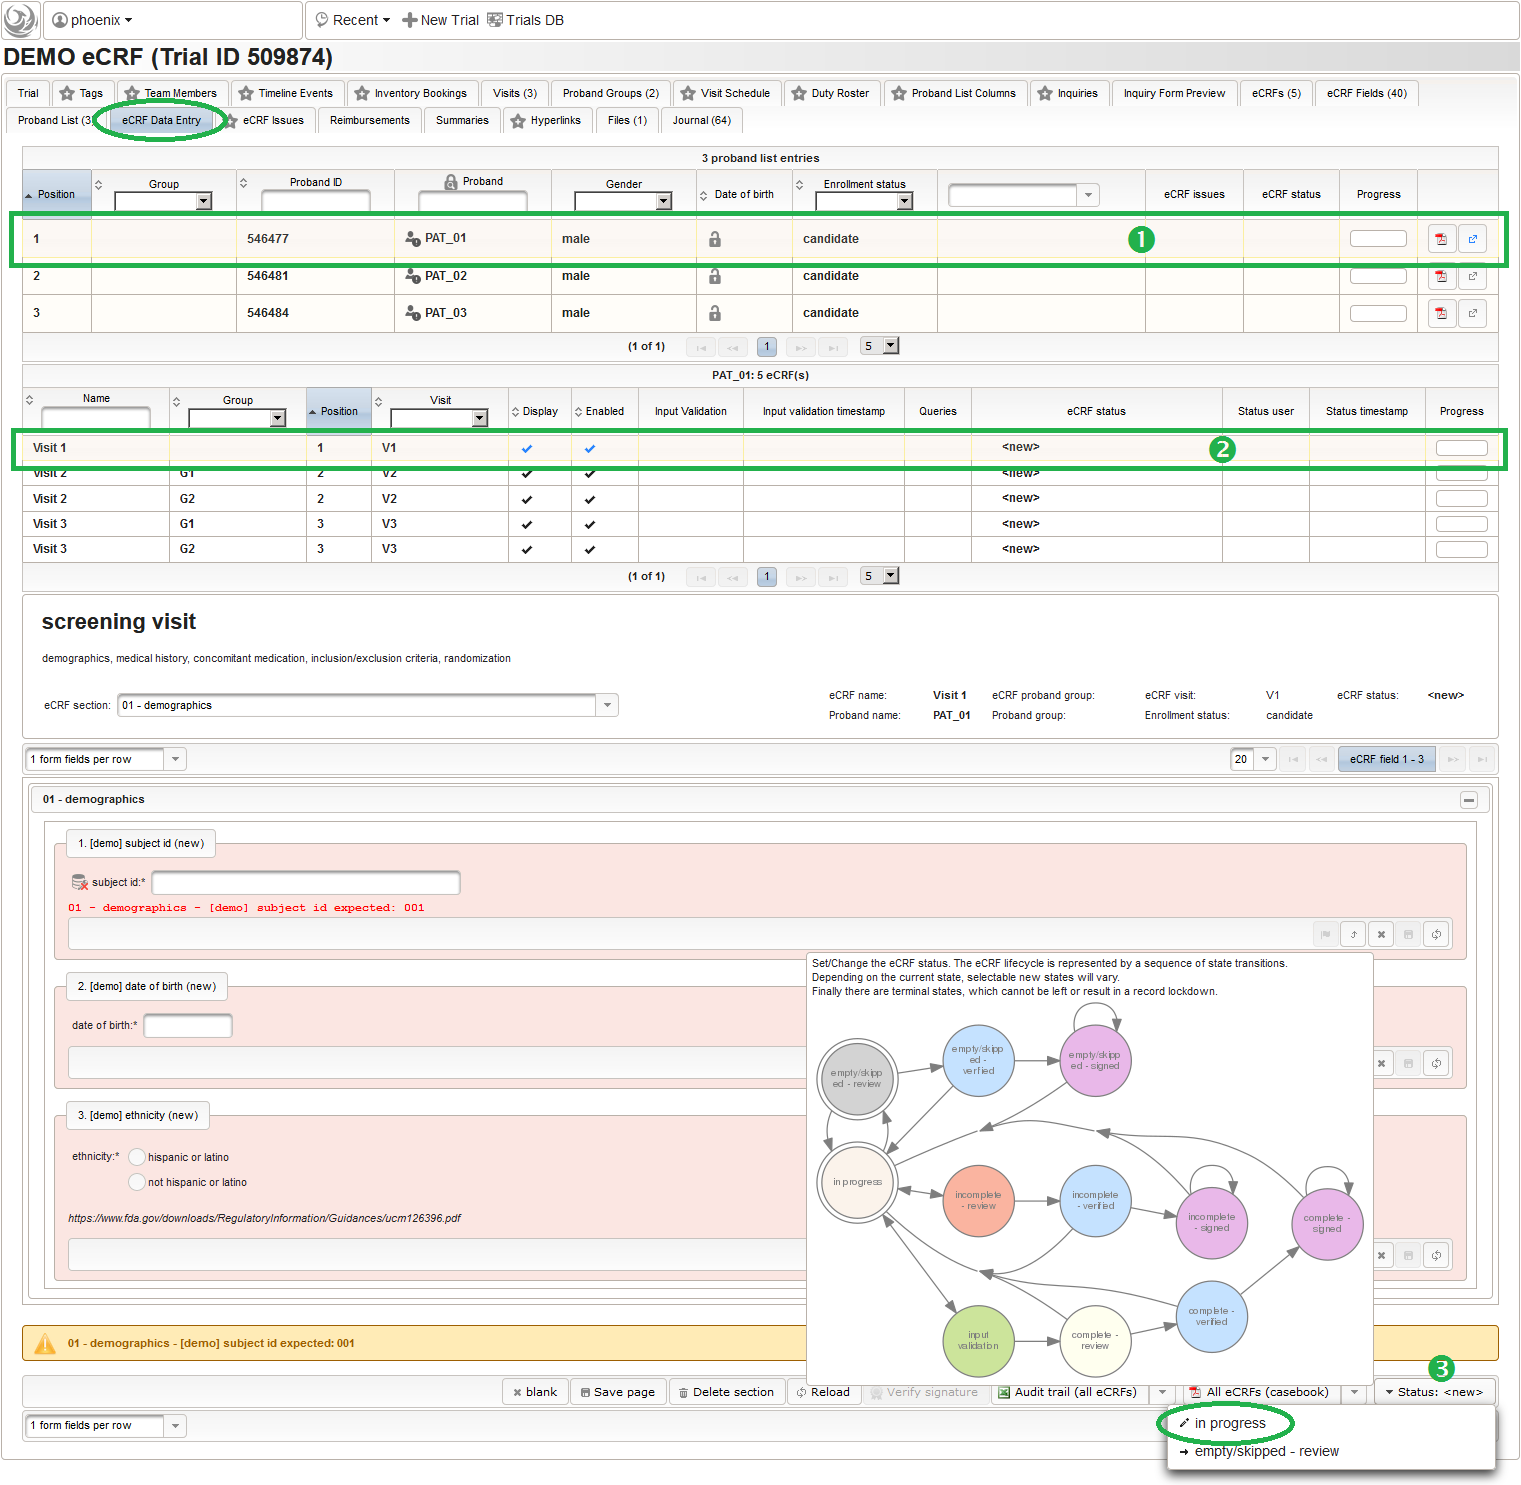
- After clicking a row (2) in the list of available eCRFs, the eCRF input form UI is presented in the lower area of the screen. The data entry and verification workflow are fundamentally controlled by the Status of the eCRF, starting with <new> (no status yet). Although the system is entirely safe regarding concurrent operations (ie. when multiple users are working on the same eCRF) by means of optimistic locking, it is usually preferred to have staff working on separate eCRFs at a time. Optimistic locking (aka record versioning) allows to prevent a user from overwriting intermediate changes by presenting an error message, if the record he is trying to save was saved by someone else meanwhile. To avoid such situations, other users are ought to grab only eCRFs for data entry that are not being worked on by someone else yet. Therefore, the eCRF status is set to in progress using the Status drop-down button (3). This will automatically happen when saving an eCRF’s form page for the first time.
Before starting with filling in data, you now might want to explore the actual appearance of the available eCRFs. The input form features and controls are explained in detail in the next part.
Input Form UI
Navigation and Form layout
The eCRF input forms can be navigated by their section using the Section drop-down. It displays the progress per section and the respective number of queries by their status using colored flag icons.
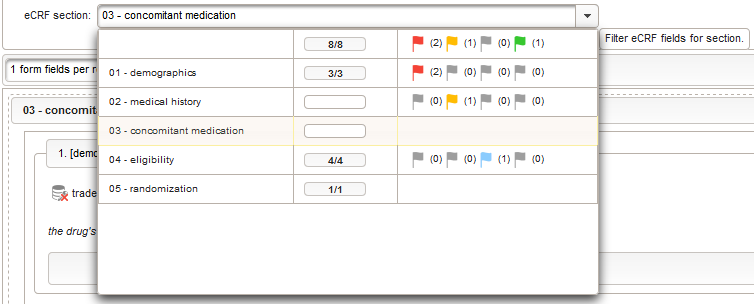
| flag icon color | the trailing number in paranthesis shows the number of queries with a status of |
|---|---|
| new query | |
| query update | |
| proposed resulution for query | |
| query done |
The input form is essentially a list of input elements. It therefore can be paginated (1), allowing acceptable response times even with hundreds of form fields. You can adjust the form layout regarding the number of fields display in a row (2) and the number of fields of a page (3).
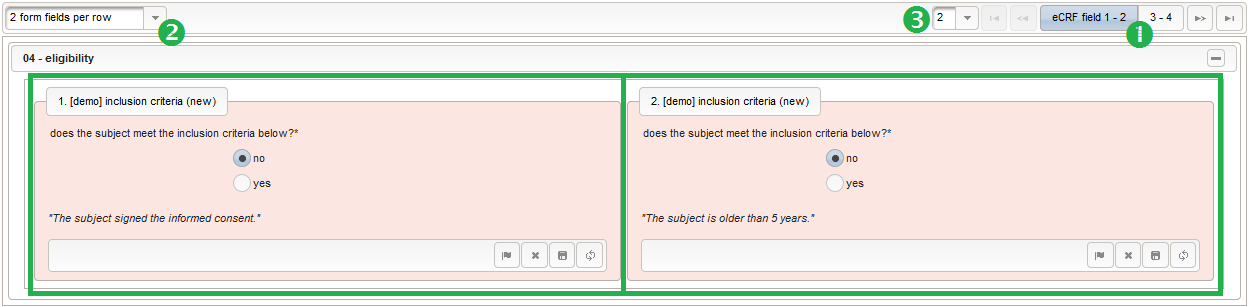
Input fields belonging to a section are enclosed in a collapsible panel area. Series sections are highlighted by dashed borders (4). A series section allows to repeat entering the section’s form field values as needed, producing additional section panels with incremented index (starting from 0).

Typing in Values
When typing in values into form fields that have output expressions defined, the fields’ output areas below the input elements are refreshed as-you-type. Output messages with red background or foreground color will raise a query when switching to the input validation eCRF state. The Apply calculated value button is visible for fields that have a value expression defined and will copy over the expected (calculated) value into the field input element. As a result, the entered value will match the calculated value, and the output message text (if any) turns green, hence no query will be produced later on.
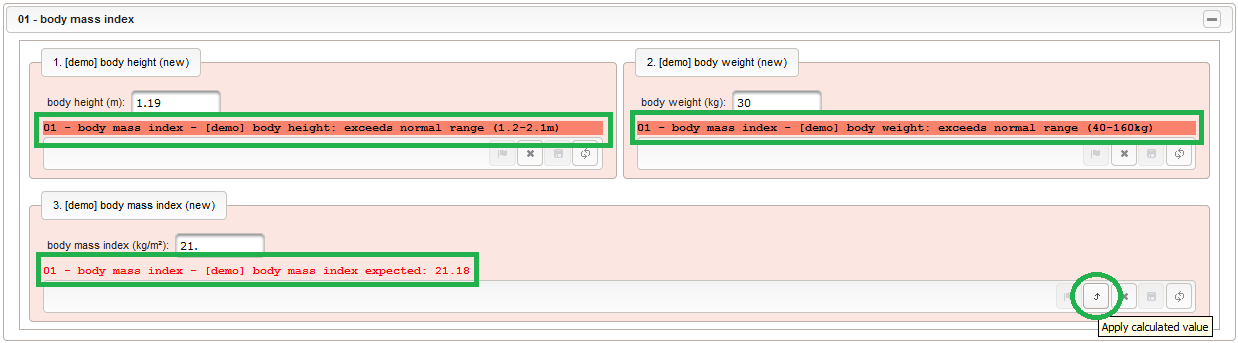
Saving Values
Entered values must be saved manually, by explicitly pressing a save button before any navigation activity or before you close the browser window. It is possible to either save a single form field value (5) or the whole visible page (6). The record version is incremented with each save operation, no matter if the value differs from the old one or not. It therefore is recommended to save page-wise when filling in initially, but save single values when modifying odd values afterwards. To save an additional series section index, the Save new index section has to be used (7). While a series section index cannot be removed explicitly, the Delete section button allows to reset by deleting any of the series section values stored (after confirmation). If an input field has a range (min/max value, string format, …) defined, it is impossible to save a value violating the range. In this case the predefined validation error message will be displayed next to the input elements when trying to save (8). The same happens for mandatory fields when trying to save them without any value entered (9). A mandatory field is denoted by an input prompt label ending with a * symbol. The eCRF status cannot be switched to complete unless there is a saved value present for any mandatory field – you will be forced to use the alternative eCRF states (incomplete, empty) in this case.
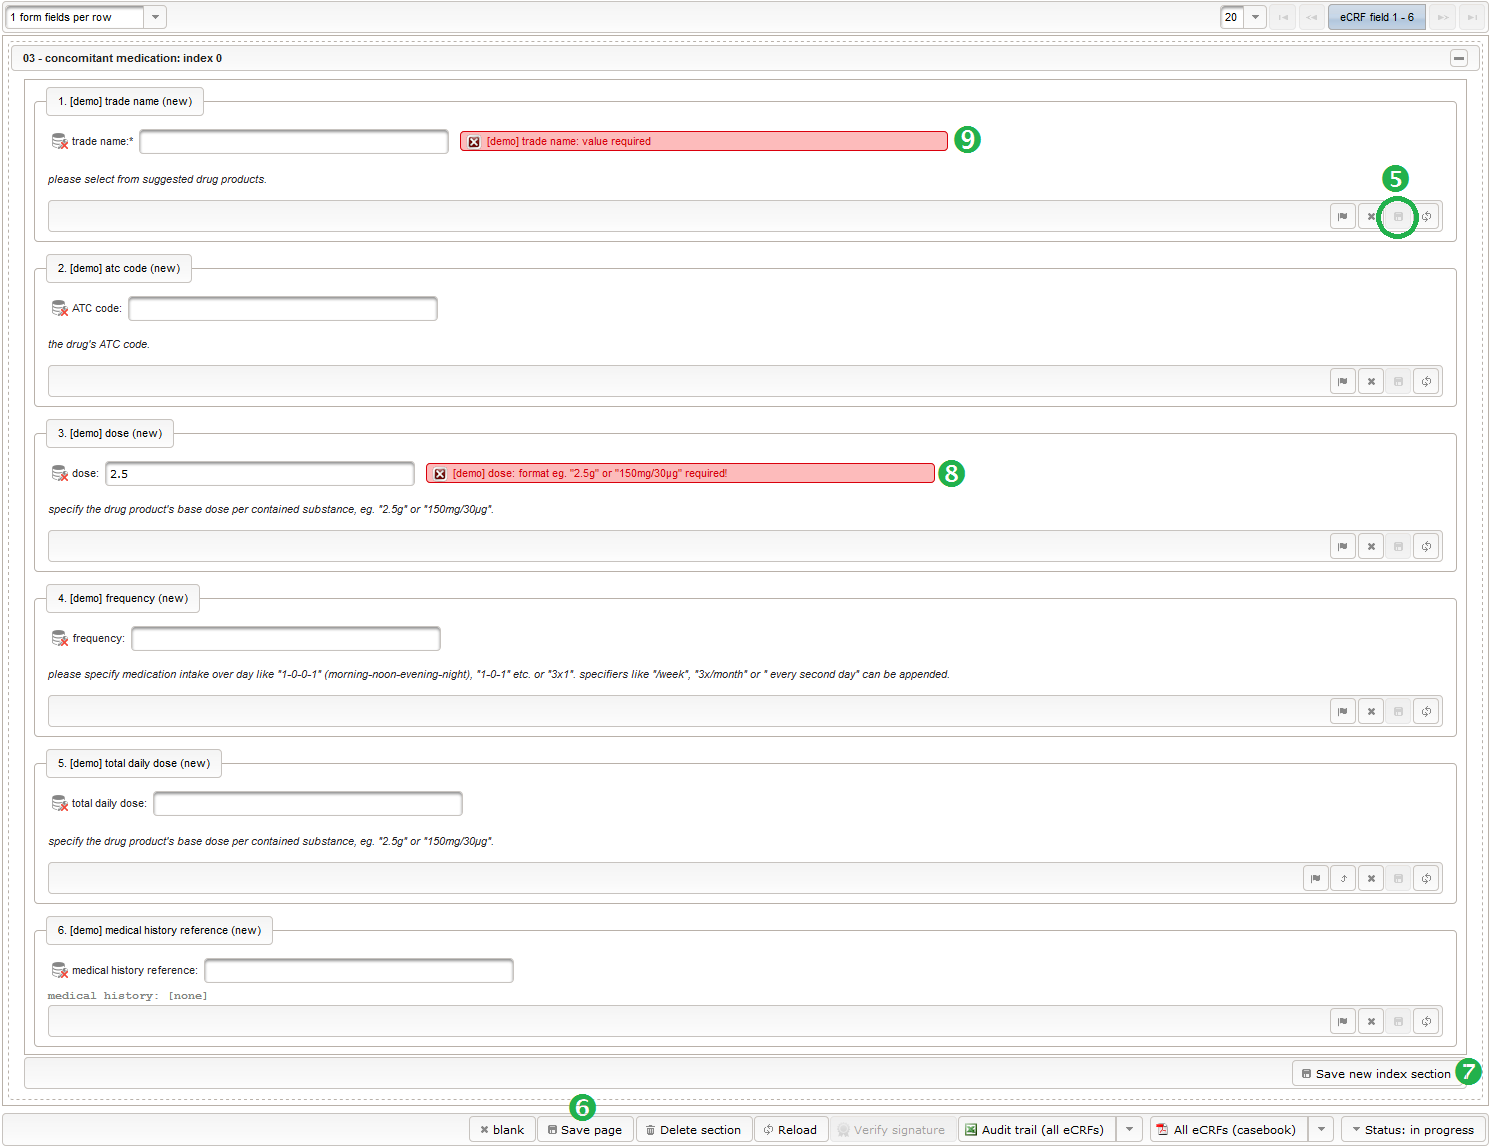
A form field’s background color indicates if a value has been saved yet or the status of present queries regarding the field.
| background color | indication |
|---|---|
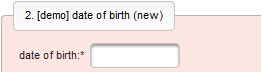 | no value exists yet |
 | no value exists yet (next series section index) |
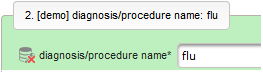 | value exists (the green tone turns more intense, the more often the field was saved) |
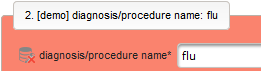 | new query raised |
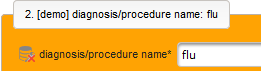 | query update |
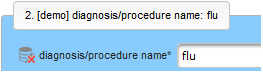 | proposed resulution for query |
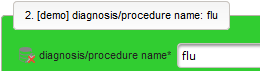 | query done (data was corrected) |
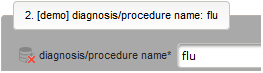 | query done (data n/a) |
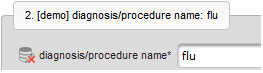 | query done (closed for other reason) |
Input elements get disabled once the eCRF was switched to a review state, so the value is fixed and can’t be re-saved any more. It however can can be unlocked for editing again by raising a query (flag icon button). In a review eCRF state state, saving a field value requires to provide a Reason for change (wether the value changed or not), if Audit trail is enabled for the field.

Data Entry – V1
After we got to know the basic usage of the data entry form UI, we are ready for entering data from the screening visit (V1) of our first test proband.
- Starting with the “01 – demographics” section, you can press the Apply calculated value button of the subject id field to get the expected subject id pasted automatically (1). Presuming your selected subject has a proband list entry position of 1, it will show up as three-digit string “001”. Next, pick a date of birth not too long ago (2), to intentionally produce the edit check message shown which we will later use when demonstrating the query resolution workflow. After setting a radio button group such as used for the ethnicity field (3), you can reset it only using the field’s x button. Finally, press the Save page button to persist the three field values entered.
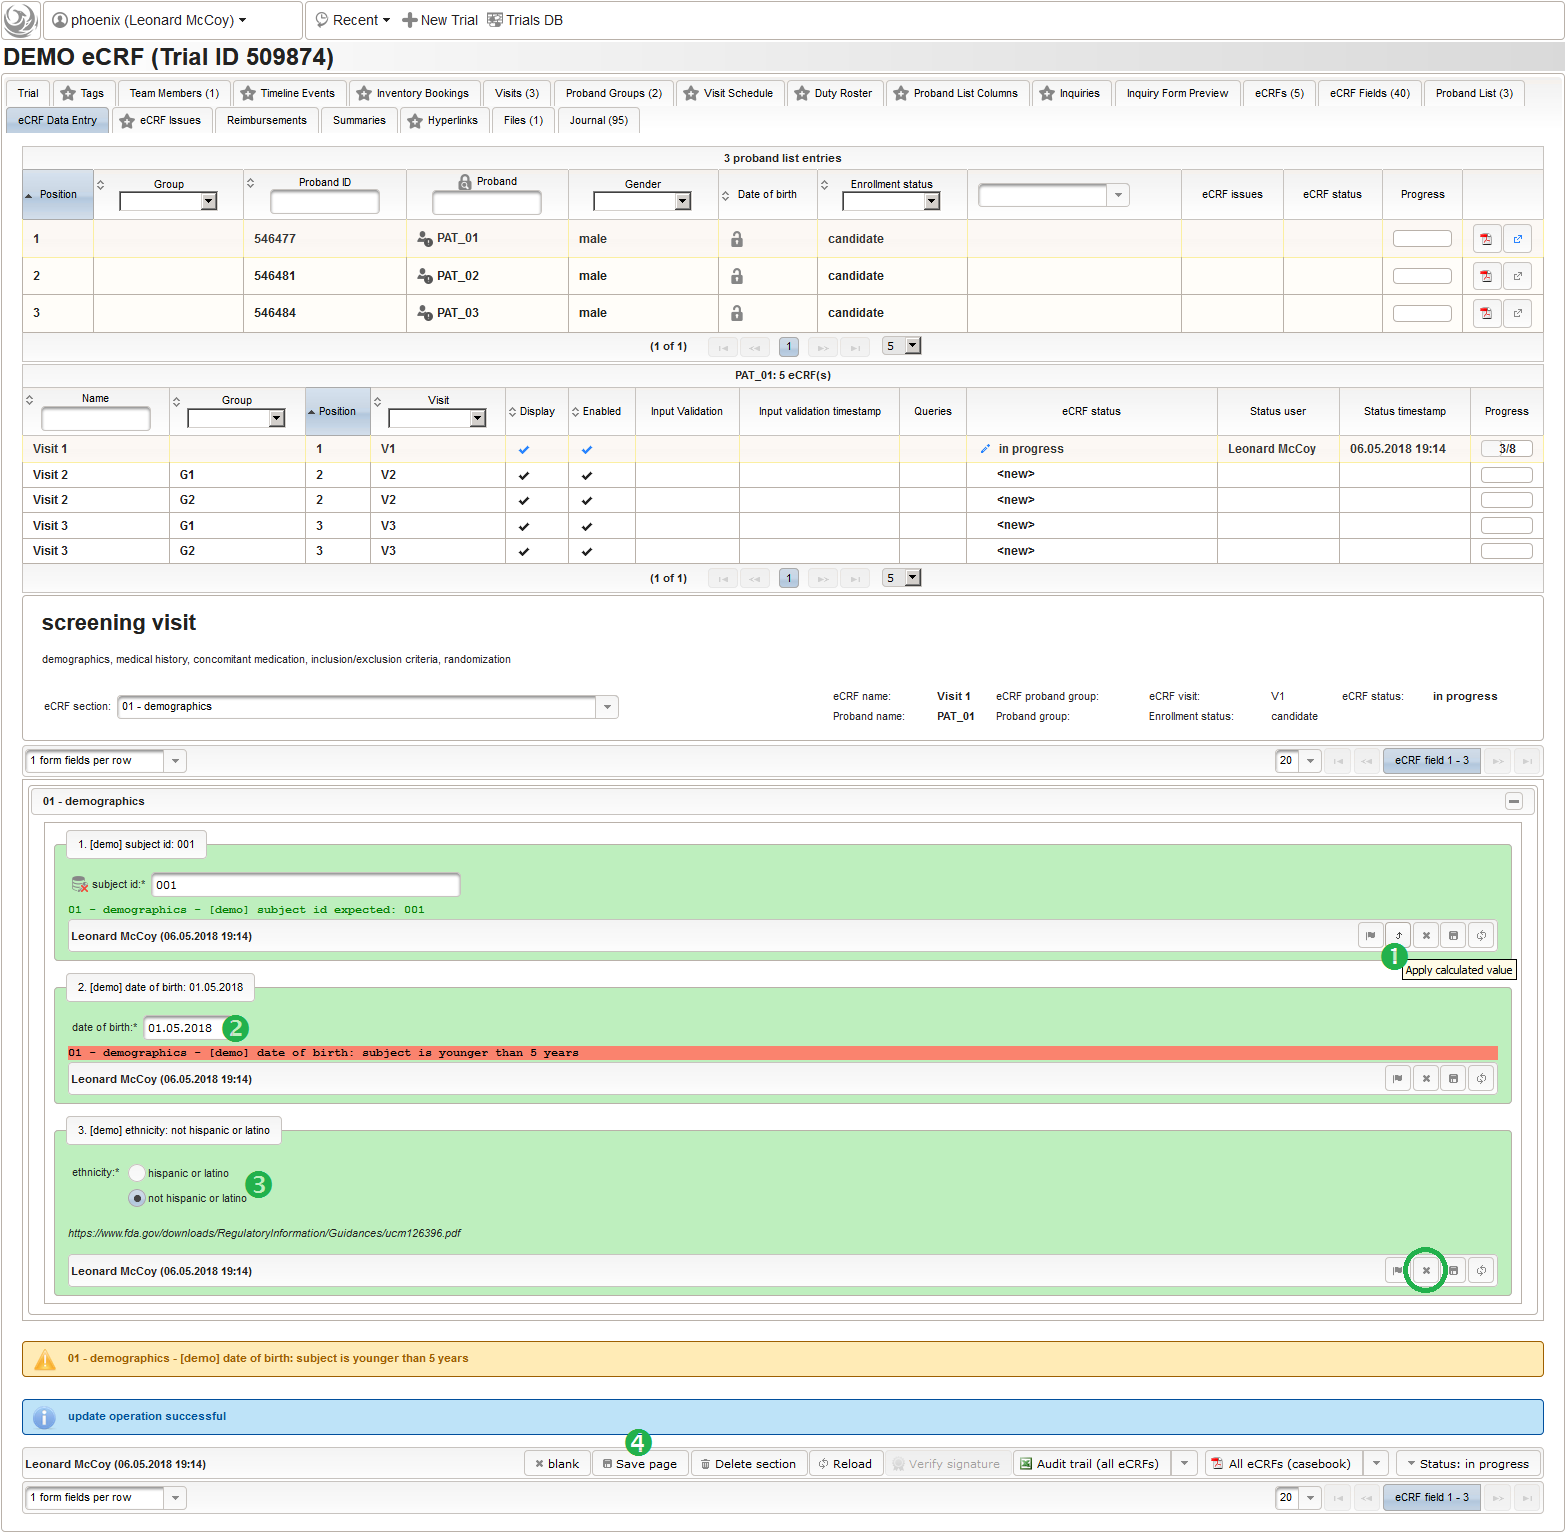
- Next, switch the eCRF section dropdown to section “02 – medical history” (1) to start entering the first (hypertension) of our three diagnosis/procedure entries (hypertension, appendectomy, flu). Select diagnosis to use the ICD-10 catalogue for looking up “hypertension” (2). The appearing dropdown will narrow down listed suggestions while typing. When clicking the proper match (3), the ICD-10 code will be pasted automatically (4). In our example, the manifestation of the hypertension was noted as “2009”, hence the partial date of the onset date can be entered with Not Known day and month parts (5). The preset value of the ongoing field is checked (6), so it can be left as-is. According to the implemented edit check, the stop date has to be left empty subsequentially, to not produce a edit check message. The dashed UI panel borders reminds that this is an index section, so the Save new index section button (7) has to be used to save the fields with white background. The fields’ background turns green, indicating the values for the first index 0 of “02 – medical history” were sucessfully added. At the same time a fresh blank section panel will appear, ready for entering diagnosis/procedure data of the next index 1.
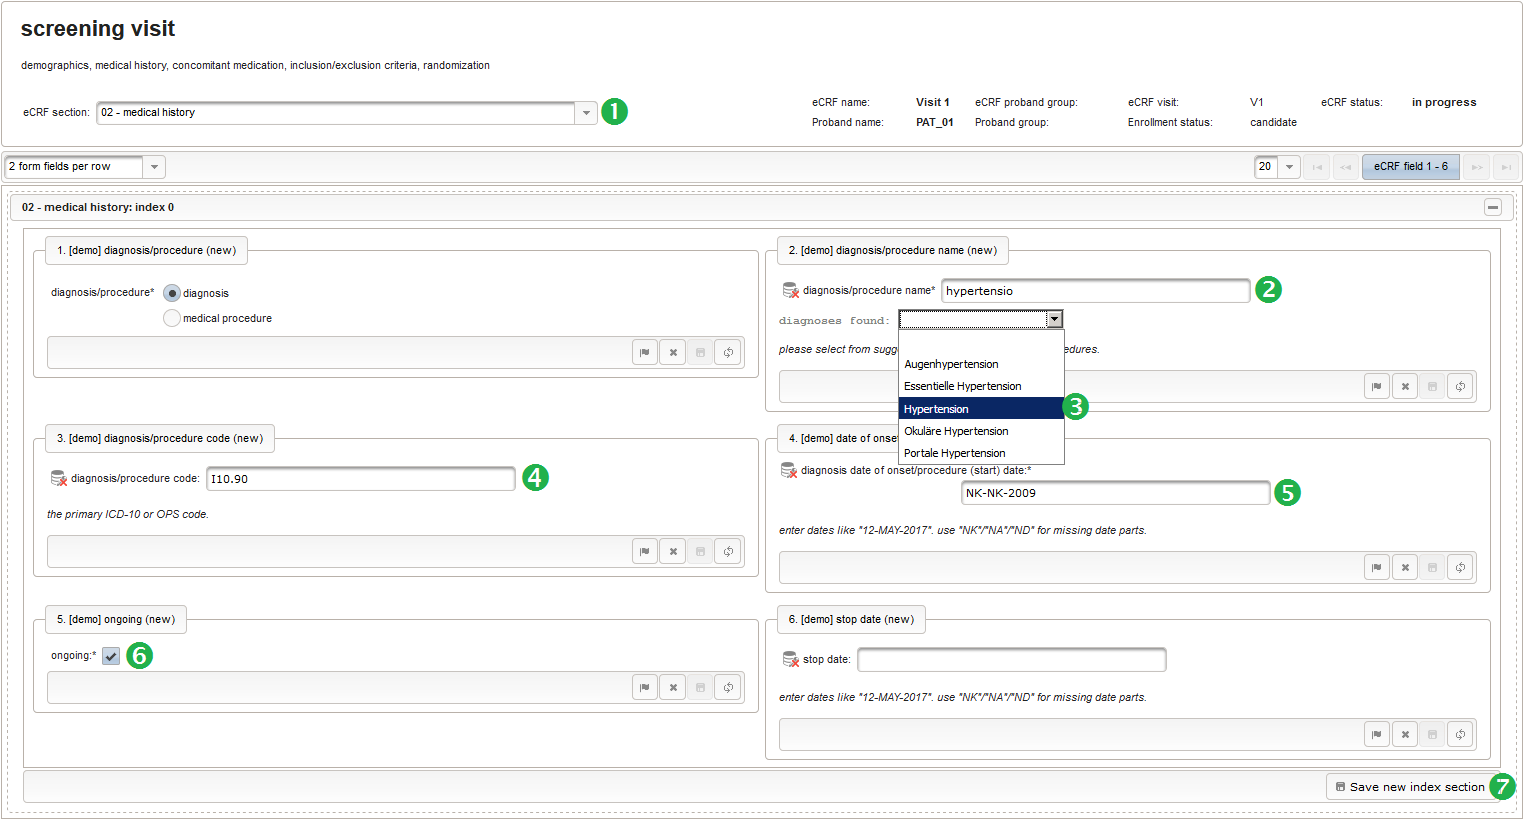
- The second medical history record (“02 – medical history” index 1) will be the appendectomy, which is a medical procedure rather than a diagnosis (1). When searching the OPS catalogue (2), it suggests a multitude of variants but no straight “Appendektomie”. We therefore want to raise a query to get help from the monitor or investigator. The dialog to enter the manual query is opened when pressing the flag button (3). The question is entered in the Comment field and saved by pressing the Add button in the dialog, after which the field’s background turns red to indicate the existence of a query in new query state. The surgery was performed in June 1999, so the day part is Not Known only for the procedure (start) partial date (4). As this procedure is a one-time event, ongoing is reverted to un-checked. While for diagnoses a stop date would be expected in this case, the implemented edit check accepts an empty value (6). So we are ready to save (7) for now, to make the section index “02 – medical history: index 1” permanent. Again, a fresh blank section panel will appear, ready for entering diagnosis/procedure data of the next index 2.
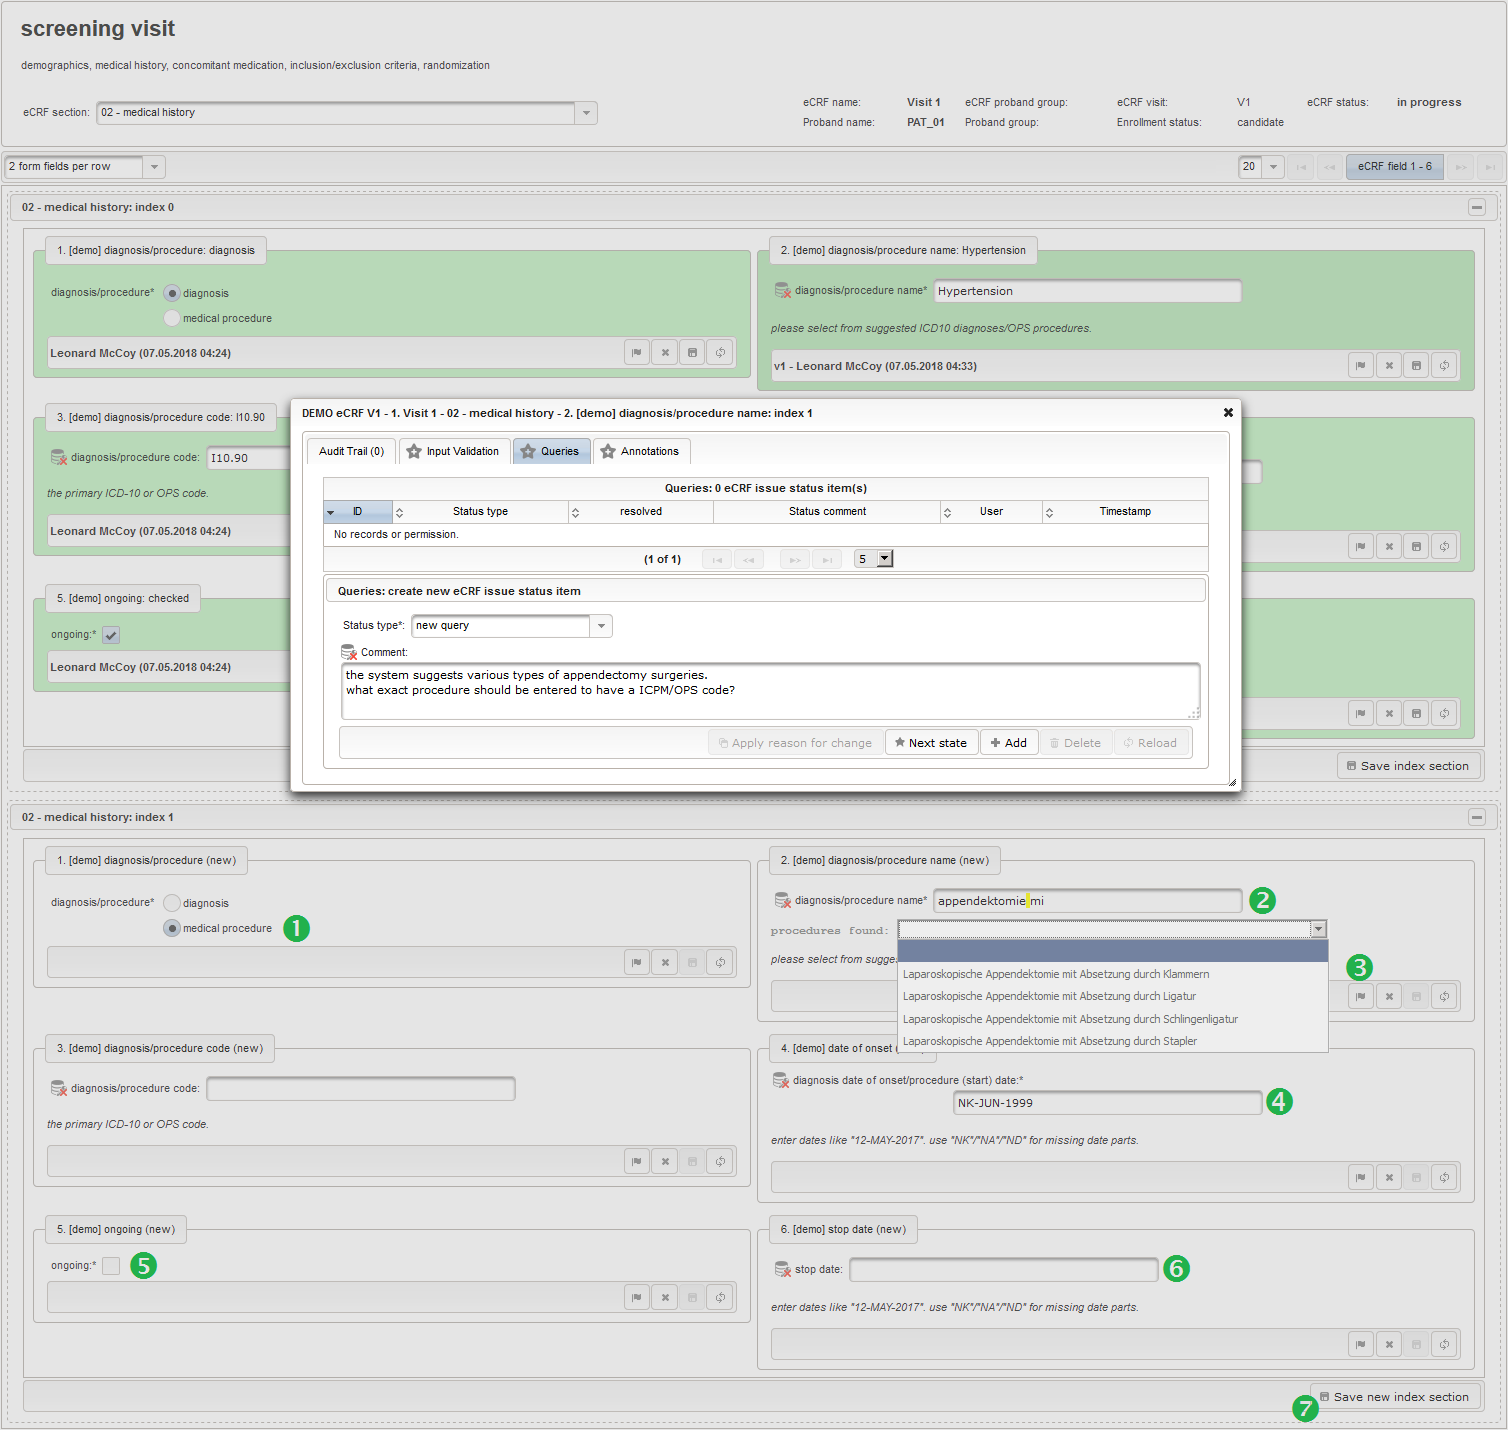
- The last diagnosis to provide for the medical history is the flu, for which we start over in the new section index (“02 – medical history” index 2) with the white field backgrounds. After switching to ICD-10 by selecting diagnosis (1), a direct hit can be found when searching for the german term “grippaler Infekt” (2). Again the ICD-10 diagnosis code is populated (4) when clicking the item from teh suggestion dropdown (3). This time the patient remembered the exact period of the illness, so the partial date values of the onset date (5) and stop date (7) show full dates. The entry is persisted by clicking Save new index section as usual, and entering the medical history is complete, ending up with a total of three series section indexes (0, 1 and 2) and one query regarding coding for later resolution.
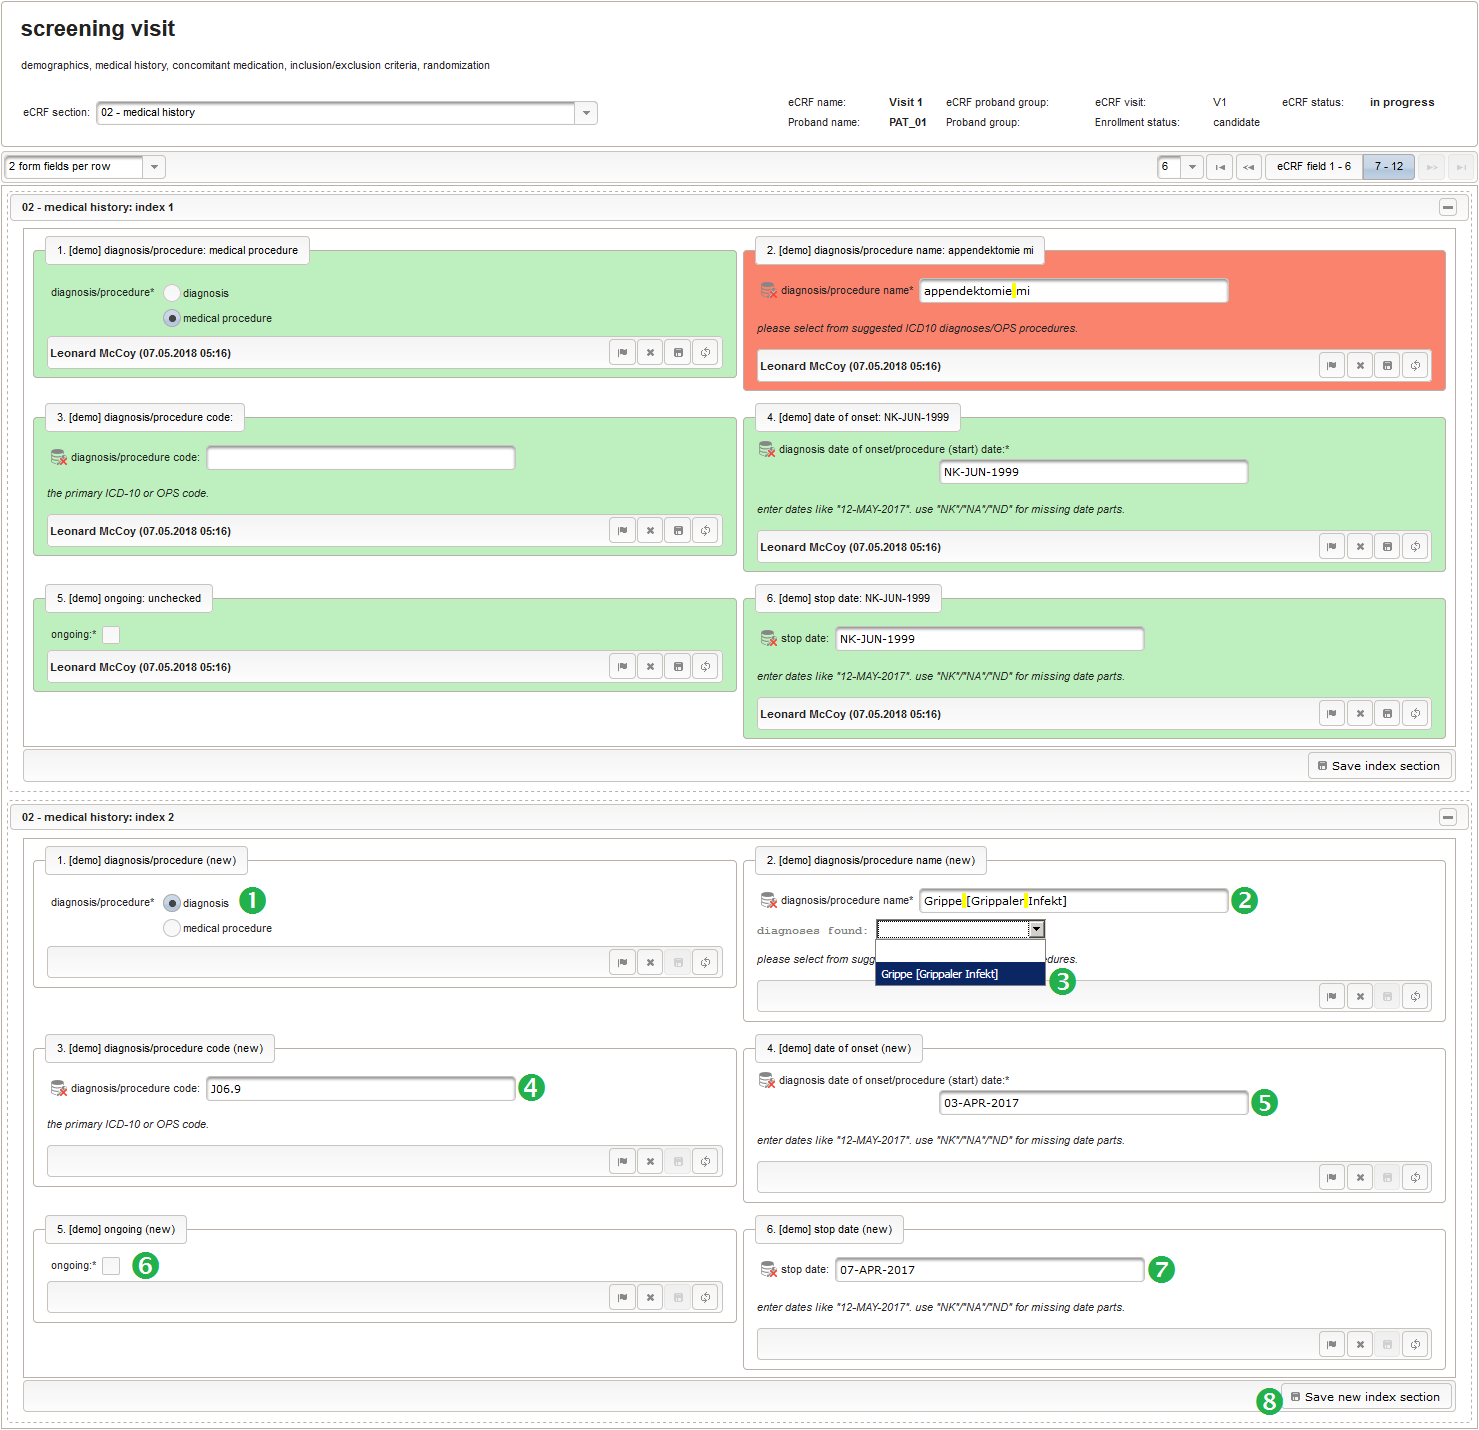
- In the next step we switch to the subsequent “03 – concomitant medication” index section (1) in order to enter the four concomitant medication records (Beloc, Piperacillin/Tazobactam, Novalgin, Aspirin). The first will be the Beloc antihypertensive, which can be found with different doses (2) of its main substance (metoprololtartrat) in the ATC product catalogue (APS – austrain drug specialities register). After clicking the concrete product (3), the ATC code (4) gets populated. Also, the output area below the dose field will display the drug’s active substance(s) in grey text, for which the base dose is entered (5). After entering the given intake frequency of “1-0-1” – one pill at morning and one in the evening (6), the total daily dose is calculated and can be applied (7). The section index 0 for the hypertension in “02 – medical history” is selected from the dropdown showing all medical history entries (8). Now the data entry of the first concomitant medication is complete and can be saved (9).
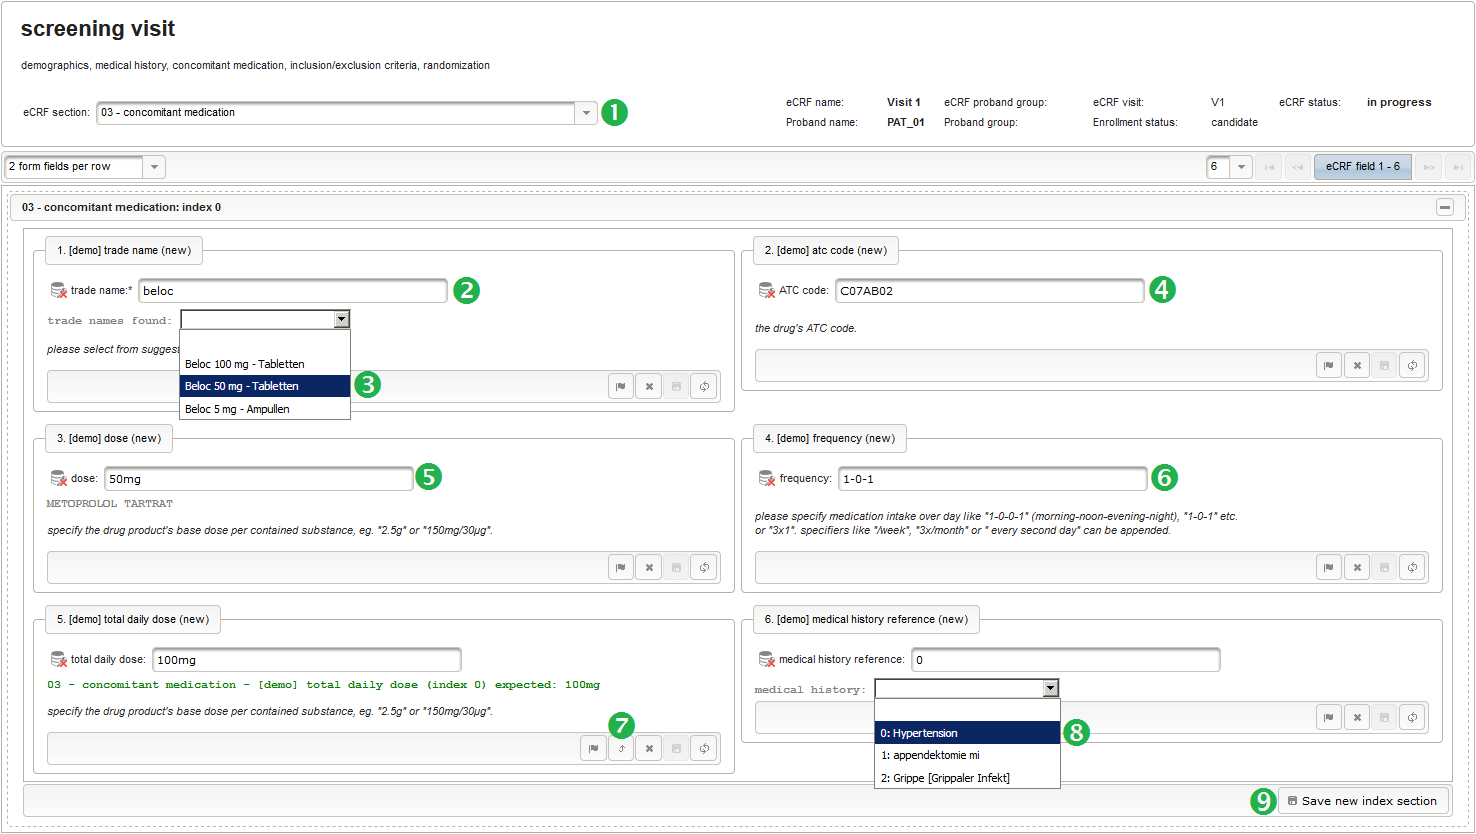
- The next concomitant medication to record is the antibiotics infusion during the appendectomy hospital stay. SQL wildcard characters (“_” for matching any single character, “%” for matching zero or more characters) can be used when searching a catalogue (1). As the product name “Piperacillin/Tazobactam” indicates, there will be two active substances this time and a dose for each is to be considered. According to our demonstrated implementation, the dose string therefore uses a notation to separate each dose by a “/” (3), which gets reflected in the total daily dose calculation (5) accordingly.
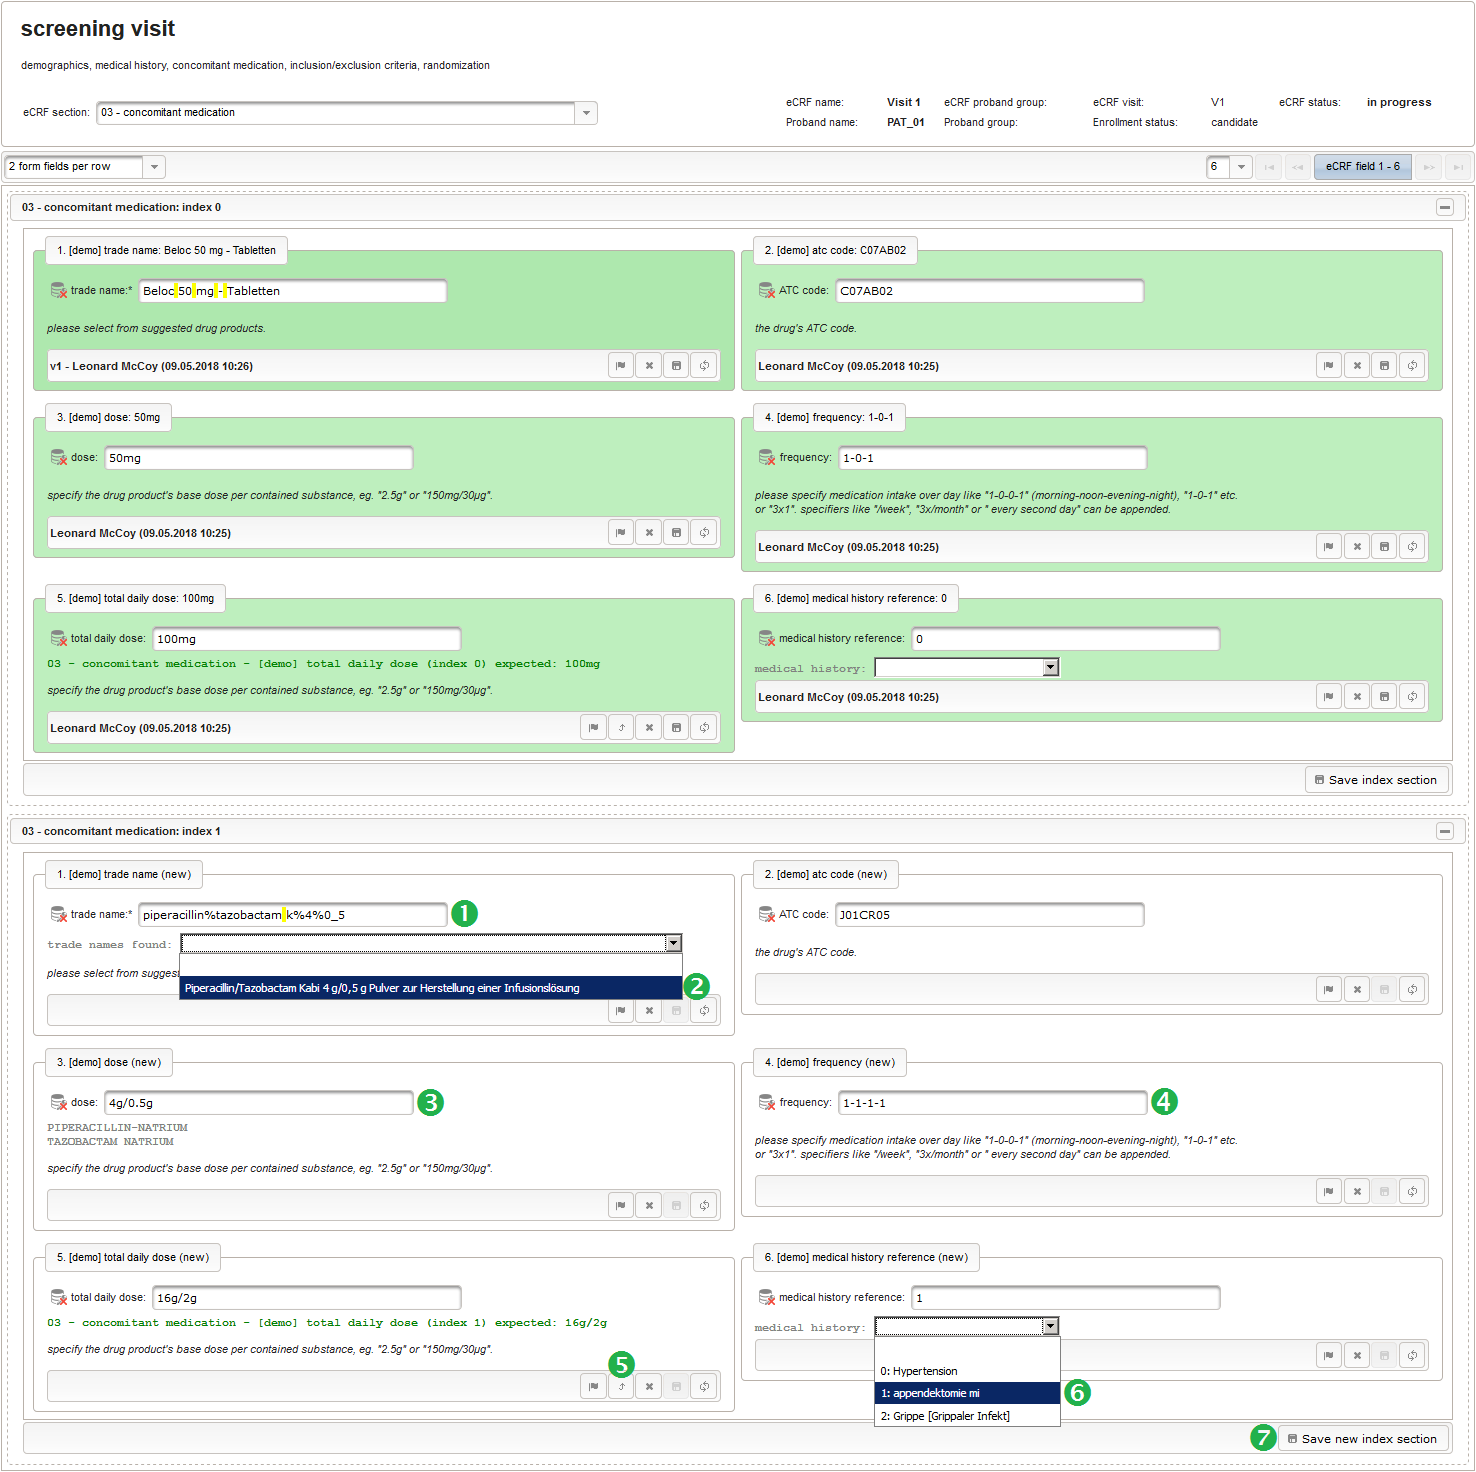
- The second medication in the course of the appendectomy was a painkiller drip. This case demonstrates how the choosen implementation will not restrict the dose unit of measure, so even informal “drops” can be entered (3). However, any entered unit part will also be expected in the calculated total daily dose (5).
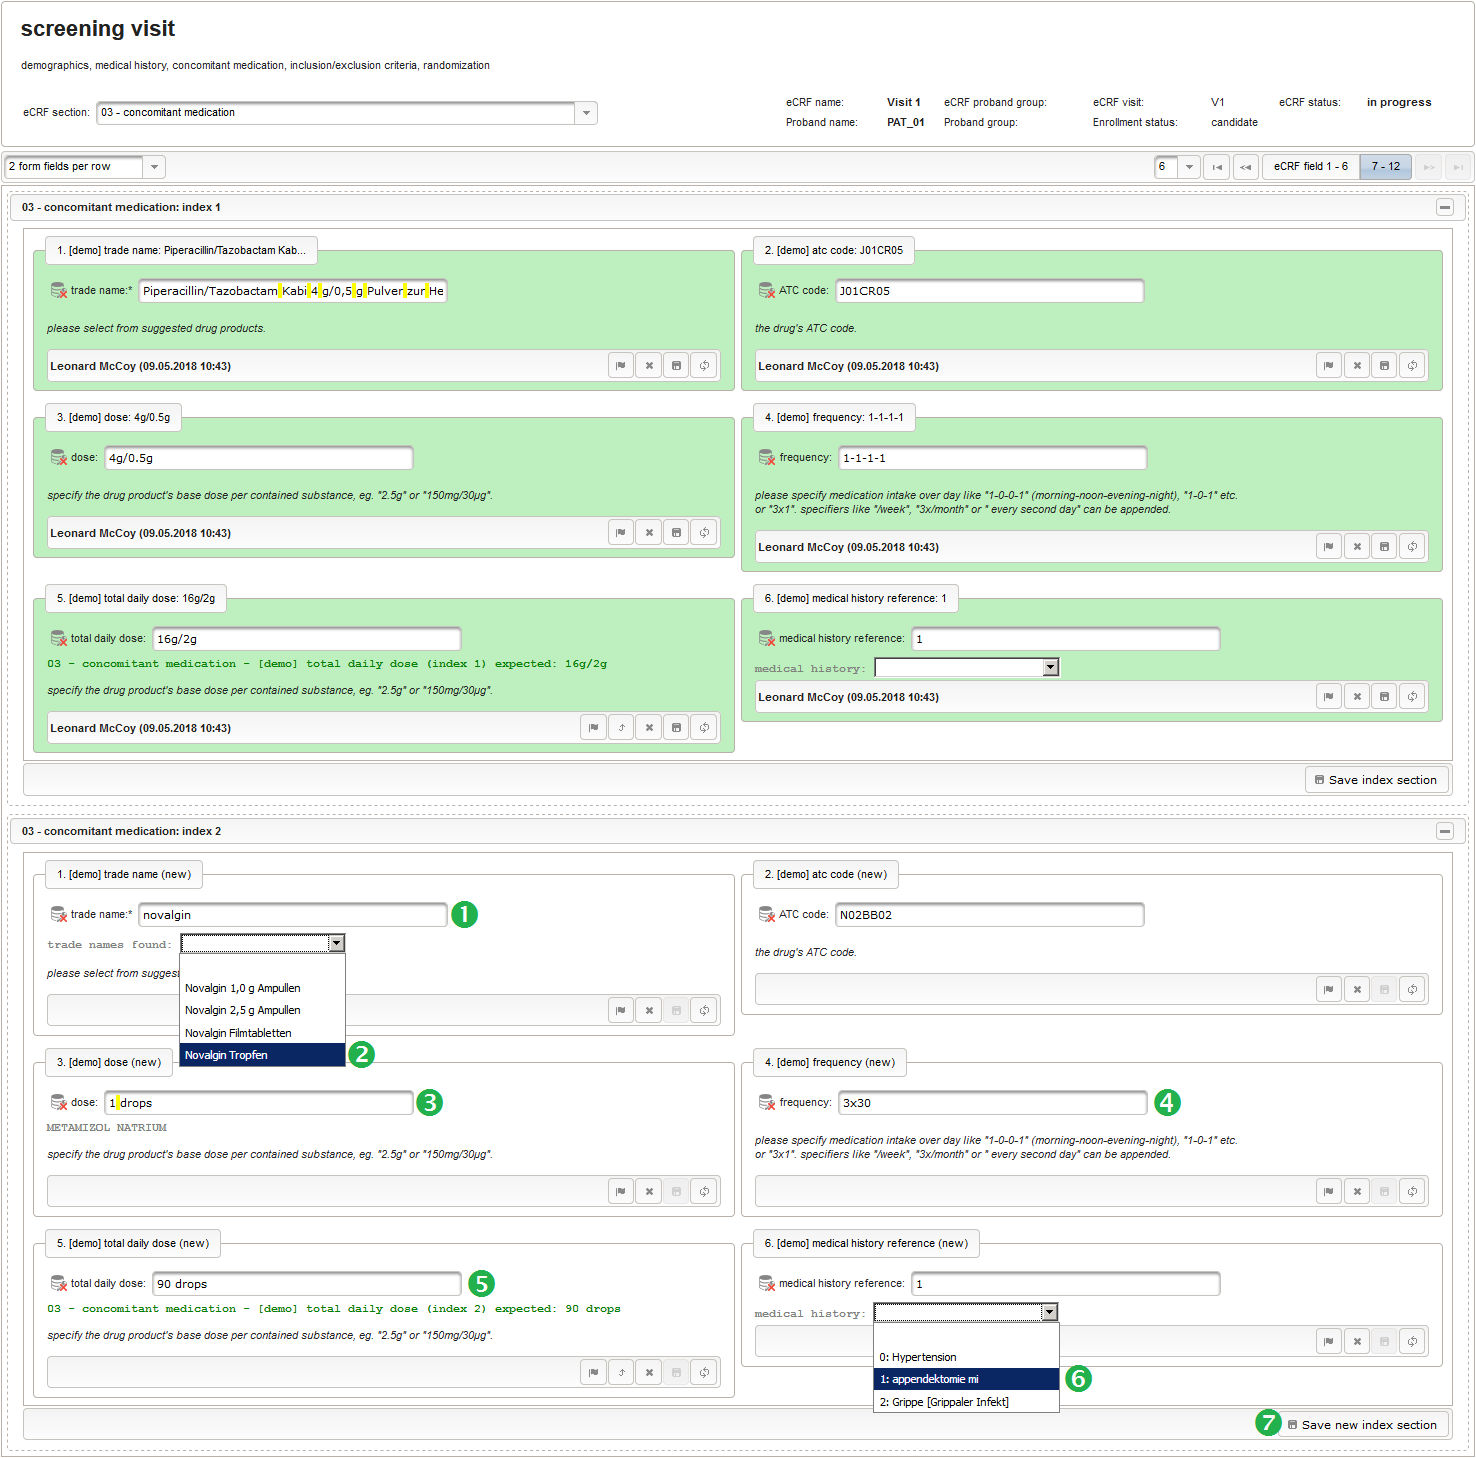
- The last concomitant medication to store is the aspirin taken to treat the flu. After filling in and saving (7), the concomitant medication part is done with a total of four series section indexes (0, 1, 2 and 4) created.
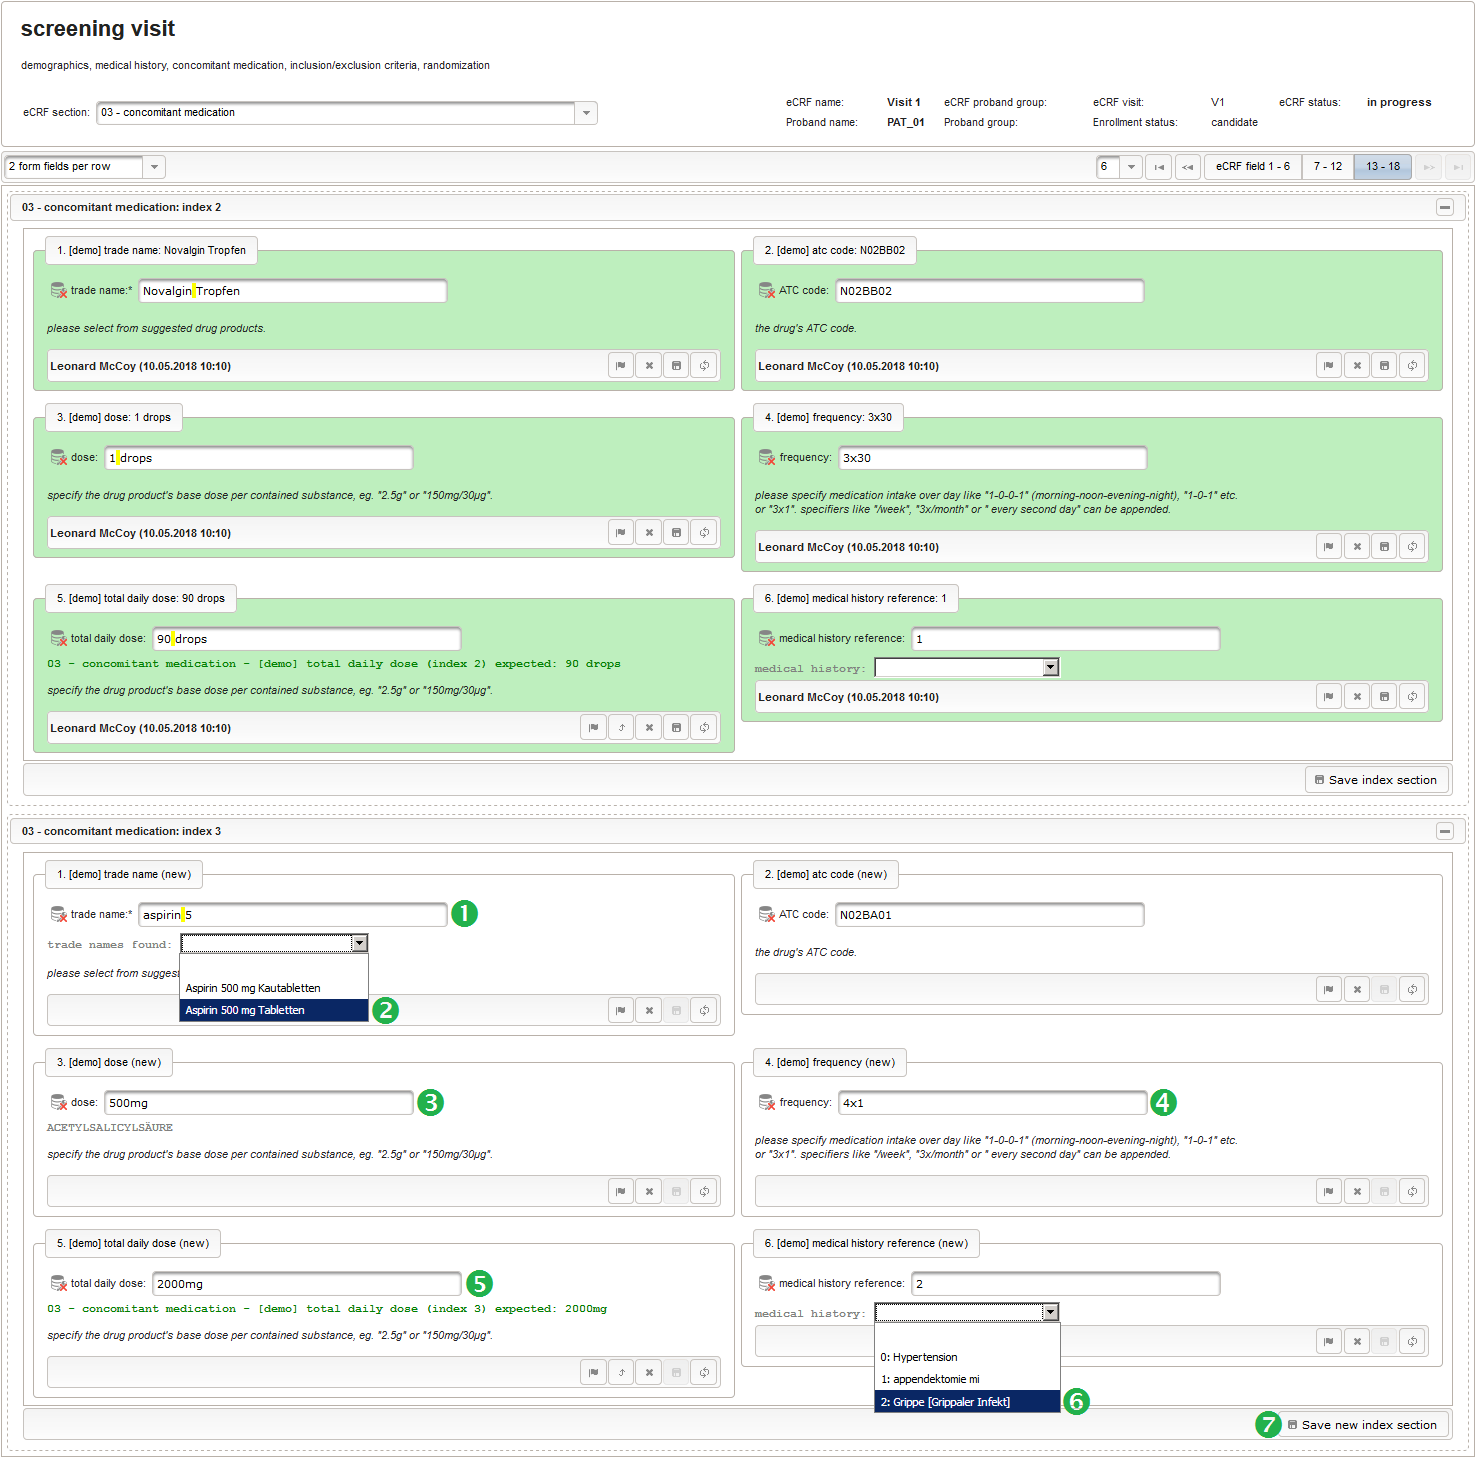
- The next section “04 – eligibility” (1) shows the form to note the inclusion/exclusion criteria (2) and the screening outcome (3). The implemented edit check expects a positive screening result if each inclusion criterion is met and each exclusion criterion is negative. In the example screen below the screening result should be set to screening ok to turn the red message into a green one and not generate a query when switching the eCRF to the input validation status later. The yellow box at the bottom summarizes any such message in the whole eCRF, which also includes those from checks of eCRF sections pending for entry. An example is “apply calculated value to randomize pA = 1/2″ which indicates the expectation of a non-empty randomization result in case of successful screening. This is yet to be entered in the next section “05 – randomization”. As you see, the form logic in our checks relies on calculated values and not the actually entered ones (in the example, the randomization is expected although screening failure is selected). The form scripting framework is geared use calculated values in dependent variables, but it is also possible to implement calculations/checks to use the $enteredValue where needed.
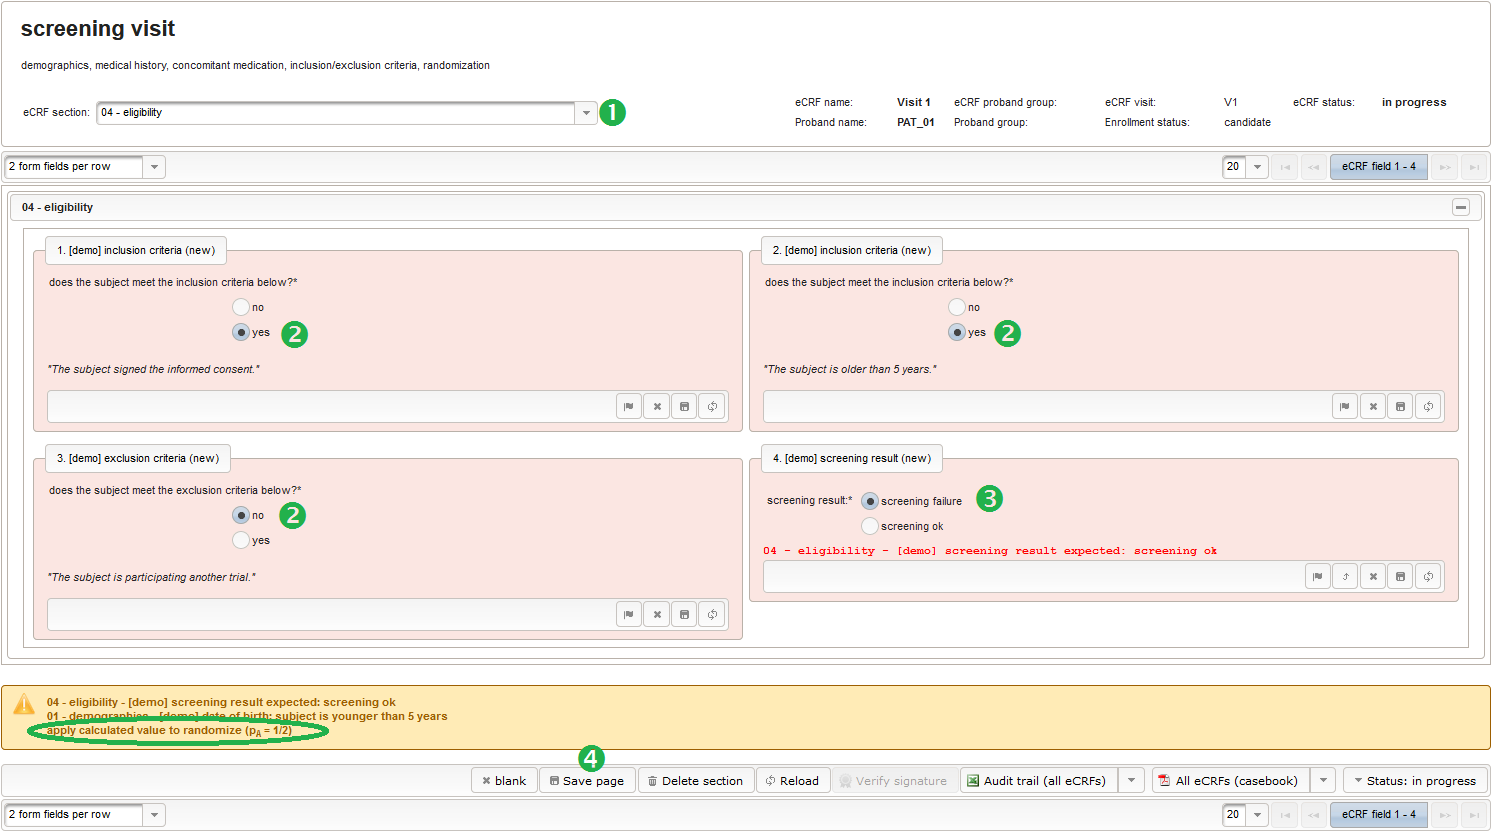
- The last section “05 – randomization” (1) of the screening visit eCRF shows a single field for entering the randomized proband group. By pressing the Apply calculated value button (2), the result of the adaptive randomization algorithm we prepared gets pasted. For a result of proband group G1, the propability is > 0.5 for the next subject being assigned to G2. Saving the page comes down to save the only field in it (3).
 The field’s output message says “proband group not set, please update to G1” to indicate the logic detected that the subject was not assigned to a proband group yet. To do so, switch to the Proband List tab and open the PAT_01 proband list entry by clicking the row. Select Group G1 from the dropdown and click Save.
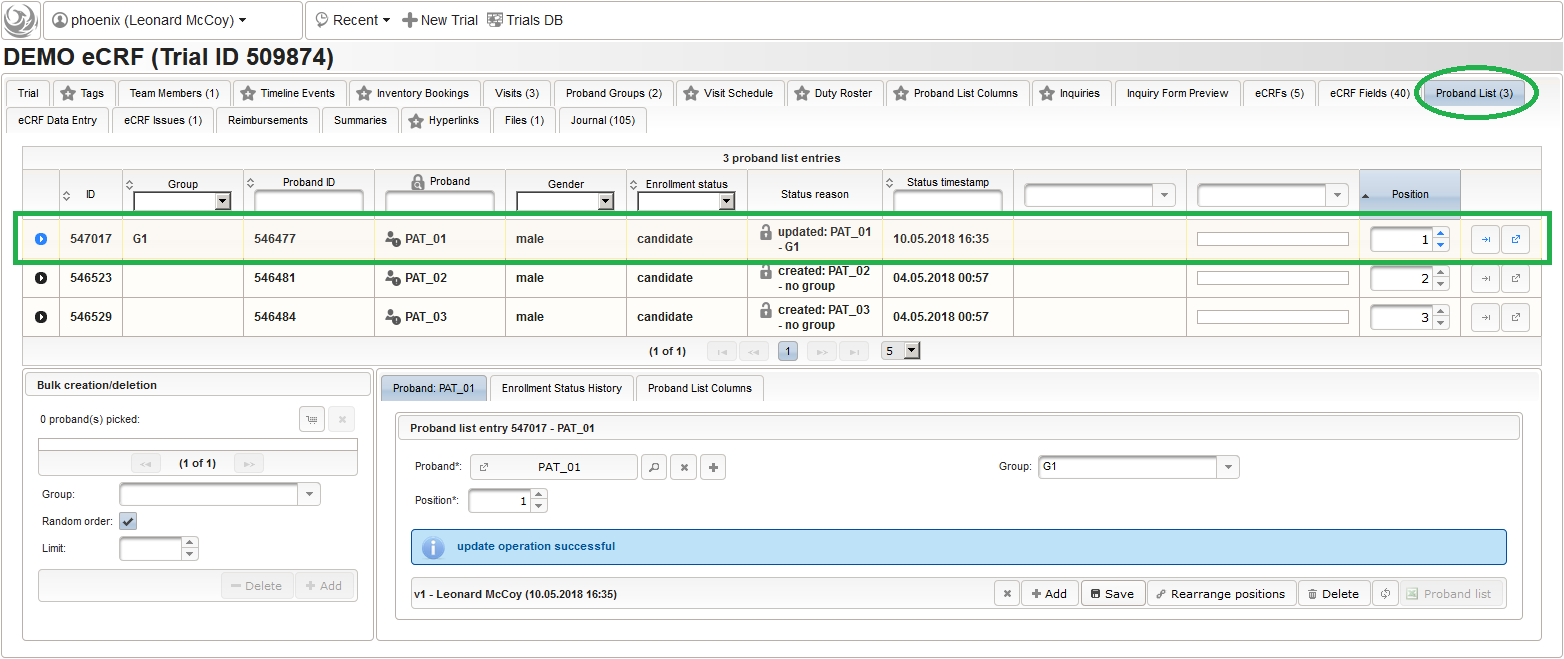
- Back in th trial’s eCRF Data Entry tab, the eCRFs available for PAT_01 are now properly filtered for a G1 (Group A) subject (Visit 1, Visit 2 – Group A, Visit 3 – Group A). We close down the Visit 1 data entry by setting the eCRF status from in progress to input validation. At this point, the edit checks are run server-side to produce a query for each of the red messages seen in the eCRF form pages during data entry. The step is known to complete in a few seconds for forms with up to 500 form fields. For larger forms, a queuing mechanism can be activated to defer and jump in at scheduled times to compele the step. The input validation timestamp shows a status message (ie. “input validation pending” if deferred) or timestamp the validation was successfully executed. To prevent manipulating the validated data again, the form inputs get locked unless there is an open query. You now have a chance to review entries, correct and close down unwanted queries yourself before setting the eCRF status to complete – review. This will notify the study monitor to review and manage queries, which will be covered in detail later.
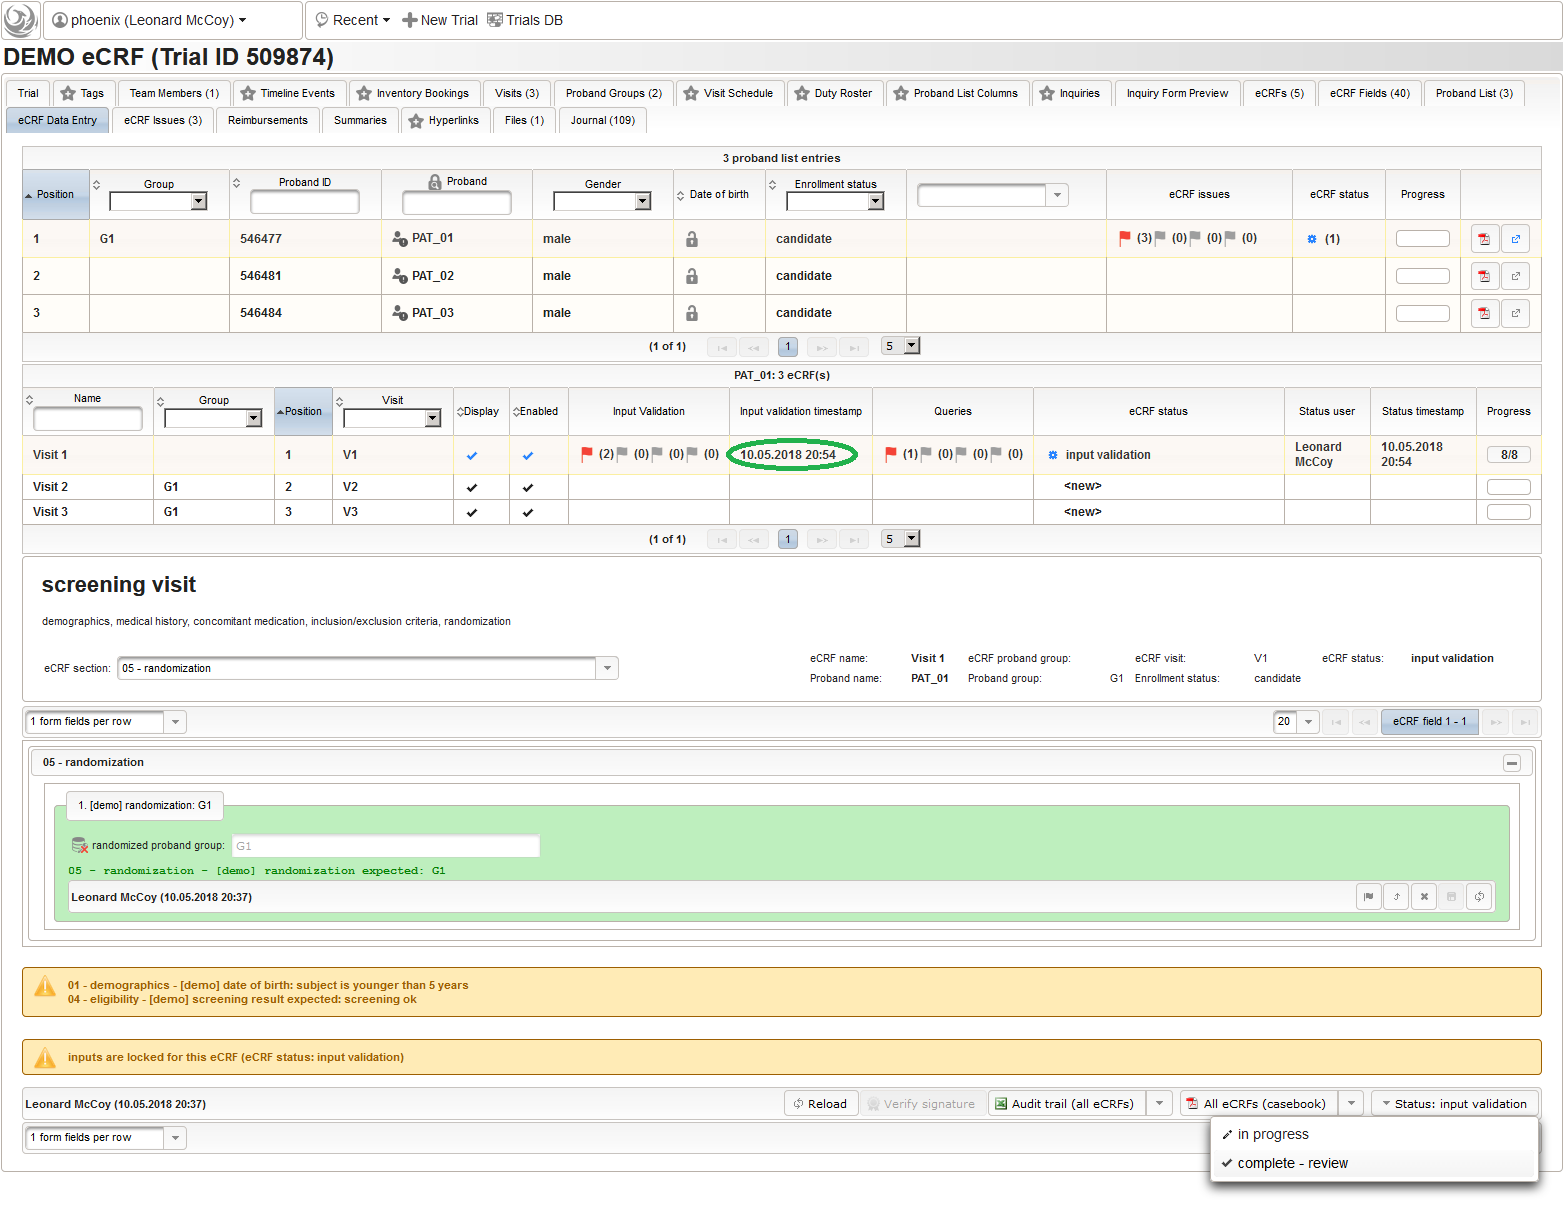
Data Entry – V2
To move on to the Vsisit 2 – Group A eCRF, click the respective row of the PAT_01 eCRF list. For Group A, it represents results collected after the subject received the intervention under test (the novel diet plan). Since this eCRF is rather short, the empty eCRF section filter from the dropdown can be selected in order to display all three sections (“01 – body mass index”, “02 – heart rate”, “03 – blood pressure”) in one page. For demonstration purposes, an inaccurate body mass index value is provided. Also the low blood pressure is intended to trigger the implemented normal range check. Since all the form’s field are visible, pressing Save page will store the entire eCRF at once in this case.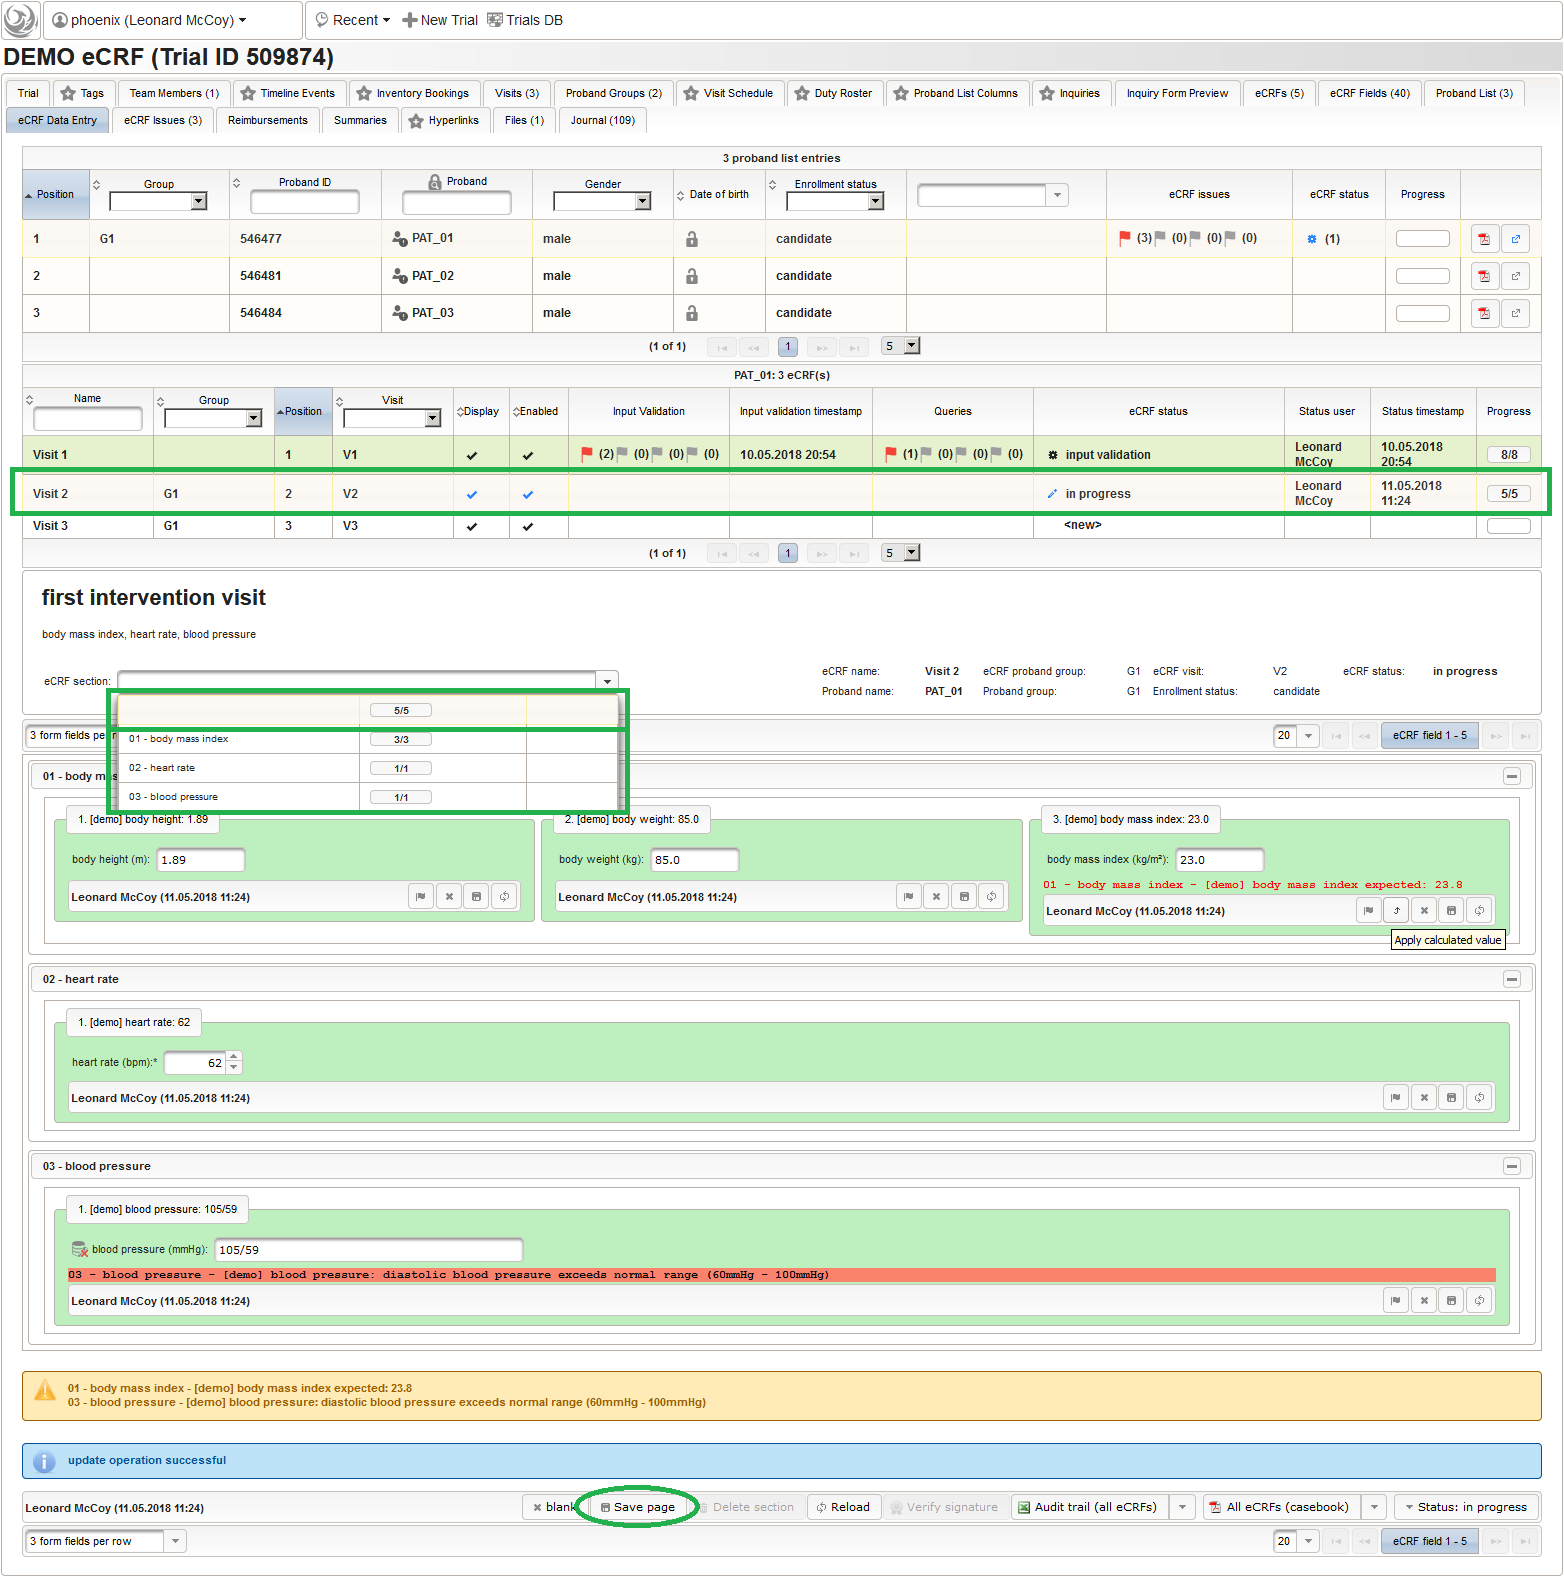
When done, you can proceed with setting the eCRF status from in progress to input validation right away.
Data Entry – V3
The Visit 3 – Group A eCRF looks identical to Visit 2 – Group A. For Group A, it represents results collected after the subject switched to the regular diet (control intervention) after some wash-out period. After entering some values and saving, the data entry for PAT_01 is fully completed, which is indicated by full progress bars in the list of eCRFs. We can forward to input validation eCRF status to align with previous eCRFs.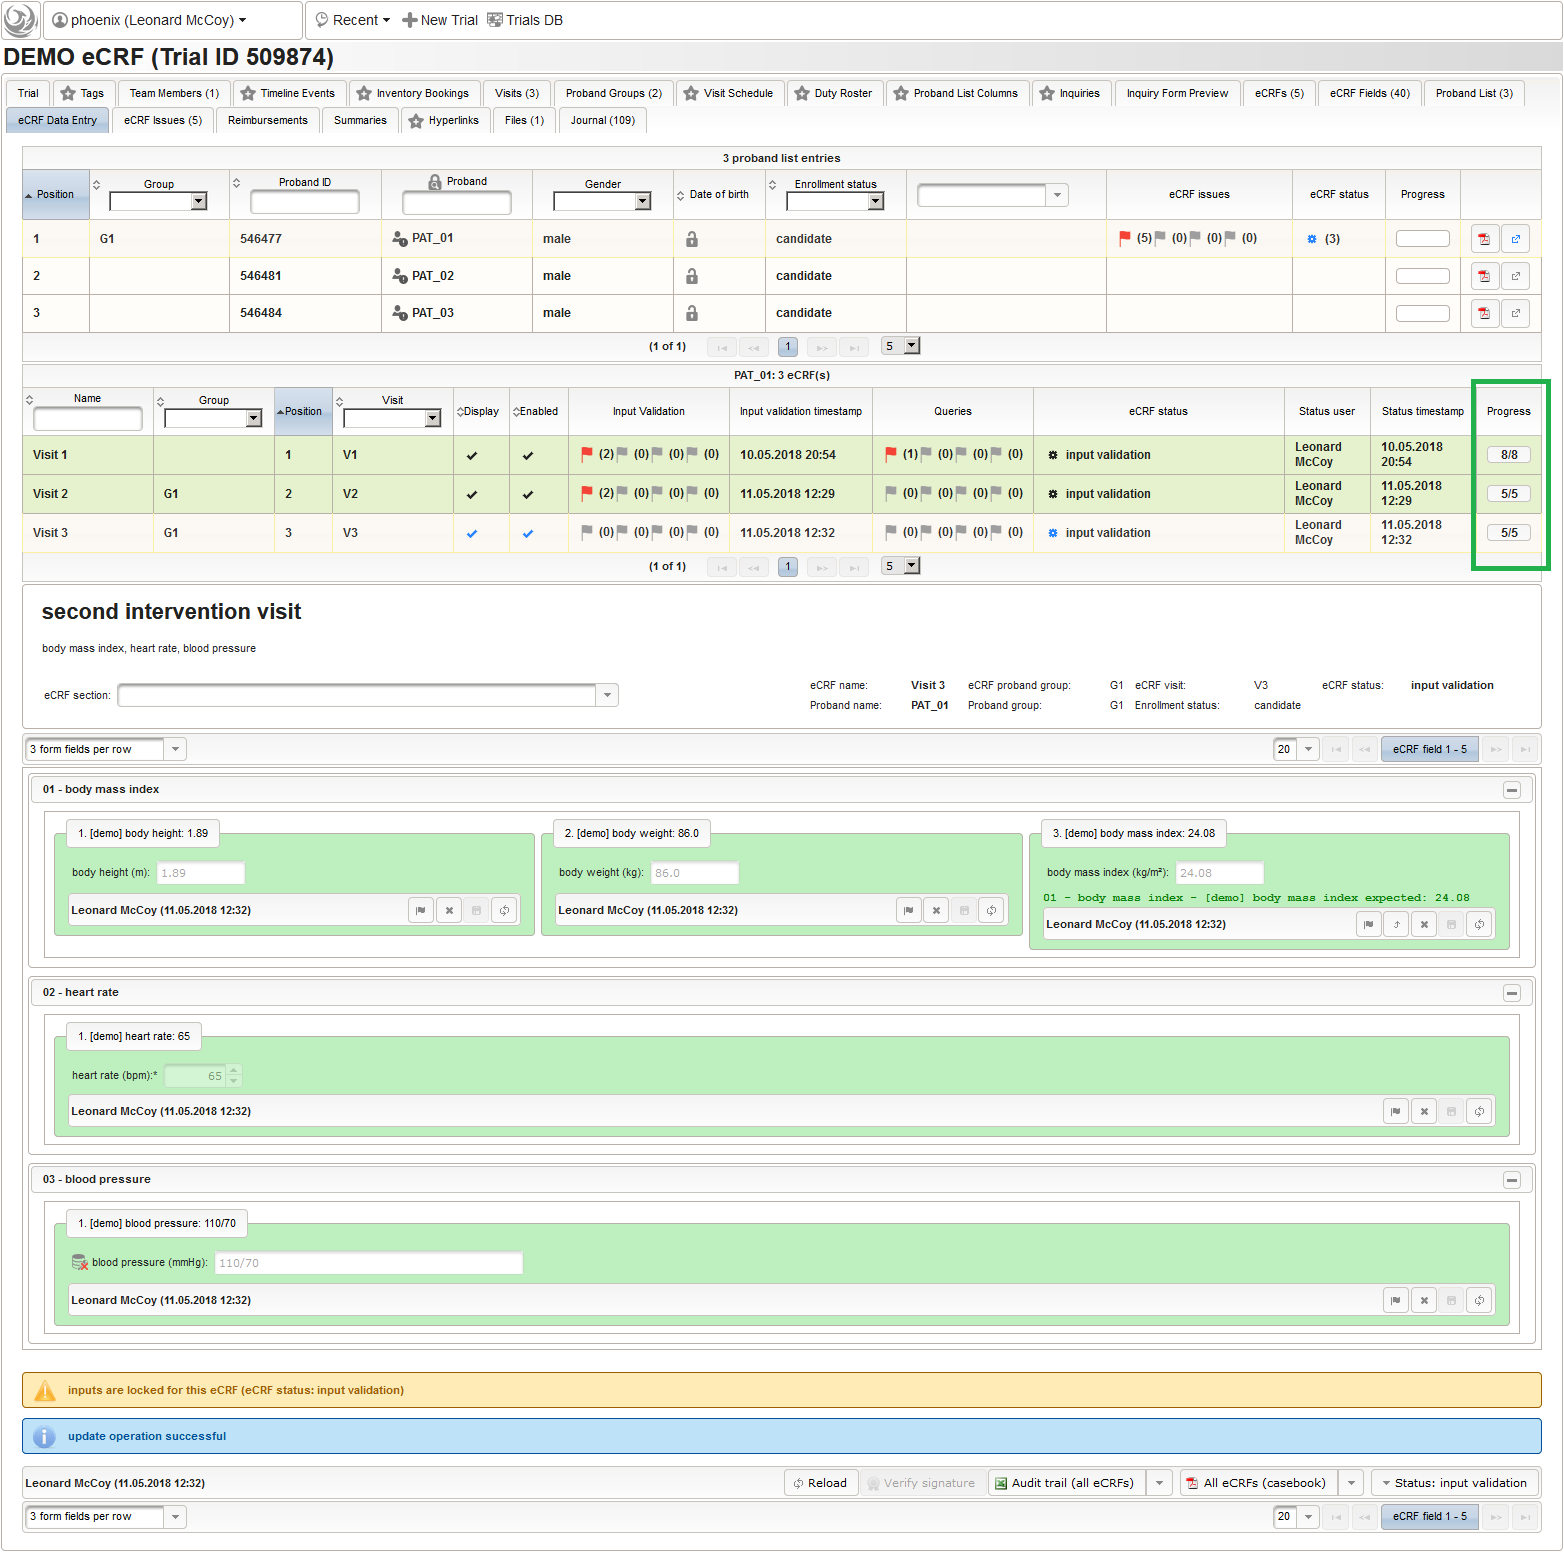
Data Verification
The eCRF data entry and verification workflow considers three basic roles/phases:
- data entry clerk
- study monitor
- principal investiagtor
In the first phase shown so far, the data entry clerk entered values to fill in the forms. In the second step, a study monitor (CRA) is ought to review the data entry, help data entry clerks with corrections before finally approving the eCRFs. This supports a data validation plan considering verification of each eCRF of each subject, with obligation to resolve all raised discrepancies. The system encourages a query resolution workflow to control and record the dialogue when clarifying the discrepancy with an eCRF field value. In the third an final step, the principal investigator (PI) seals the eCRF casebook by means of an advanced electronic signature.

The current stage of the data entry and verification process of an eCRF is reflected by the status of the eCRF, which is set by the user and subject to checks/restrictions by the system.
| icon | eCRF status | form input locked (an unresolved eCRF issue is required to edit a field) | create/edit eCRF issues | audit trail (if enabled for the field) | actions performed when switching to this status | who can leave this eCRF status? |
|---|---|---|---|---|---|---|
| in progress | yes | anyone | ||||
| input validation | yes | yes | yes (no reason for change required) | - check for missing mandatory fields - run form scripting server-side and create resulting eCRF issues - notify eCRF status (ie. for data entry clerk when deferred) | anyone | |
| complete - review | yes | yes | yes | - notify eCRF status (ie. for study monitor) | study monitor | |
| complete - verified | yes | - check for unresolved eCRF issues - notify eCRF status (ie. for principal investigator) | principal investigator | |||
| complete - signed | yes | - set enrollment status - create electronic signature | principal investigator | |||
| incomplete - review | yes | yes | yes | - notify eCRF status (ie. for study monitor) | study monitor | |
| incomplete - verified | yes | - notify eCRF status (ie. for principal investigator) | principal investigator | |||
| incomplete - signed | yes | - set enrollment status - create electronic signature | principal investigator | |||
| empty/skipped - review | yes | - delete all saved values - delete all eCRF issues - notify eCRF status (ie. for study monitor) | study monitor | |||
| empty/skipped - verified | yes | - notify eCRF status (ie. for principal investigator) | principal investigator | |||
| empty/skipped - signed | yes | - set enrollment status - create electronic signature | principal investigator |
The state diagram below shows the standard setup of possible pathways when switching an eCRF’s status.
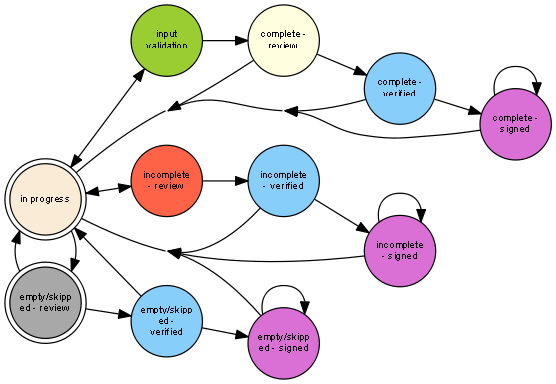
Each eCRF will effectively walk through one of the three typical lifecycles (pathways of the eCRF status) below:
- complete eCRF: <new> → in progress → input validation → complete – review → complete – verified → clomplete – signed
- incomplete eCRF: <new> → in progress → incomplete – review → incomplete – verified → inclomplete – signed
- empty/skipped eCRF: <new> → empty/skipped – review → empty/skipped – verified → empty/skipped – signed
User Setup
Presuming the phoenix account created by the installation procedure is used, it is to be configured to cover all three eCRF data entry roles (data entry clerk, study monitor and principal investigator) in our DEMO eCRF trial. At first it is required to complete the setup of the phoenix user and legitimate it to edit the trial’s team members.
- If not done yet, the phoenix user needs to be linked to an person/organisation idenity. Therefore, open the phoenix user for editing from the start page.
- Click the plus button of the staff selector to create a new person/organisation item.
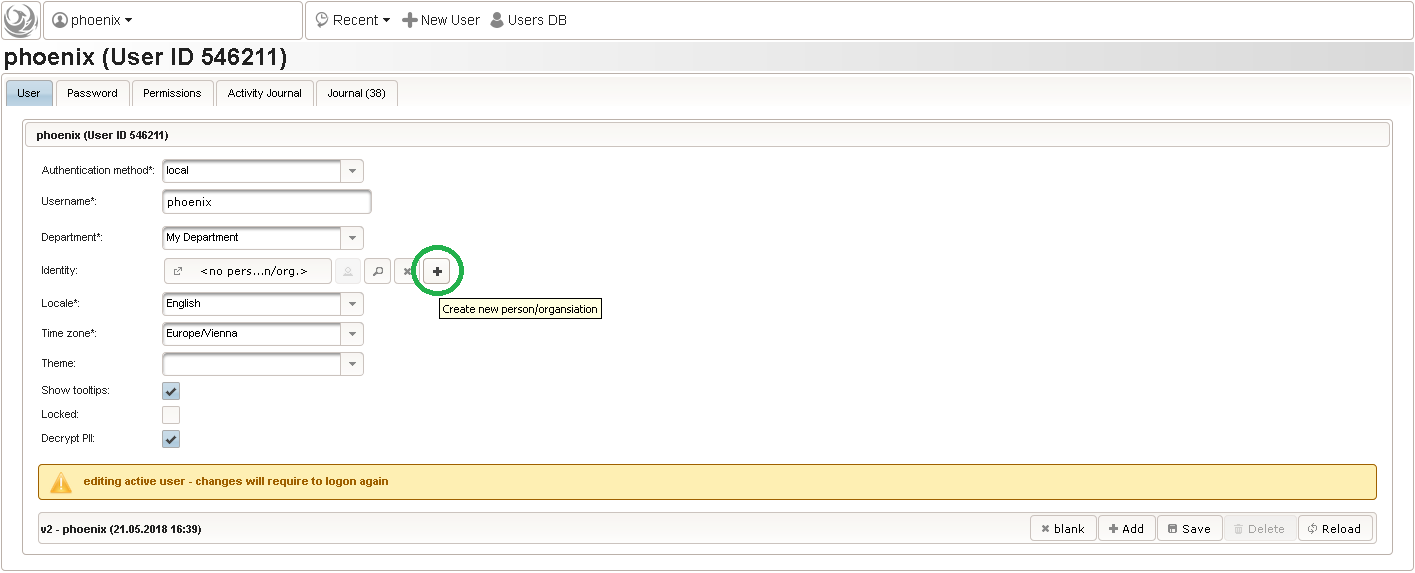 While it is possible to use an organisation as identity (ie. company login), signing eCRFs will require a person. Thus make sure the Person checkbox is checked, provide a name remaining staff information and click Save.
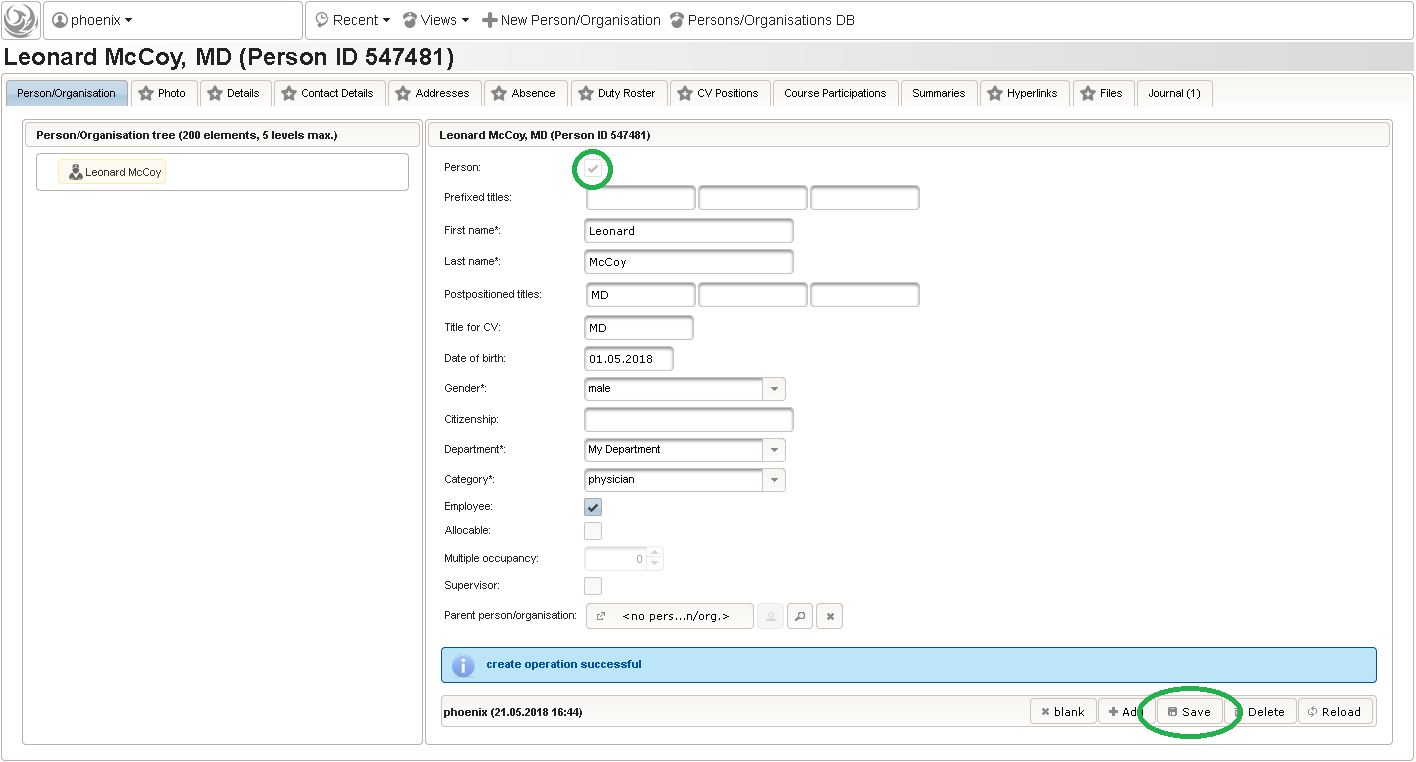
- In the browser tab showing the phoenix user, now click the staff selector’s search icon in order to pick the person we just created.
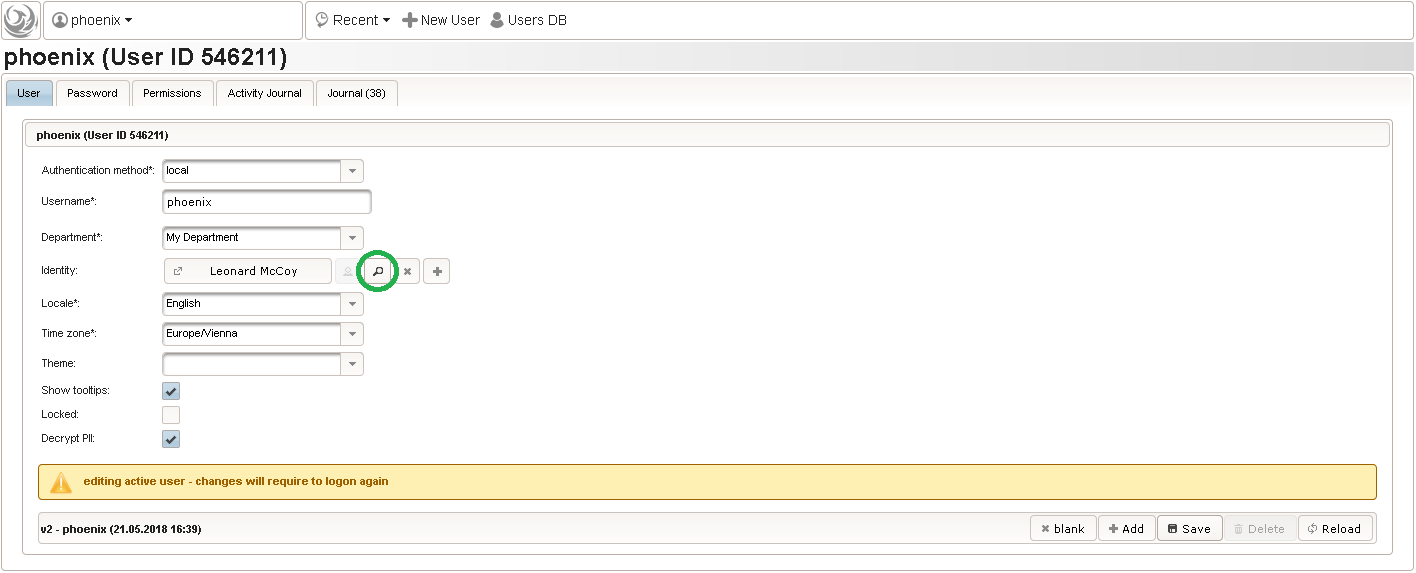 It will open a pop-up browser window to search and select from existing person/organisation records. When doing this for the first time (eg. right after a vanilla installation), there are no search queries defined yet. The most simple search query contains no criteria, which will list all existing persons/organisations. To prepare such once, remove the empty criterion row and click Add after providing a name.
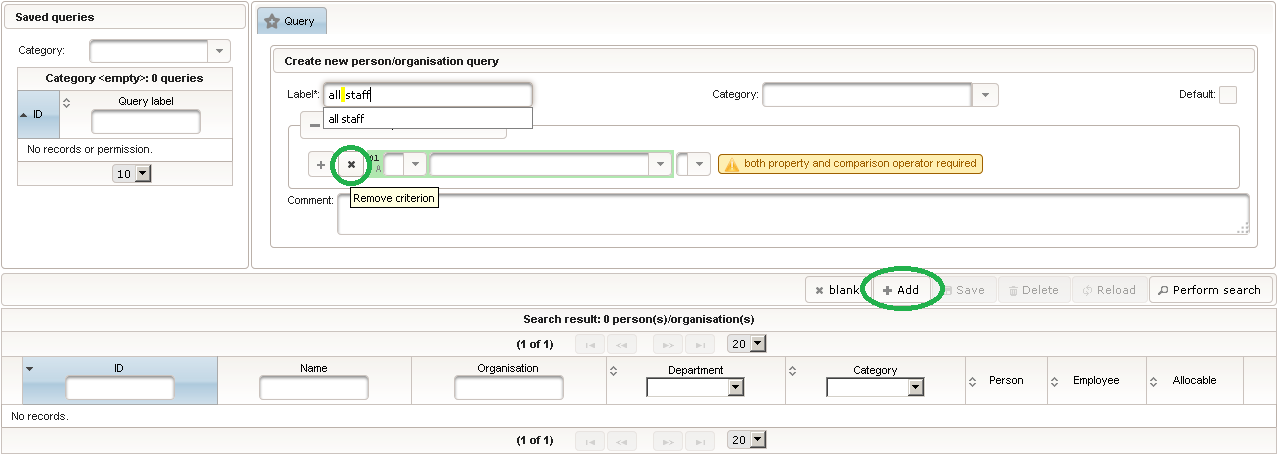
- Now click Perform search to see the search query result list. By clicking the Pick button of the row of the desired staff to link with the user, it will be selected in the phoenix user browser tab, and the search pop-up window will close.

- Click Save to update the phoenix user. Note that this will require to login again, if it is the account you are currently working with.
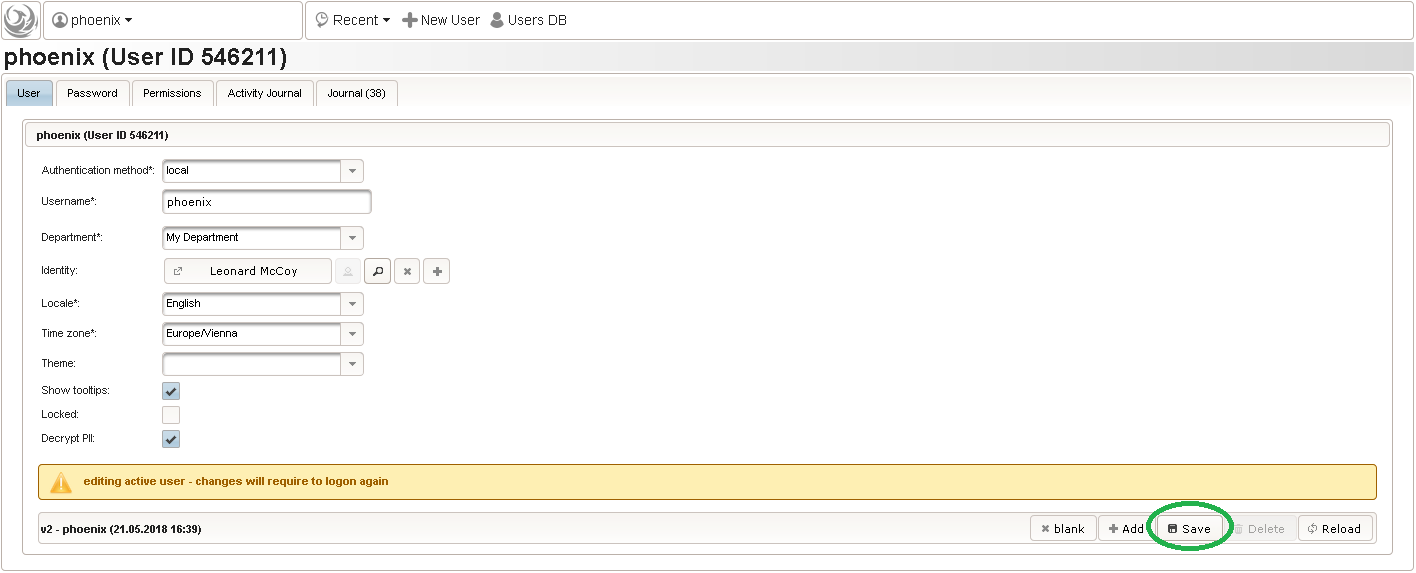
- In the Permissions tab, make sure the phoenix user has administrative permissions for the trial module.
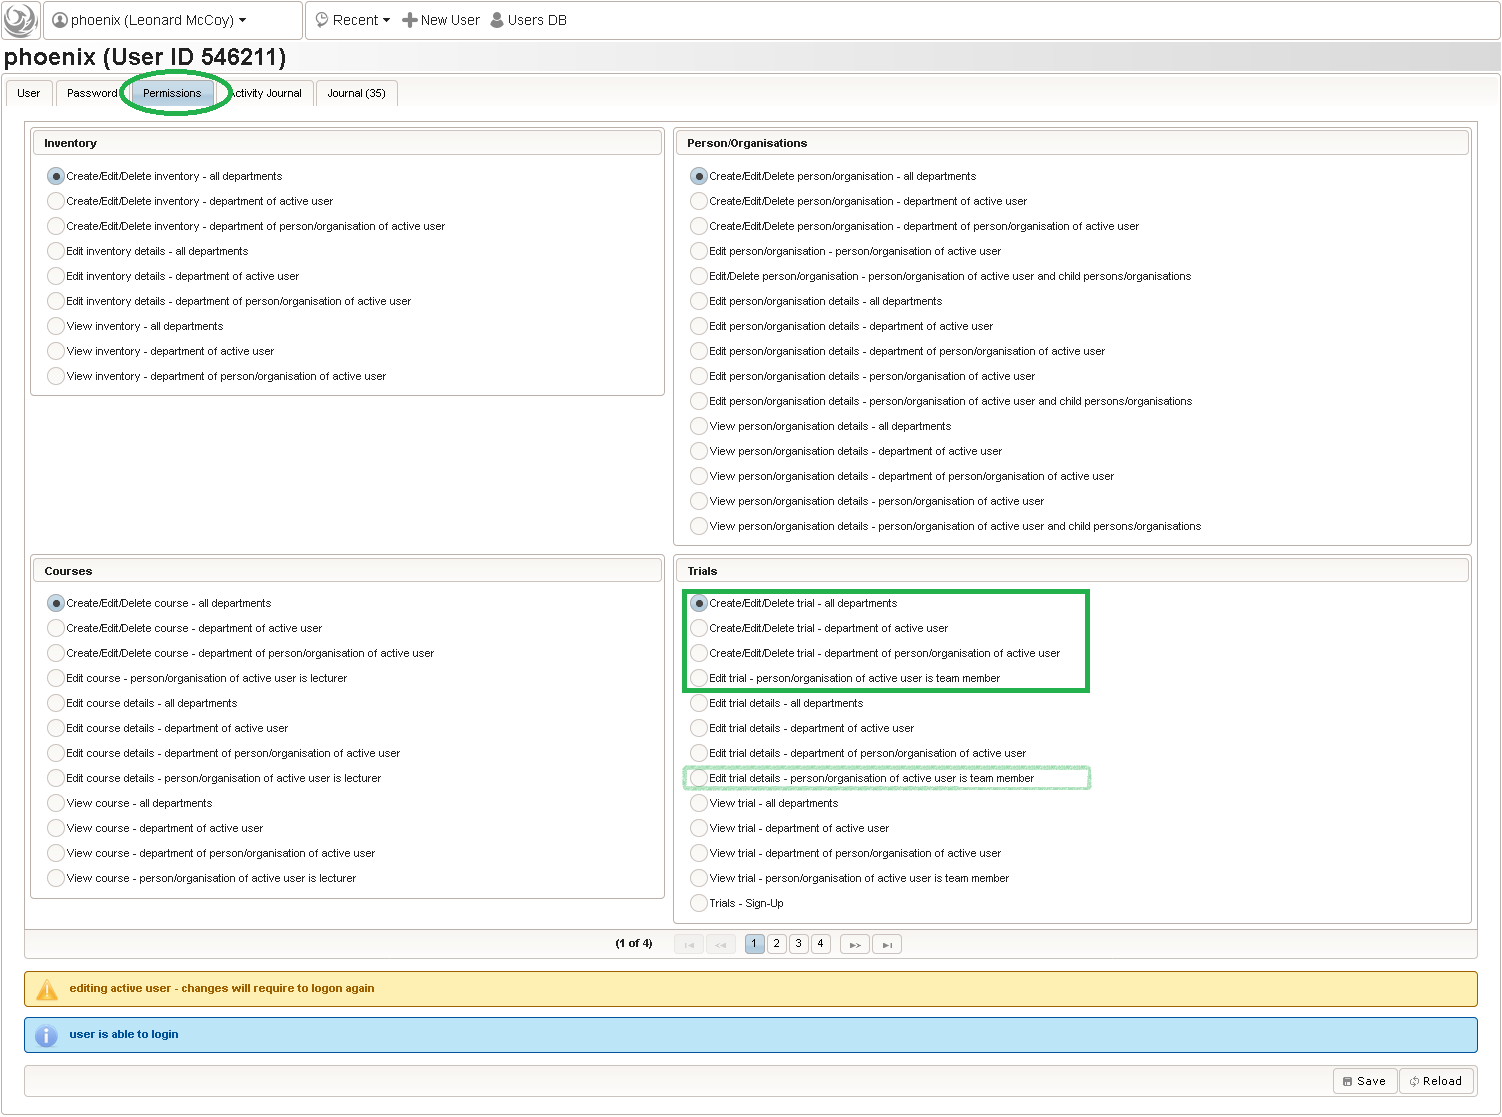 To change the team members of a trial, one of the permissions below is required:
- Create/Edit/Delete trial – all departments: the user is allowed to create/delete, edit the main tab and team members of trials of any department.
- Create/Edit/Delete trial – department of active user: the user is allowed to create/delete, edit the main tab and team members of trials of the user’s department only.
- Create/Edit/Delete trial – department of identity of active user: the user is allowed to create/delete, edit the main tab and team members of trials of the department of the user’s person only.
- Edit trial – identity of active user is team member: the user is allowed to edit the main tab and team members of trials only, where the user’s person was added as a team member.
For regular (not administrative) user accounts such as data entry clerks, it is recommended to go with the Edit trial details – identity of active user is team member permission. This requires an administrative user to explicitly add staff to a trial’s team in order to give access.
Trial Team Member Setup
Back in the team members tab of the DEMO eCRF trial, the phoenix user’s person can now be added in order to grant particular privileges for the eCRF data entry and verification workflow. You can click the Active Person/organisation button to quickly select the person of the logged-in user in the staff selector. 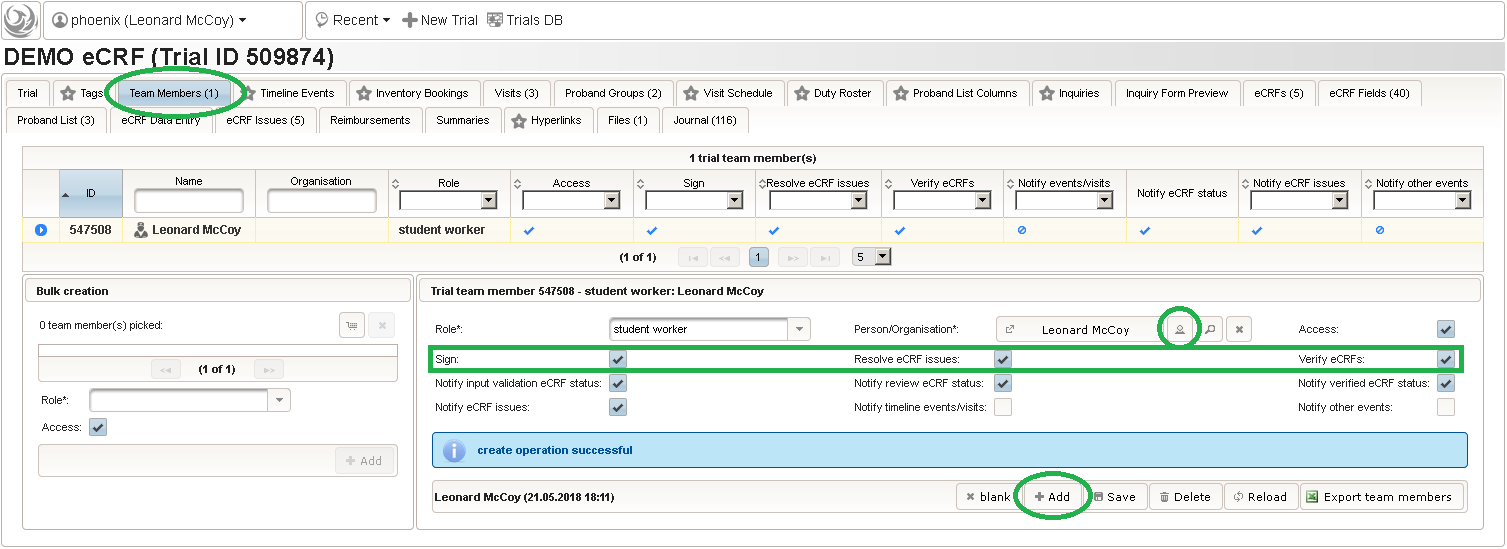 While the role of a data entry clerk is considered as minimal because it only allows saving eCRF values, the highlighted checkboxes allow to elevate the role by granting operations for the study monitor and principal investigator in a fine-grained way.
- study monitor: resolve eCRF issues, verify eCRFs
- principal investigator: sign
To incorporate all roles into one team member, adjust the checkboxes as shown and click Add.
| checkbox | description | should be exclusive for role |
|---|---|---|
| Sign: | The team member is allowed to sign data (e.g. eCRFs) in this trial. Mandatory to set and leave a "signed" eCRF status. | principal investigator |
| Resolve eCRF issues: | The team member is allowed to resolve eCRF issues in this trial. | study monitor |
| Verify eCRFs: | The team member is allowed to verify eCRFs (set to a "verified" eCRF status) in this trial. | study monitor |
| Notify input validation eCRF status: | Notify the team member when the "input validation" eCRF status was set and the server-side input validation completed. Useful for deferred execution with large eCRFs. | data entry clerk |
| Notify review eCRF status: | Notify the team member when a "review" eCRF status was set, to indicate the eCRF is ready to be reviewed by the trial monitor. | study monitor |
| Notify verified eCRF status: | Notify the team member when a "verified" eCRF status was set, to indicate the eCRF is ready to be signed by the investigator. | principal investigator |
| Notify eCRF issues: | Notify the team member when a eCRF issue record was created (e.g. by input validation or a manually raised query). | data entry clerk, study monitor |
eCRF Issue Resolution
With users and trial team mebers set up properly, we can now continute with the data verification workflow. To sum up, so far each eCRF of PAT_01 was set to the input validation eCRF state after the forms were filled in. An eCRF issue was manually added for demonstration, to note that fixing the respective form field value is required. Switching to the input validation eCRF status triggered the execution of the input validation on the server, which automatically created additional eCRF issue records – one for each edit check message seen in the UI at last. All form fields got locked except those for which eCRF issues are present (as long they are in an unresolved state). This means a field can be unlocked to correct a value by creating a eCRF issue for the field. After all, the data verification workflow comes down to the study monitor and data entry clerk managing these eCRF issues.
- Presuming the data entry clerk is entering values from paper source data, he/she can mark an eCRF as done by setting to a review state (complete – review, incomplete – review or empty/skipped – review).
 The eCRF is handed over to the study monitor, who therefore receives a notification and can start reviewing eCRF issues. Notifications are displayed in the lower area of the start page, and sent by mail (if configured).
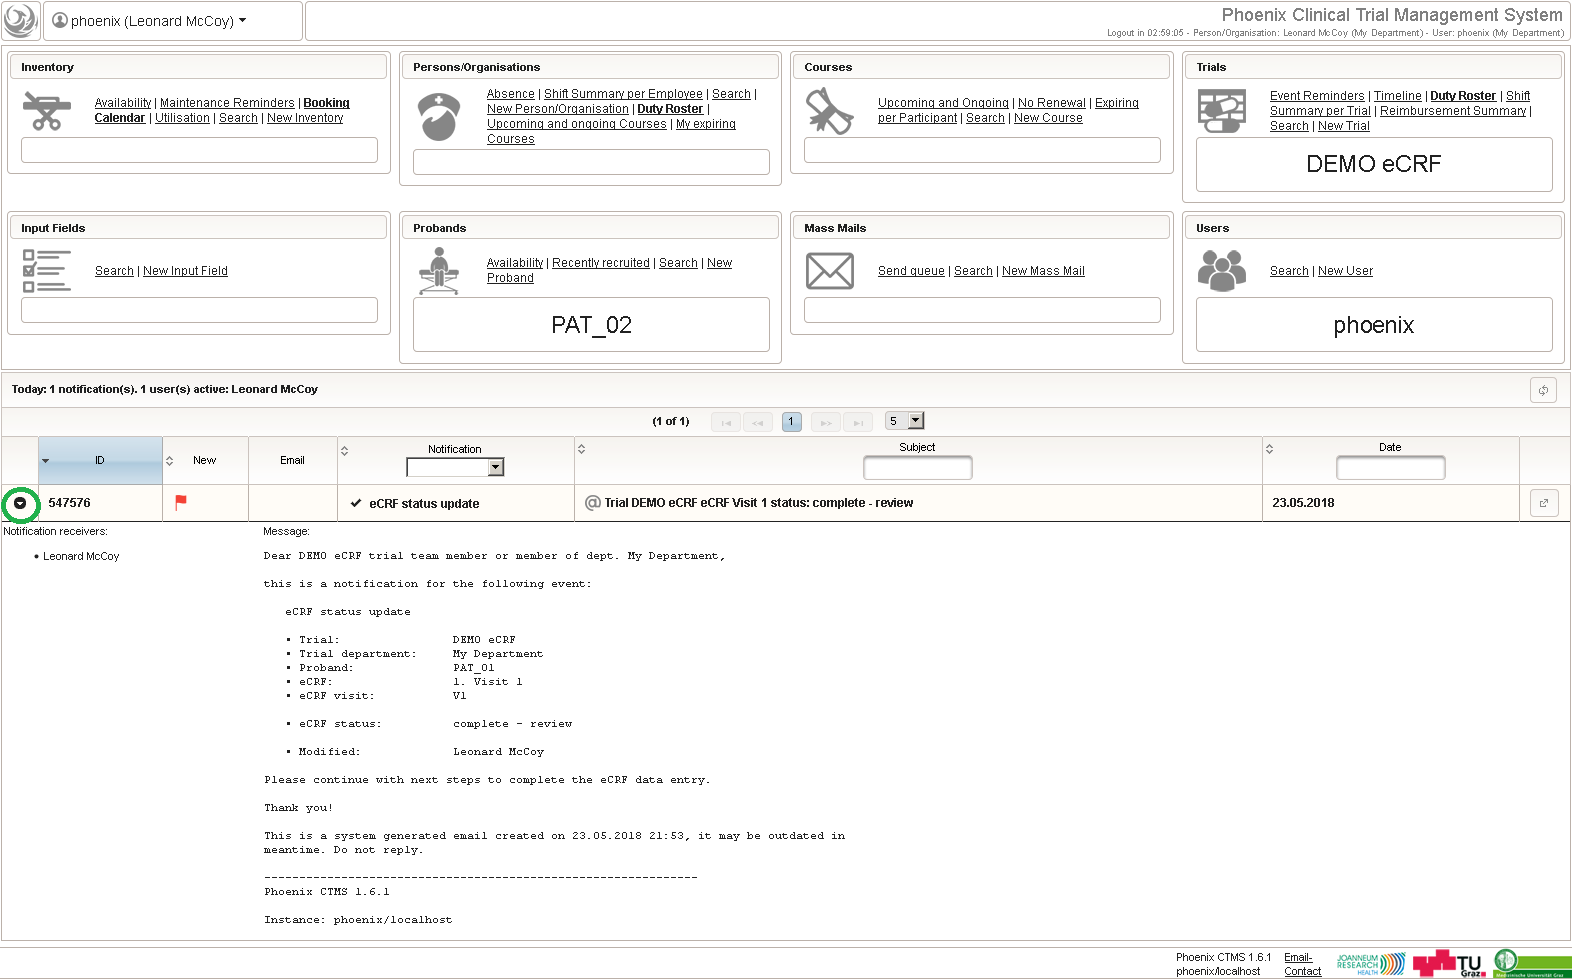
- The study monitor can open the trial to view the eCRF Issues tab. It shows a list of all existing eCRF issues of any subject/eCRF in the trial. As with any datatable in the UI, a particular item can be found easily using the filters for column values.
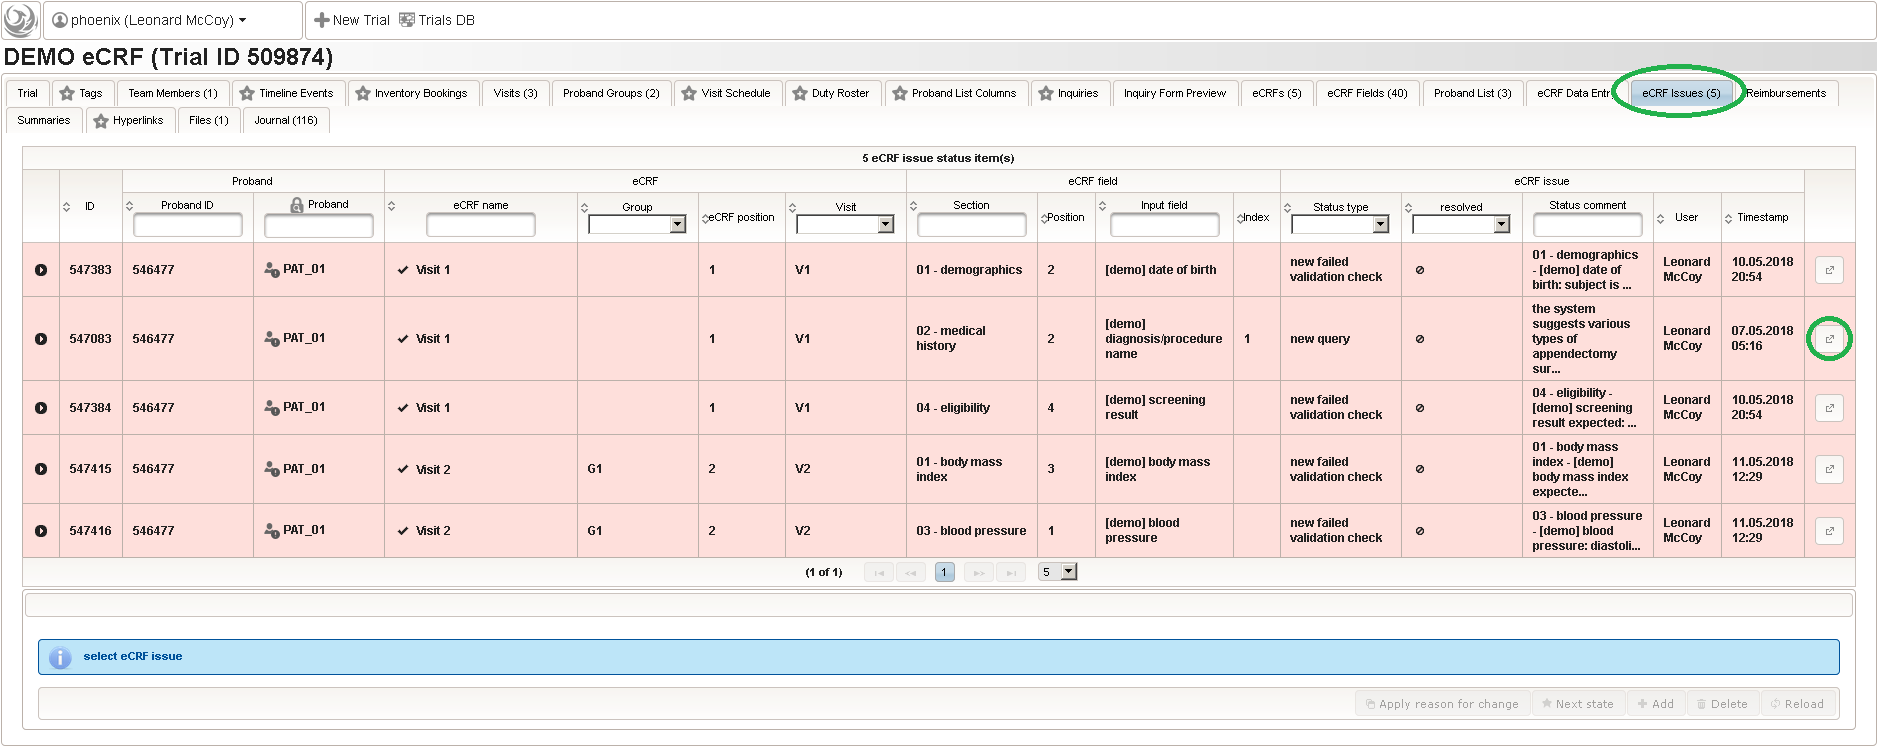
- To view a particular eCRF issue in context, the data entry form for the eCRF section containing the field with the issue can be opened in a separate browswer window. The example below shows the query from the data entry clerk who was not sure what to enter if there is no precise match for the appendectomy diagnosis. After opening the dialog for eCRF issues by clicking the flag button, selecting the issue status from the history list reveals the full query comment. The current status of the eCRF issue is new query, which is reflected by the red background color of the field.
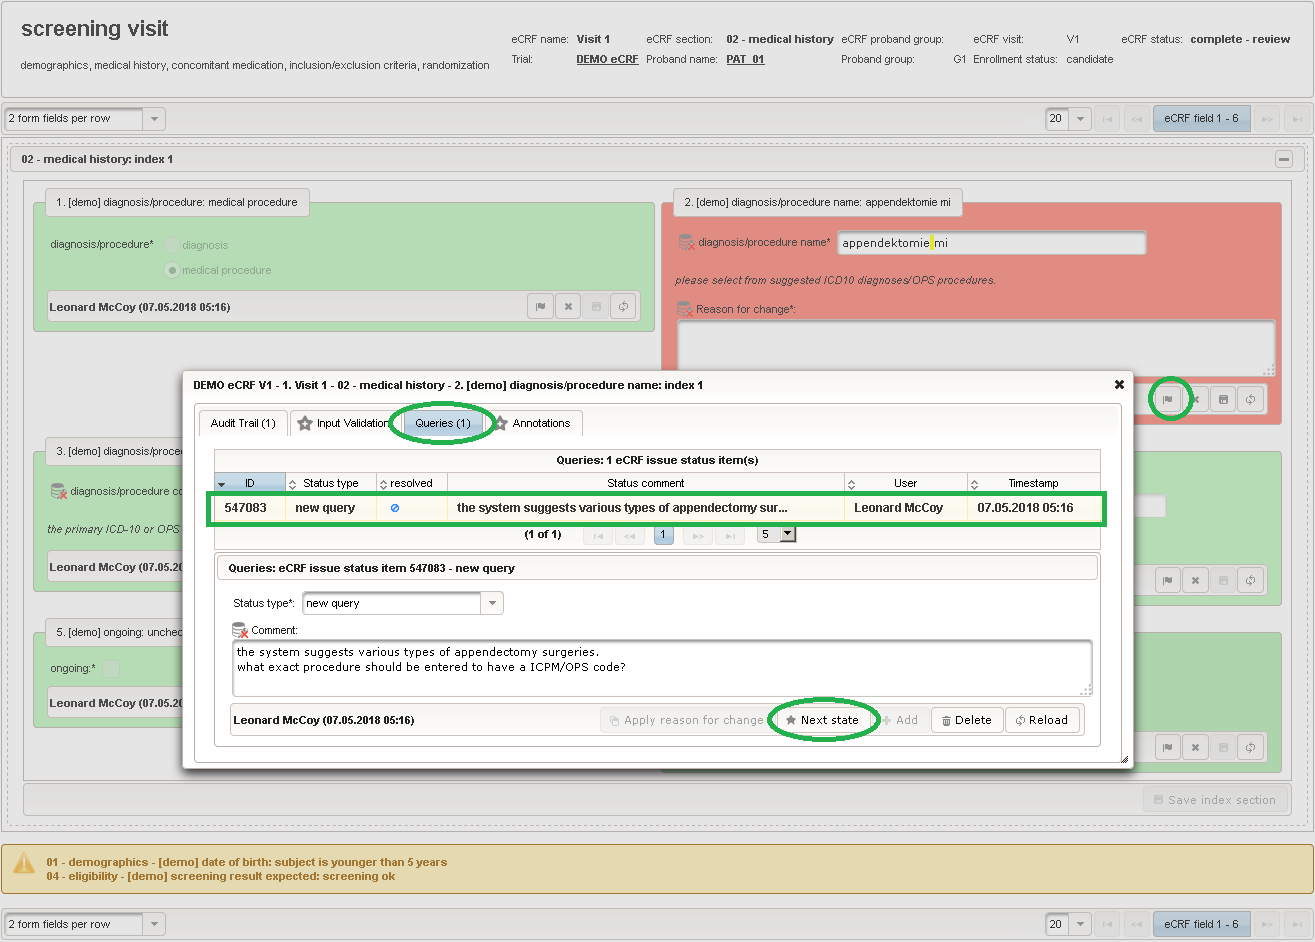
- After reading the query comment, the study monitor will reply with an appropriate advice. The eCRF issue status is therefore changed from new query to query update. The field’s background will turn from red to orange after saving the new status together with the reply comment.

- At the same time, trial team members designated as data entry clerks can receive a notification about the query status update of the study monitor. Notifications about status changes of eCRF issues from the Query tab are sent to any trial team member having the Notify eCRF issue checkbox checked. To prevent spamming, these notification are however not generated for eCRF issues of the Input Validation tab (unless activated for a particular field).
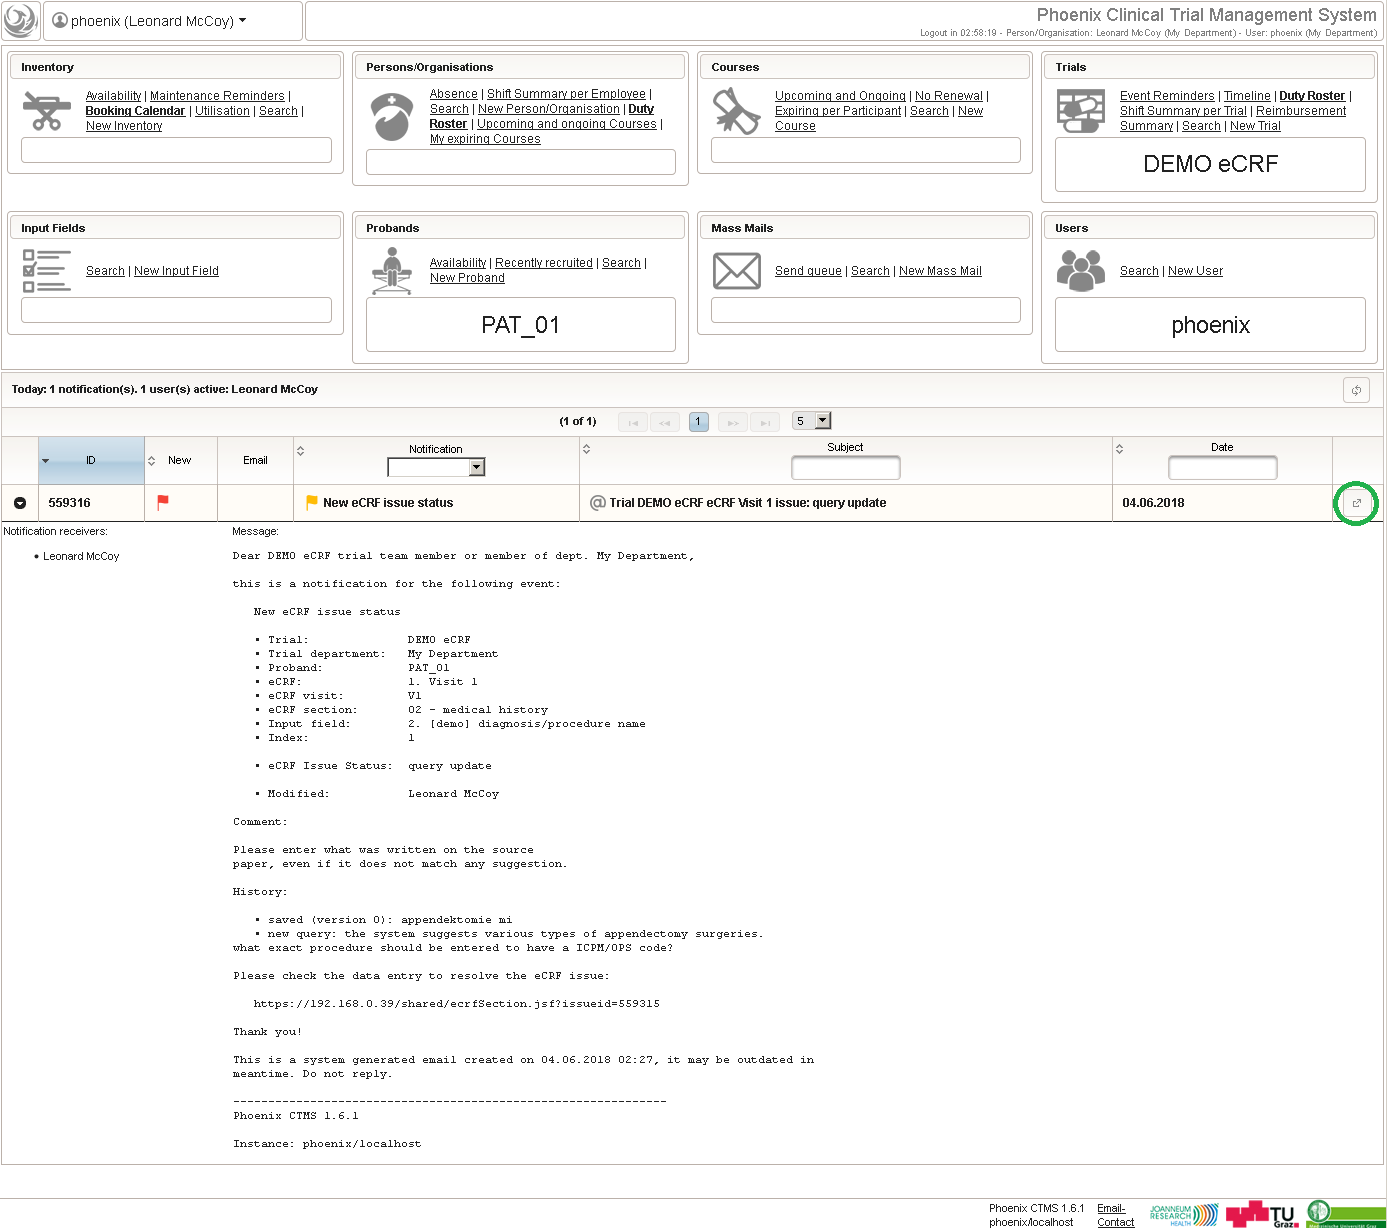
- The data entry clerk receives the notification and can directly jump to the data entry form showing the eCRF section that contains the topical field with orange background. The notification’s message text contains a link in case the notification is read from a email client. To follow the study monitor’s advice the diagnosis/procedure name changed to “Appendektomie”, presuming this was written on the paper source (1). To satisfy FDA CFR 21 rules, saving requires to provide a Reason for change (2) when the eCRF is in a review status. After saving the corrected value (3), we now want to update the query to notify the study monitor about the correction for a final re-check. Therefore, we open the eCRF issue dialog again using the flag button. After selecting proposed resolution as a new query status (4), the previously provided Reason for change can be copied into the comment field by pressing Apply reason for change (5). The new query status is ready to be saved using the Add button (6).
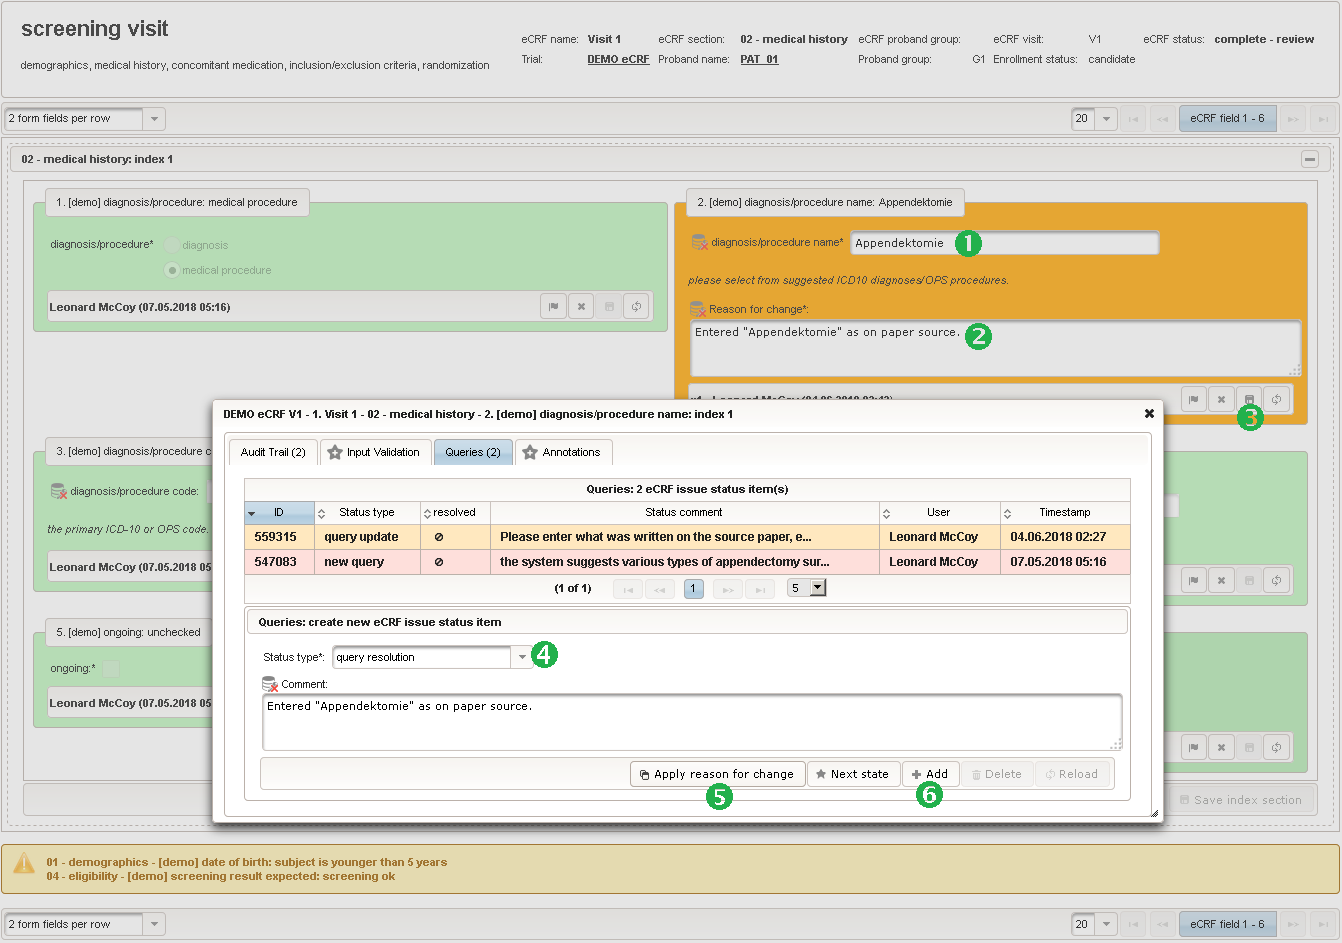
- Another notification is sent automatically to draw the study monitor’s attention.

- The study monitor opens the eCRF section and sees the field with the proposed resolution in blue color. After re-checking the corrections provided by the data entry clerk, the query can be closed down. Therefore the eCRF issue status is changed to a terminal state such as query corrected. For eCRF issues of the Queries tab, this is will be prohibited for team members that do not have the Resolve eCRF issues checkbox checked.
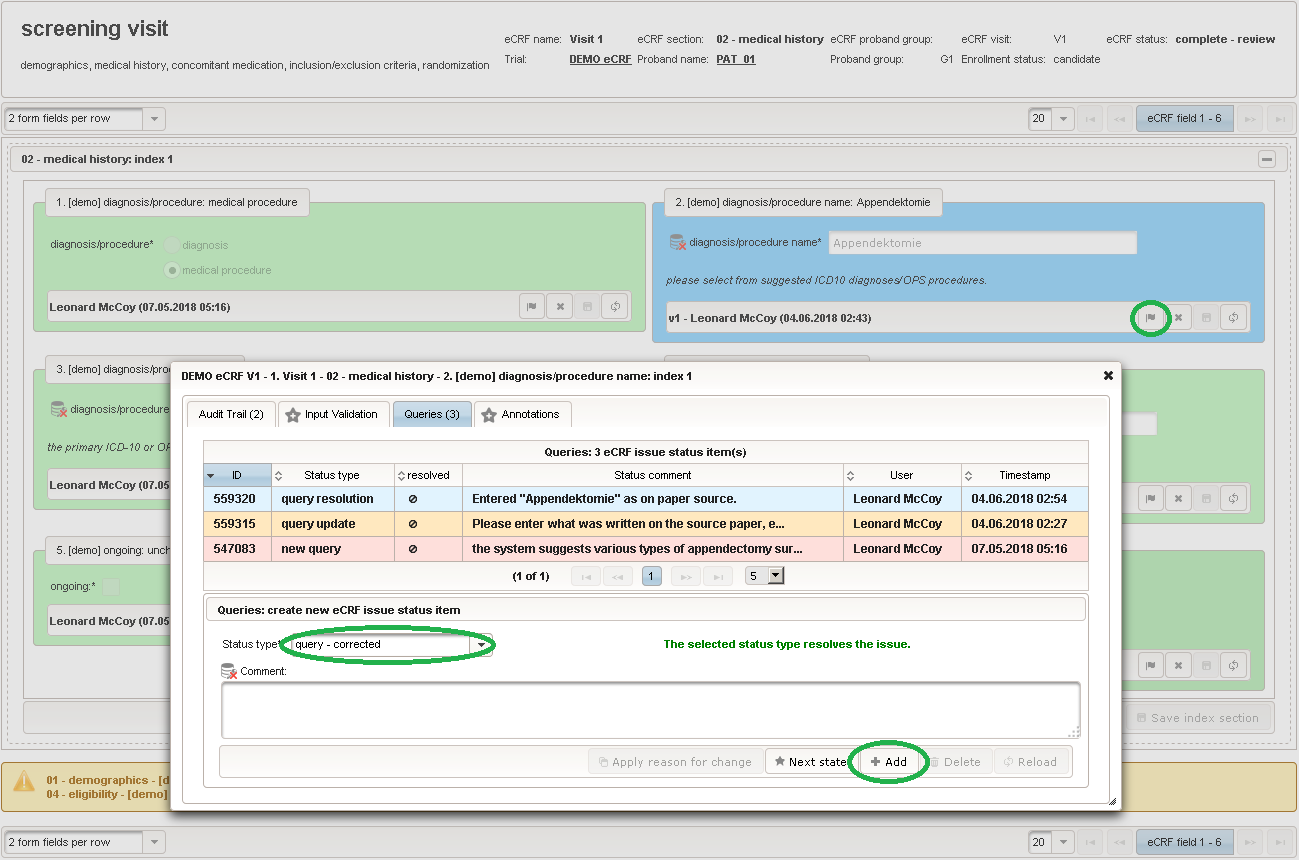
- The form field’s background turns to a intense green color and the green flag appears in the eCRF Data Entry tab to indicate the closed query.
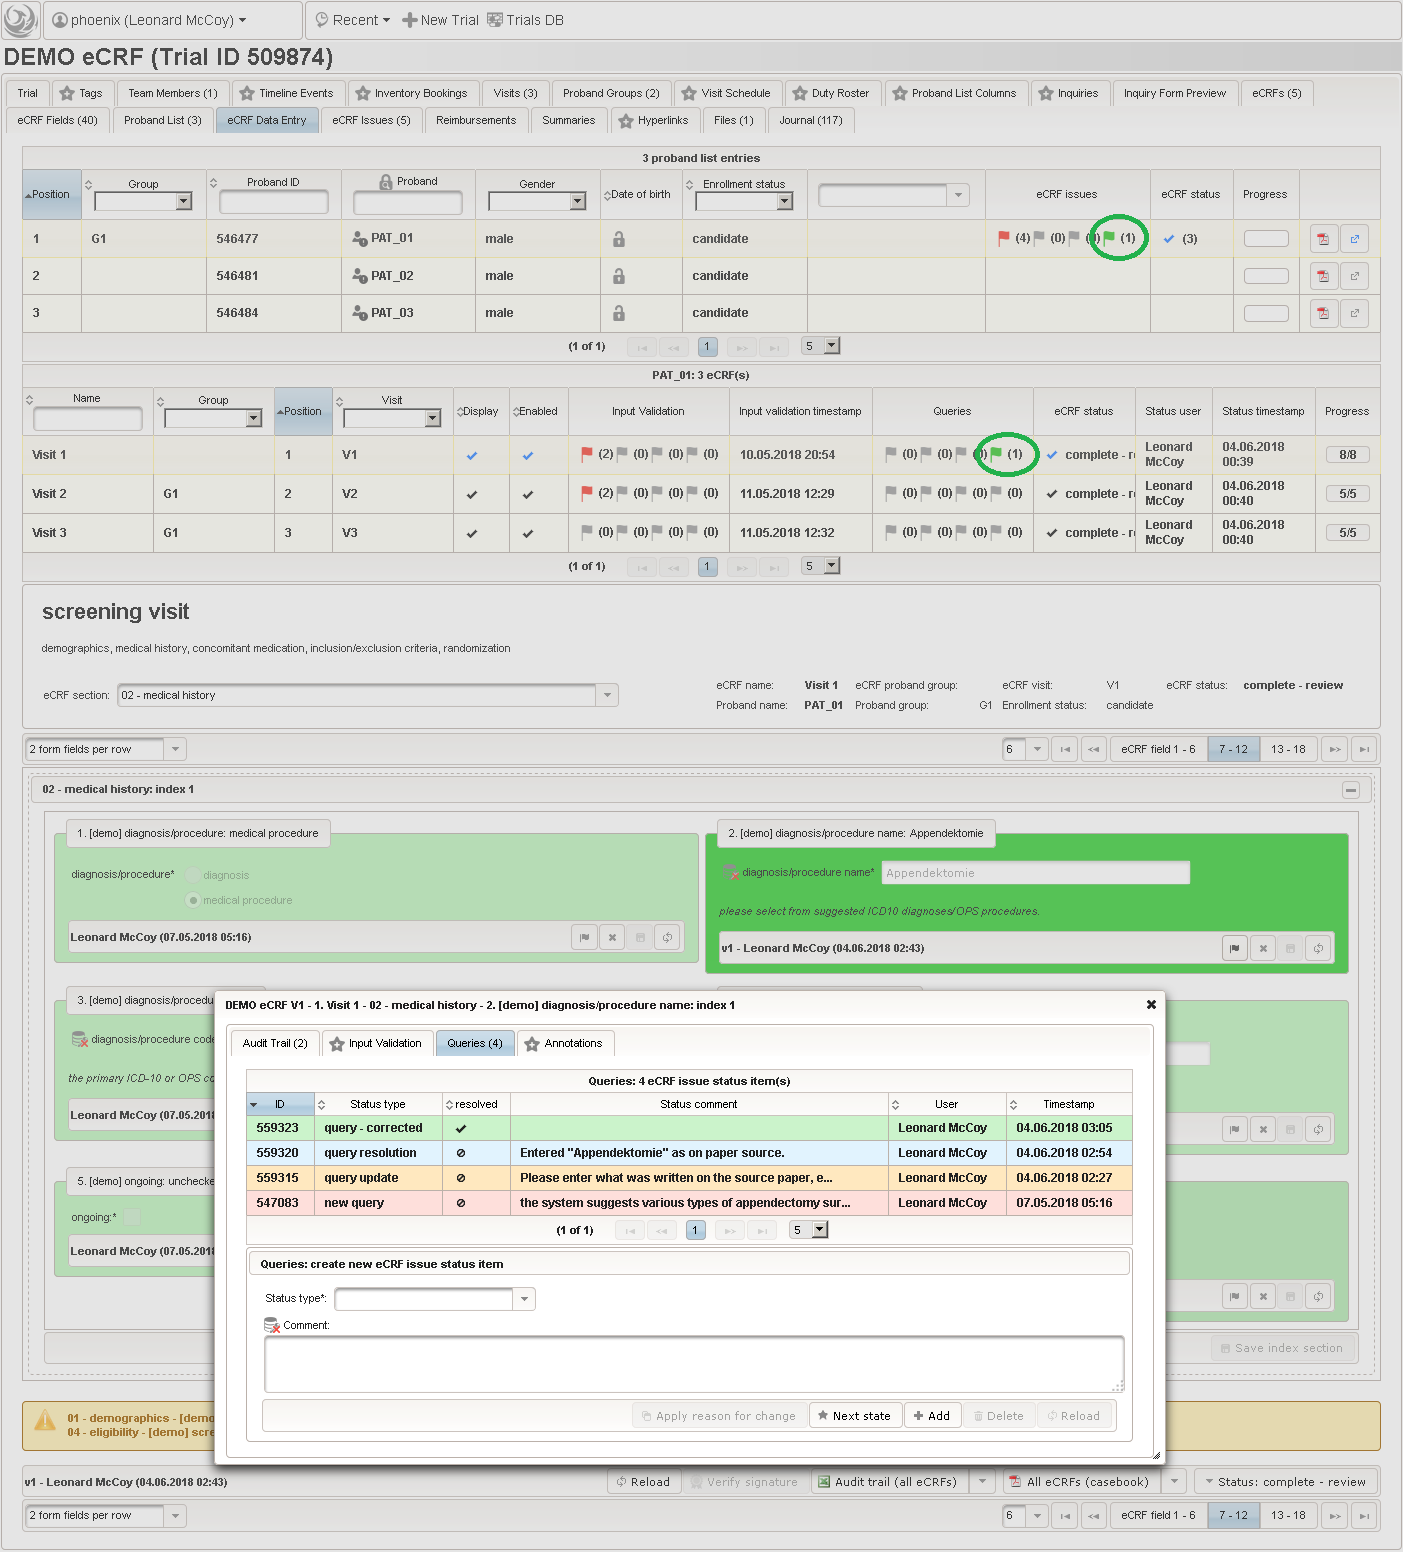
- The eCRF Issues overview shows a green row indicating the resolved query. There are 4 issues left to resolve, each of which created by the system at the input validation step. We next take a closer look at the one from the screening result section of V1 Screening eCRF.
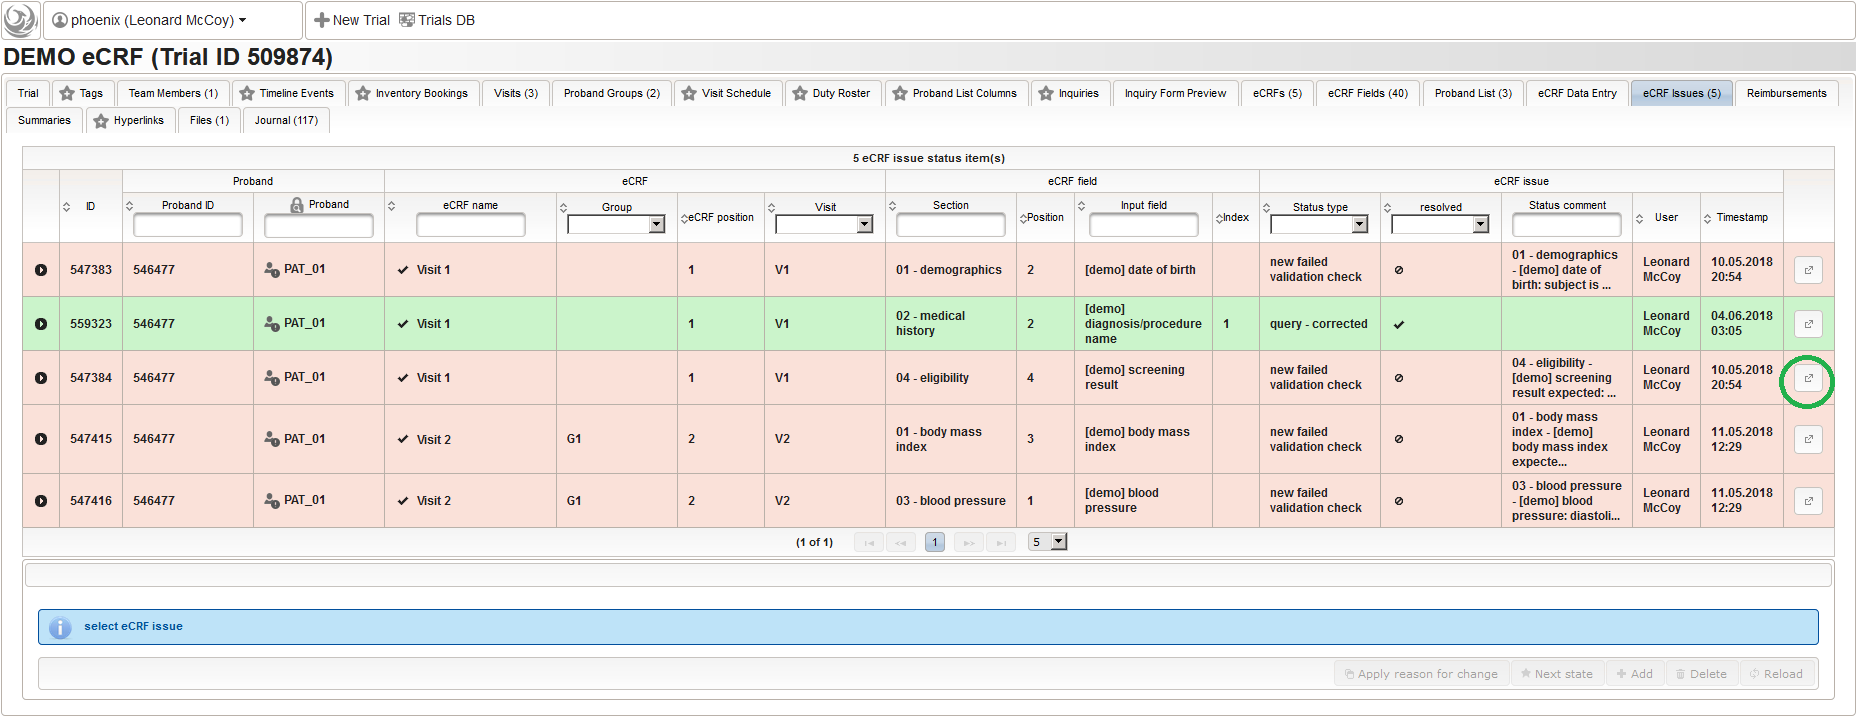
- The failed validation check indicates a discrepancy regarding the expected screening result. As shown below, the issue comment is a manifestation of the edit checked message shown below the field when entering data.
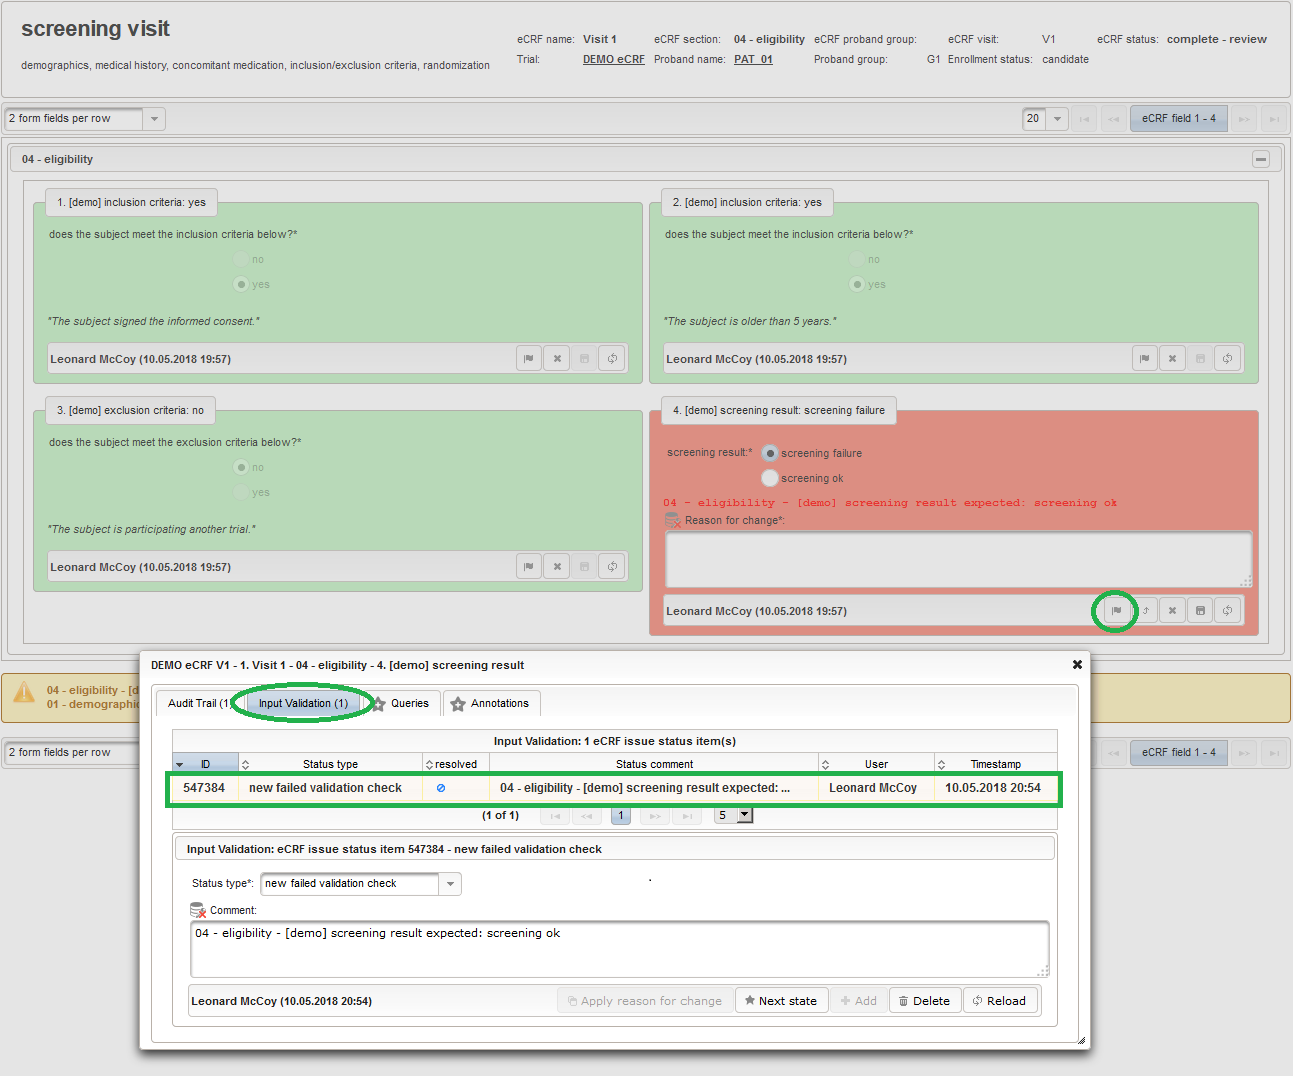
- For eCRF issues like this that are automatically genereated by the input validation, we more often than not will prefer to close it without round-trips between study monitor and data entry clerk. To start doin so, the screening result value is corrected, ie. by pressing the Apply calculated value button (1). To satisfy FDA CFR 21 rules, saving requires to provide a Reason for change (2). After saving the corrected value (3), we open the eCRF issue dialog again using the flag button and enter some obligatory comment (5) after selecting failed validation check closed for the new new query status (4). It is now ready to be saved using the Add button (6).
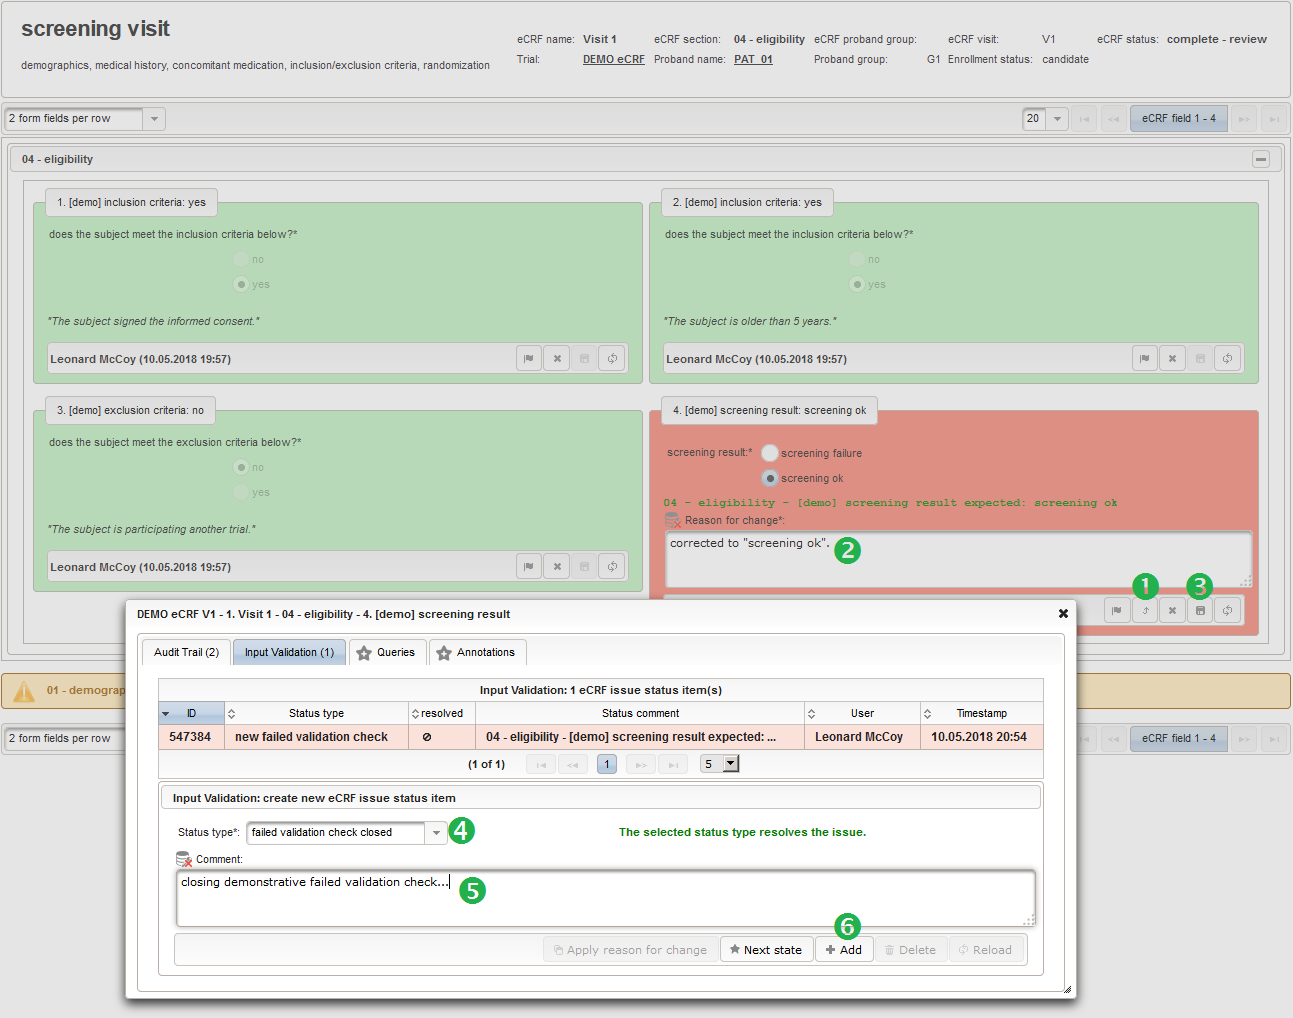
- While closing down eCRF issues of the Queries tab requires a study monitor (team member having the Resolve eCRF issues checkbox checked), resolving eCRF issues of the Input Validation tab is not restricted (as per default system configuration). While such global setting can be overridden if needed, the idea is to encourage data entry clerks to resolve failed validation checks on their own as far as possible, to relieve the study monitor. The data entry clerk can repeat this steps to resolve the remaining eCRF issues generated by the input validation of PAT_o1’s V1 Screening eCRF. Once all issues are resolved, the system will allow the study monitor to set the eCRF status to complete – verified.
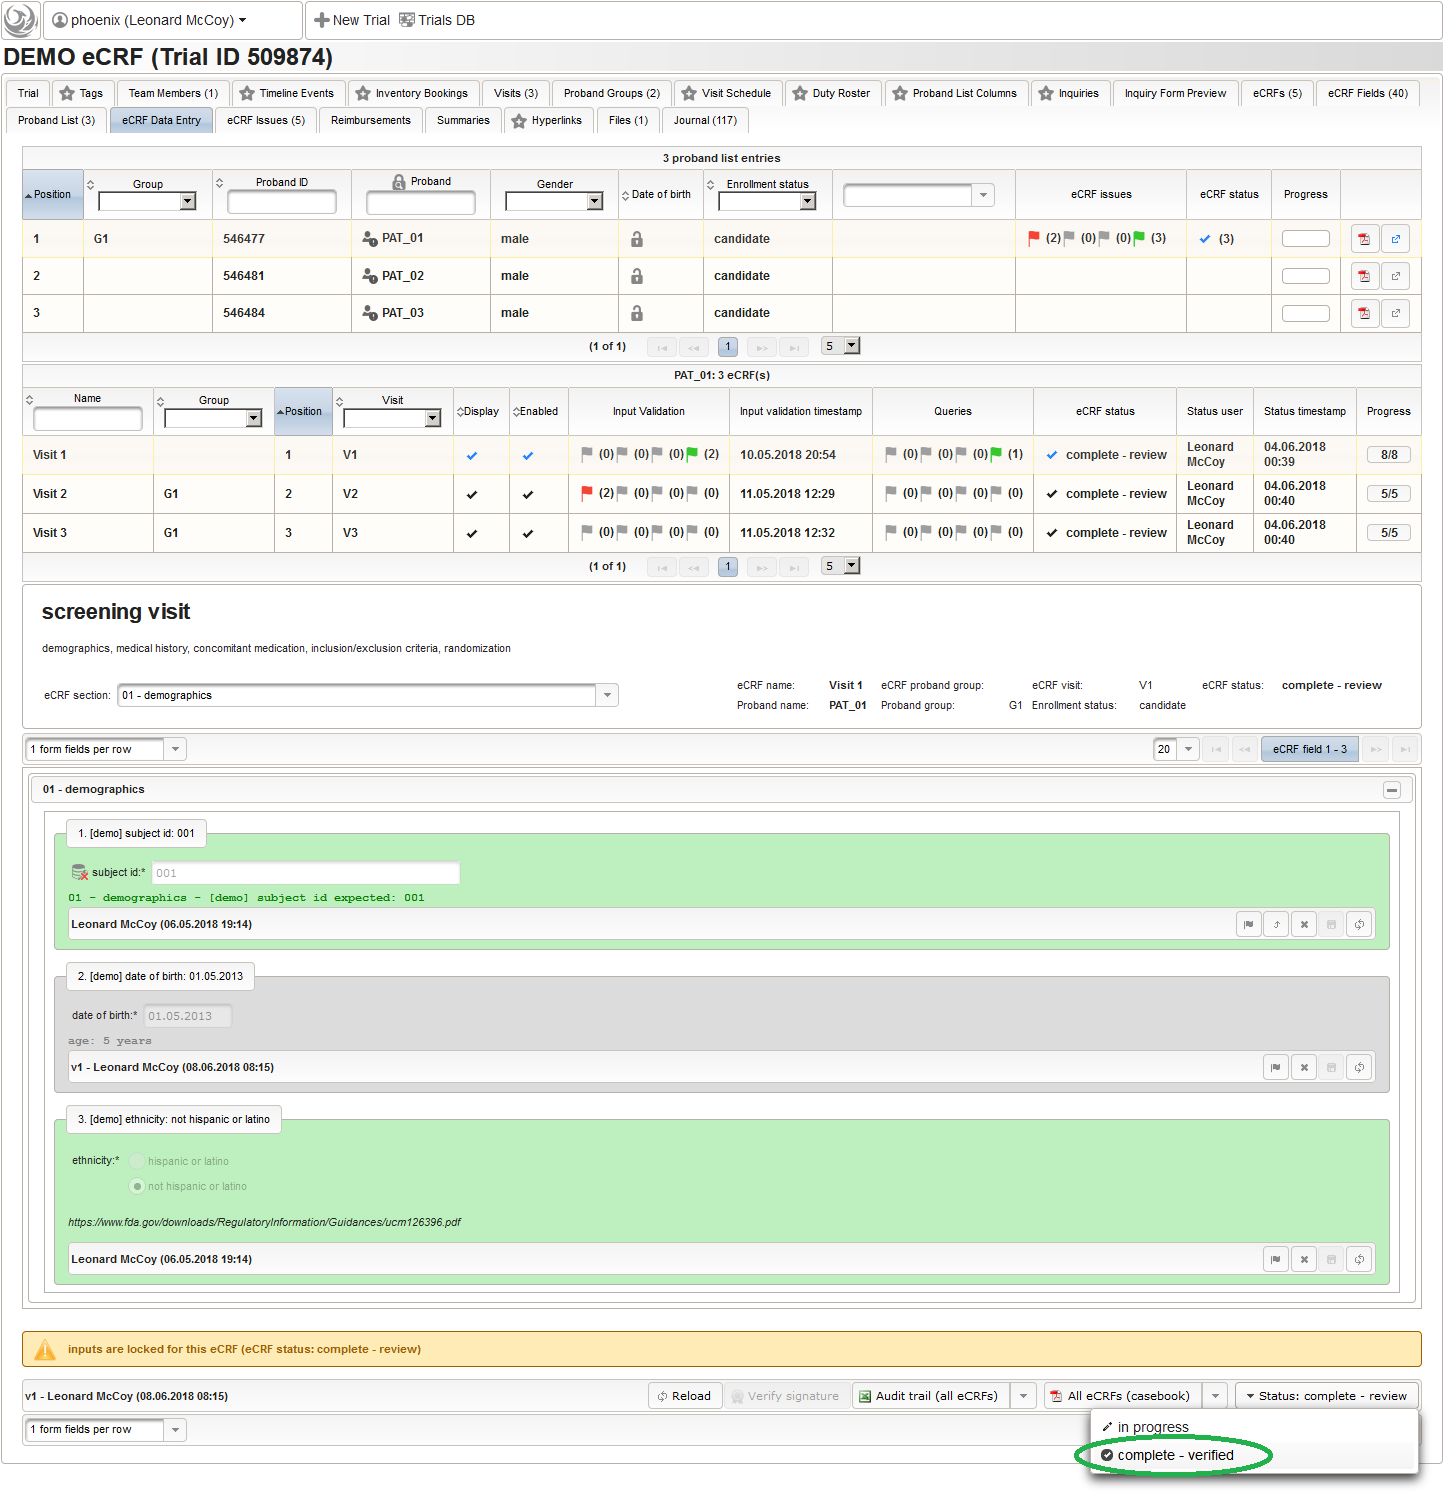
Sign eCRFs
When an eCRF got witched to a verified state, trial team member allowed to sign eCRFs (principal investigators) will receive a notification. When navigating to PAT_01 in the trial’s eCRF Data Entry tab, the principal investigator can see the Sign casebook button. According to FDA CFR 21 rules, the user has to confirm the identity by providing the password. For all the subject’s eCRFs in a verified state, the electronic signature is calculated and the eCRF status is set to signed. These eCRF now are sealed, meaning only the investigator can unlock an eCRF again by setting it back to in progress, in order to let the team re-iterate the data entry and verification workflow ie. to correct things. As shown below, PAT_01’s Screening eCRF got signed, and the top-level progress bar indicates the subject’s total completion (one of three eCRFs done). 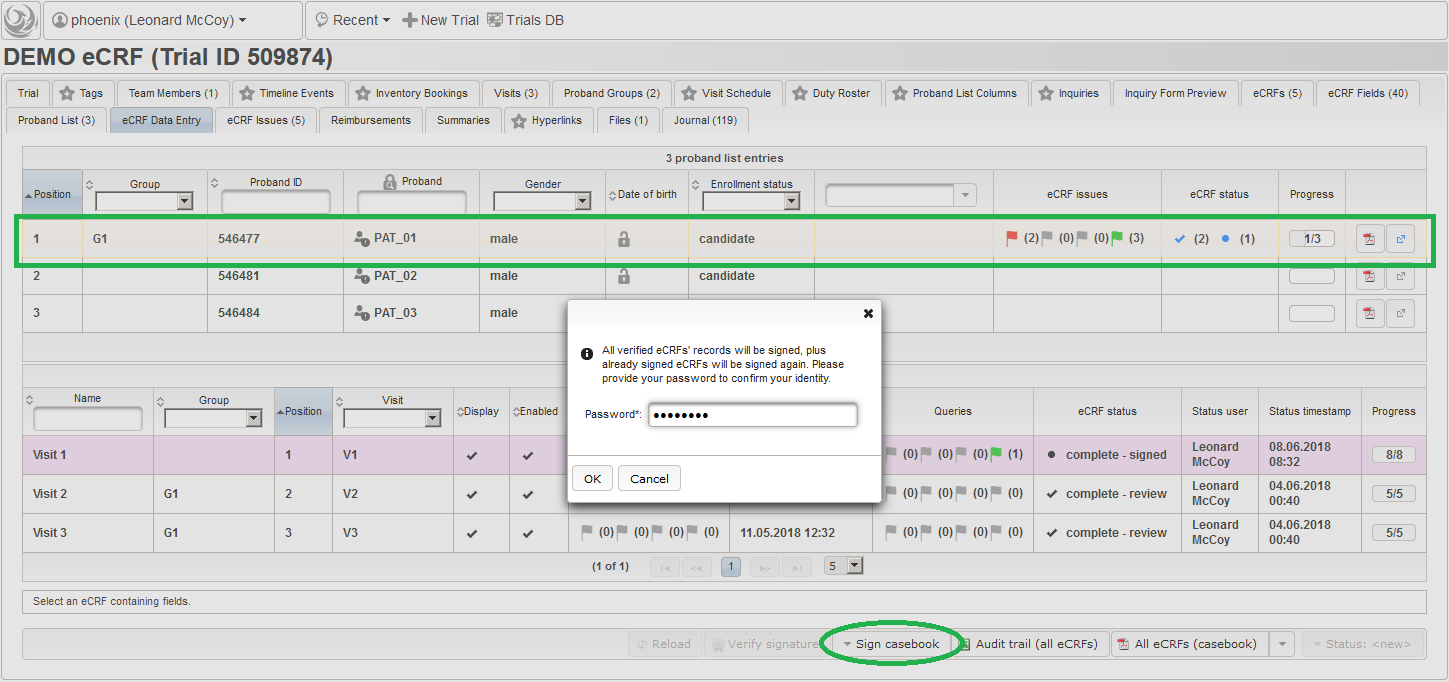
Once signed, the Verify eCRF button gets enabled, allowing any user to instantly check the signature against an the current data stored for a particular eCRF.
While modifying some aspects of the eCRF setup (ie. adjust field value expressions or fix typos in field labels, comments) is intentionally tolerated and safe to not break a signature, re-signing will be neccesary if one of below got changed (ie. by tampering with the database tables):
- subject:
- the subject’s alias (if blinded) or first name, lastname or date of birth (if not blinded)
- changing the subject from blinded to not blinded (or vice versa)
- proband id
- eCRF setup:
- the eCRF title
- the order of eCRF sections or eCRF fields within the sections
- the number of eCRF sections or eCRF fields within the sections
- the option label/value of any used selection set value (of an input field of selection type) and their order (in case of multiple selection)
- data entry:
- the value entered for an eCRF field along with timestamp and record version → no (re-)saving (even if it is the same value)
- the provided Reson for Change and the delta to the previously stored value
- the user’s username and id that saved the value along with the timestamp and record version
- discrepancies:
- the comment, timestamp and record version of a eCRF issue status → no removing and (re-)adding (even if it is the same comment)
- the user’s username and id that created an eCRF issue status along with the timestamp and record version
eCRF Data Export
In the previous sections, the eCRF data entry and verification process was presented in detail by example of the V1 Screening Visit eCRF of our PAT_01 subject. Completing the remaining eCRFs is up to the reader but not needed to go ahead with exporting eCRF data, which will be the final part of this tutorial. There are several supported export formats, which can be catgorized as below:
- .csv: UTF-8 encoded text file with comma separated values (Excel compliant)
- single file with horizontal (one row with values per subject) eCRF data of all subjects
- .xlsx: Office Open XML workbook file
- single file with spreadsheets for horizontal and vertical (one row per values) eCRF data of all subjects
- .db: SQLite 3 database file
- single file with tables and views for horizontal and vertical eCRF data of all subjects
- .pdf: portable document file
- eCRF casebook pdf file per subject
- .xls: Excel Binary Fromat file
- single file with spreadsheets for audit trail (values changed during review), eCRF issues from edit checks, eCRF issues raised manually (queries)
- single file with spreadsheets containing the eCRF definitions (see Import/Export eCRF Setups) – aka Field Annotation Report
- single file with journal records of all modifications related to the eCRF definitions (changelog) – aka Field Amendment Report
Note that horizontal data in .xslx spreadsheets and .db tables is limited to app. 16k and 255 columns respectively, while .csv allows an unlimited number of parameters. The exporter functionality is powered by the Bulk Processor Framework again, which additionally introduces a project-based approach for advanced tasks such as subsequent data aggregation and analysis (perl programming skills needed).
Exports are possible at any point in time, resulting in a snapshot of the eCRF data. Since the eCRF status is also exported, it can be used to filter for when processing the data. Usually signed eCRFs are to be considered only, which cannnot be modified by users any more. To globally lock all eCRFs (including in progress ones etc.) the trial status can be switched from Carrying out to Interrupted or Phase out (aka database lock).
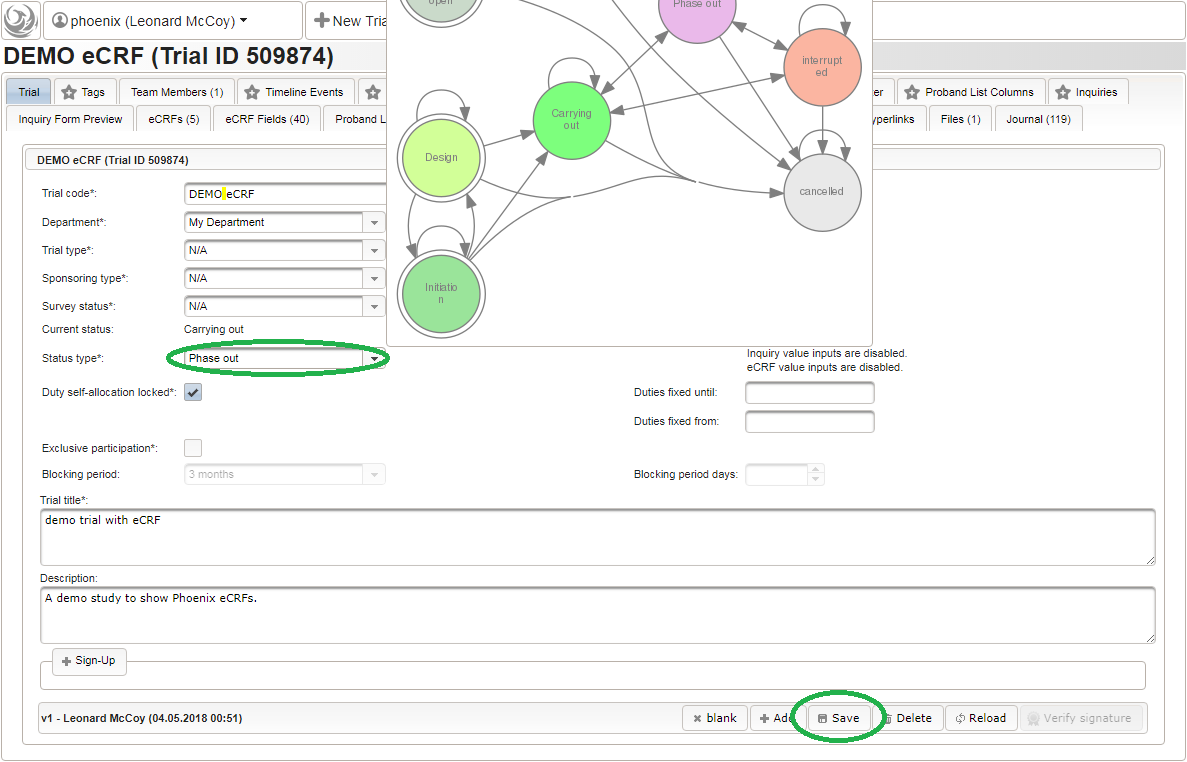
A complete export is triggered by running the below command from the Phoenix CTMS server console. Remember to change the –id option to match the trial’s id (509874 according to our screenshots):
phoenix@phoenix:~$ sudo -u ctsms /ctsms/ecrfdataexport.sh --id=509874 \
> --task=cleanup_all \
> --task=export_ecrf_data_vertical \
> --task=export_ecrf_data_horizontal \
> --task=publish_ecrf_data_sqlite \
> --task=publish_ecrf_data_horizontal_csv \
> --task=publish_ecrf_data_xls \
> --task=publish_ecrf_data_pdfs \
> --task=publish_audit_trail_xls \
> --task=publish_ecrf_journal_xls \
> --task=publish_ecrfs_xls \
> --force
[sudo] password for phoenix:
Bulk Processing Framework 1.6.2 (Phoenix CTMS) [phoenix]
application path: /ctsms/bulk_processor/CTSMS/BulkProcessor/
working path: /ctsms/bulk_processor/output/ecrf_exporter/
2 cpu(s), multithreading disabled
master config file /ctsms/bulk_processor/CTSMS/BulkProcessor/Projects/ETL/EcrfExporter/config.cfg loaded
INFO - config file /ctsms/bulk_processor/CTSMS/BulkProcessor/Projects/ETL/EcrfExporter/settings.yml loaded
INFO - config file /ctsms/bulk_processor/CTSMS/BulkProcessor/Projects/ETL/EcrfExporter/settings.yml loaded
INFO - starting task: 'cleanup_all'
INFO - starting task: 'export_ecrf_data_vertical'
INFO - max number of selection set values: 2
INFO - database '/ctsms/bulk_processor/output/ecrf_exporter/db/ecrf_exporter.db' created
INFO - /ctsms/bulk_processor/output/ecrf_exporter/db/ecrf_exporter.db - connected
INFO - text table created: ecrf_data_vertical
INFO - index created: ecrf_data_vertical_ecrf_name_section_position on ecrf_data_vertical
INFO - proband ID 546477: eCRF 'screening visit': complete - signed
INFO - proband ID 546477: eCRF 'first intervention visit': complete - review
ERROR - my_department_cron@http://127.0.0.1:8080 - 422 : proband ID 546477: no eCRF status for DEMO eCRF G2:V2 - 2. Visit 2
INFO - proband ID 546477: eCRF 'first intervention visit':
INFO - 50 row(s) exported
INFO - proband ID 546477: eCRF 'second intervention visit': complete - review
ERROR - my_department_cron@http://127.0.0.1:8080 - 422 : proband ID 546477: no eCRF status for DEMO eCRF G2:V3 - 3. Visit 3
INFO - proband ID 546477: eCRF 'second intervention visit':
ERROR - my_department_cron@http://127.0.0.1:8080 - 422 : proband ID 546481: no eCRF status for DEMO eCRF V1 - 1. Visit 1
INFO - proband ID 546481: eCRF 'screening visit':
ERROR - my_department_cron@http://127.0.0.1:8080 - 422 : proband ID 546481: no eCRF status for DEMO eCRF G1:V2 - 2. Visit 2
INFO - proband ID 546481: eCRF 'first intervention visit':
ERROR - my_department_cron@http://127.0.0.1:8080 - 422 : proband ID 546481: no eCRF status for DEMO eCRF G2:V2 - 2. Visit 2
INFO - proband ID 546481: eCRF 'first intervention visit':
ERROR - my_department_cron@http://127.0.0.1:8080 - 422 : proband ID 546481: no eCRF status for DEMO eCRF G1:V3 - 3. Visit 3
INFO - proband ID 546481: eCRF 'second intervention visit':
ERROR - my_department_cron@http://127.0.0.1:8080 - 422 : proband ID 546481: no eCRF status for DEMO eCRF G2:V3 - 3. Visit 3
INFO - proband ID 546481: eCRF 'second intervention visit':
ERROR - my_department_cron@http://127.0.0.1:8080 - 422 : proband ID 546484: no eCRF status for DEMO eCRF V1 - 1. Visit 1
INFO - proband ID 546484: eCRF 'screening visit':
INFO - 50 row(s) exported
ERROR - my_department_cron@http://127.0.0.1:8080 - 422 : proband ID 546484: no eCRF status for DEMO eCRF G1:V2 - 2. Visit 2
INFO - proband ID 546484: eCRF 'first intervention visit':
ERROR - my_department_cron@http://127.0.0.1:8080 - 422 : proband ID 546484: no eCRF status for DEMO eCRF G2:V2 - 2. Visit 2
INFO - proband ID 546484: eCRF 'first intervention visit':
ERROR - my_department_cron@http://127.0.0.1:8080 - 422 : proband ID 546484: no eCRF status for DEMO eCRF G1:V3 - 3. Visit 3
INFO - proband ID 546484: eCRF 'second intervention visit':
ERROR - my_department_cron@http://127.0.0.1:8080 - 422 : proband ID 546484: no eCRF status for DEMO eCRF G2:V3 - 3. Visit 3
INFO - proband ID 546484: eCRF 'second intervention visit':
INFO - 20 row(s) exported
INFO - /ctsms/bulk_processor/output/ecrf_exporter/db/ecrf_exporter.db - disconnected
INFO - starting task: 'export_ecrf_data_horizontal'
INFO - 72 columns, max column name length: 58
INFO - opening csv folder
mkdir /ctsms/bulk_processor/output/ecrf_exporter/csv/ecrf_exporter/
INFO - /ctsms/bulk_processor/output/ecrf_exporter/csv/ecrf_exporter/ - connected
INFO - text table created: ecrf_data_horizontal
INFO - proband ID 546477: eCRF 'screening visit': complete - signed
INFO - proband ID 546477: eCRF 'first intervention visit': complete - review
ERROR - my_department_cron@http://127.0.0.1:8080 - 422 : proband ID 546477: no eCRF status for DEMO eCRF G2:V2 - 2. Visit 2
INFO - proband ID 546477: eCRF 'first intervention visit':
INFO - proband ID 546477: eCRF 'second intervention visit': complete - review
ERROR - my_department_cron@http://127.0.0.1:8080 - 422 : proband ID 546477: no eCRF status for DEMO eCRF G2:V3 - 3. Visit 3
INFO - proband ID 546477: eCRF 'second intervention visit':
INFO - 1 row(s) exported
ERROR - my_department_cron@http://127.0.0.1:8080 - 422 : proband ID 546481: no eCRF status for DEMO eCRF V1 - 1. Visit 1
INFO - proband ID 546481: eCRF 'screening visit':
ERROR - my_department_cron@http://127.0.0.1:8080 - 422 : proband ID 546481: no eCRF status for DEMO eCRF G1:V2 - 2. Visit 2
INFO - proband ID 546481: eCRF 'first intervention visit':
ERROR - my_department_cron@http://127.0.0.1:8080 - 422 : proband ID 546481: no eCRF status for DEMO eCRF G2:V2 - 2. Visit 2
INFO - proband ID 546481: eCRF 'first intervention visit':
ERROR - my_department_cron@http://127.0.0.1:8080 - 422 : proband ID 546481: no eCRF status for DEMO eCRF G1:V3 - 3. Visit 3
INFO - proband ID 546481: eCRF 'second intervention visit':
ERROR - my_department_cron@http://127.0.0.1:8080 - 422 : proband ID 546481: no eCRF status for DEMO eCRF G2:V3 - 3. Visit 3
INFO - proband ID 546481: eCRF 'second intervention visit':
INFO - 1 row(s) exported
ERROR - my_department_cron@http://127.0.0.1:8080 - 422 : proband ID 546484: no eCRF status for DEMO eCRF V1 - 1. Visit 1
INFO - proband ID 546484: eCRF 'screening visit':
ERROR - my_department_cron@http://127.0.0.1:8080 - 422 : proband ID 546484: no eCRF status for DEMO eCRF G1:V2 - 2. Visit 2
INFO - proband ID 546484: eCRF 'first intervention visit':
ERROR - my_department_cron@http://127.0.0.1:8080 - 422 : proband ID 546484: no eCRF status for DEMO eCRF G2:V2 - 2. Visit 2
INFO - proband ID 546484: eCRF 'first intervention visit':
ERROR - my_department_cron@http://127.0.0.1:8080 - 422 : proband ID 546484: no eCRF status for DEMO eCRF G1:V3 - 3. Visit 3
INFO - proband ID 546484: eCRF 'second intervention visit':
ERROR - my_department_cron@http://127.0.0.1:8080 - 422 : proband ID 546484: no eCRF status for DEMO eCRF G2:V3 - 3. Visit 3
INFO - proband ID 546484: eCRF 'second intervention visit':
INFO - 1 row(s) exported
INFO - /ctsms/bulk_processor/output/ecrf_exporter/csv/ecrf_exporter/ - disconnected
INFO - starting task: 'publish_ecrf_data_sqlite'
INFO - /ctsms/bulk_processor/output/ecrf_exporter/db/ecrf_exporter.db - connected
INFO - /ctsms/bulk_processor/output/ecrf_exporter/db/ecrf_exporter.db - disconnected
INFO - starting task: 'publish_ecrf_data_horizontal_csv'
INFO - opening csv folder
INFO - /ctsms/bulk_processor/output/ecrf_exporter/csv/ecrf_exporter/ - connected
INFO - /ctsms/bulk_processor/output/ecrf_exporter/csv/ecrf_exporter/ - disconnected
INFO - starting task: 'publish_ecrf_data_xls'
INFO - workbook '/ctsms/bulk_processor/output/ecrf_exporter/output/ecrf_20180609180211.xlsx' created
INFO - opening csv folder
INFO - /ctsms/bulk_processor/output/ecrf_exporter/csv/ecrf_exporter/ - connected
INFO - [reader] opening csv folder
INFO - [reader] /ctsms/bulk_processor/output/ecrf_exporter/csv/ecrf_exporter/ - connected
INFO - table processing started: [/ctsms/bulk_processor/output/ecrf_exporter/csv/ecrf_exporter/].ecrf_data_horizontal: 3 row(s)
INFO - [reader] fetching rows from [/ctsms/bulk_processor/output/ecrf_exporter/csv/ecrf_exporter/].ecrf_data_horizontal: 1-100 of 3
INFO - processing rows: 1-3 of 3
INFO - [reader] /ctsms/bulk_processor/output/ecrf_exporter/csv/ecrf_exporter/ - disconnected
INFO - table processing done: [/ctsms/bulk_processor/output/ecrf_exporter/csv/ecrf_exporter/].ecrf_data_horizontal: 3 row(s)
INFO - 4 rows written to spreadsheet 'ecrf_data_horizontal'
INFO - /ctsms/bulk_processor/output/ecrf_exporter/db/ecrf_exporter.db - connected
INFO - [reader] /ctsms/bulk_processor/output/ecrf_exporter/db/ecrf_exporter.db - connected
INFO - table processing started: [/ctsms/bulk_processor/output/ecrf_exporter/db/ecrf_exporter.db].ecrf_data_vertical: 120 row(s)
INFO - [reader] fetching rows from [/ctsms/bulk_processor/output/ecrf_exporter/db/ecrf_exporter.db].ecrf_data_vertical: 1-100 of 120
INFO - processing rows: 1-100 of 120
INFO - [reader] fetching rows from [/ctsms/bulk_processor/output/ecrf_exporter/db/ecrf_exporter.db].ecrf_data_vertical: 101-200 of 120
INFO - processing rows: 101-120 of 120
INFO - [reader] /ctsms/bulk_processor/output/ecrf_exporter/db/ecrf_exporter.db - disconnected
INFO - table processing done: [/ctsms/bulk_processor/output/ecrf_exporter/db/ecrf_exporter.db].ecrf_data_vertical: 120 row(s)
INFO - 121 rows written to spreadsheet 'ecrf_data_vertical'
INFO - starting task: 'publish_ecrf_data_pdfs'
INFO - proband ID 546477 eCRF casebook pdf rendered
INFO - proband ID 546481 eCRF casebook pdf rendered
INFO - proband ID 546484 eCRF casebook pdf rendered
INFO - starting task: 'publish_audit_trail_xls'
CTSMS_PROPERTIES: /ctsms/properties
2018-06-09 18:02:16: starting...
Phoenix Clinical Trial Management System
version: 1.6.1
instance: phoenix/localhost
jvm: 1.8.0_171
task: export eCRF audit trail
DEMO eCRF audit trail (6), VALIDATION (6), QUERY (4), ANNOTATION (0)
saved to file '/ctsms/bulk_processor/output/ecrf_exporter/output/ecrf_issues_20180609180215.xls'
2018-06-09 18:02:30: done - execution time: 14 seconds
INFO - /ctsms/dbtool.sh executed
INFO - starting task: 'publish_ecrf_journal_xls'
CTSMS_PROPERTIES: /ctsms/properties
2018-06-09 18:02:30: starting...
Phoenix Clinical Trial Management System
version: 1.6.1
instance: phoenix/localhost
jvm: 1.8.0_171
task: export ecrf journal of a trial
trial ID 509874: 134 journal records
saved to file '/ctsms/bulk_processor/output/ecrf_exporter/output/ecrf_changelog_20180609180230.xls'
2018-06-09 18:02:44: done - execution time: 14 seconds
INFO - /ctsms/dbtool.sh executed
INFO - starting task: 'publish_ecrfs_xls'
CTSMS_PROPERTIES: /ctsms/properties
2018-06-09 18:02:45: starting...
Phoenix Clinical Trial Management System
version: 1.6.1
instance: phoenix/localhost
jvm: 1.8.0_171
task: export eCRFs, eCRF fields, input fields and selection set values
writing to file /ctsms/bulk_processor/output/ecrf_exporter/output/ecrf_setup_20180609180244.xls
5 rows exported
2018-06-09 18:02:58: done - execution time: 13 seconds
INFO - /ctsms/dbtool.sh executed
INFO - /ctsms/bulk_processor/output/ecrf_exporter/db/ecrf_exporter.db - disconnected
INFO - /ctsms/bulk_processor/output/ecrf_exporter/csv/ecrf_exporter/ - disconnected
INFO - Trial eCRF export/data aggregation:

- working directory folders cleaned up

- vertical eCRF data prepared

- horizontal eCRF data prepared

- file 'ecrf_20180609180211.db' added to the 'DEMO eCRF' trial

- file 'ecrf_horizontal_20180609180211.csv' added to the 'DEMO eCRF' trial

- file 'ecrf_20180609180211.xlsx' added to the 'DEMO eCRF' trial

- file 'demo_ecrf_546477_20180609180211.pdf' added to the 'DEMO eCRF' trial

- file 'demo_ecrf_546481_20180609180211.pdf' added to the 'DEMO eCRF' trial

- file 'demo_ecrf_546484_20180609180211.pdf' added to the 'DEMO eCRF' trial

- file 'ecrf_issues_20180609180215.xls' added to the 'DEMO eCRF' trial

- file 'ecrf_changelog_20180609180230.xls' added to the 'DEMO eCRF' trial

- file 'ecrf_setup_20180609180244.xls' added to the 'DEMO eCRF' trial

Visit https://192.168.0.39/trial/trial.jsf?trialid=509874 to download files.

time elapsed: 00:00:55
The exported files are automatically pushed to the document management and can be inspecteded/downloaded from the trial’s Files tab.
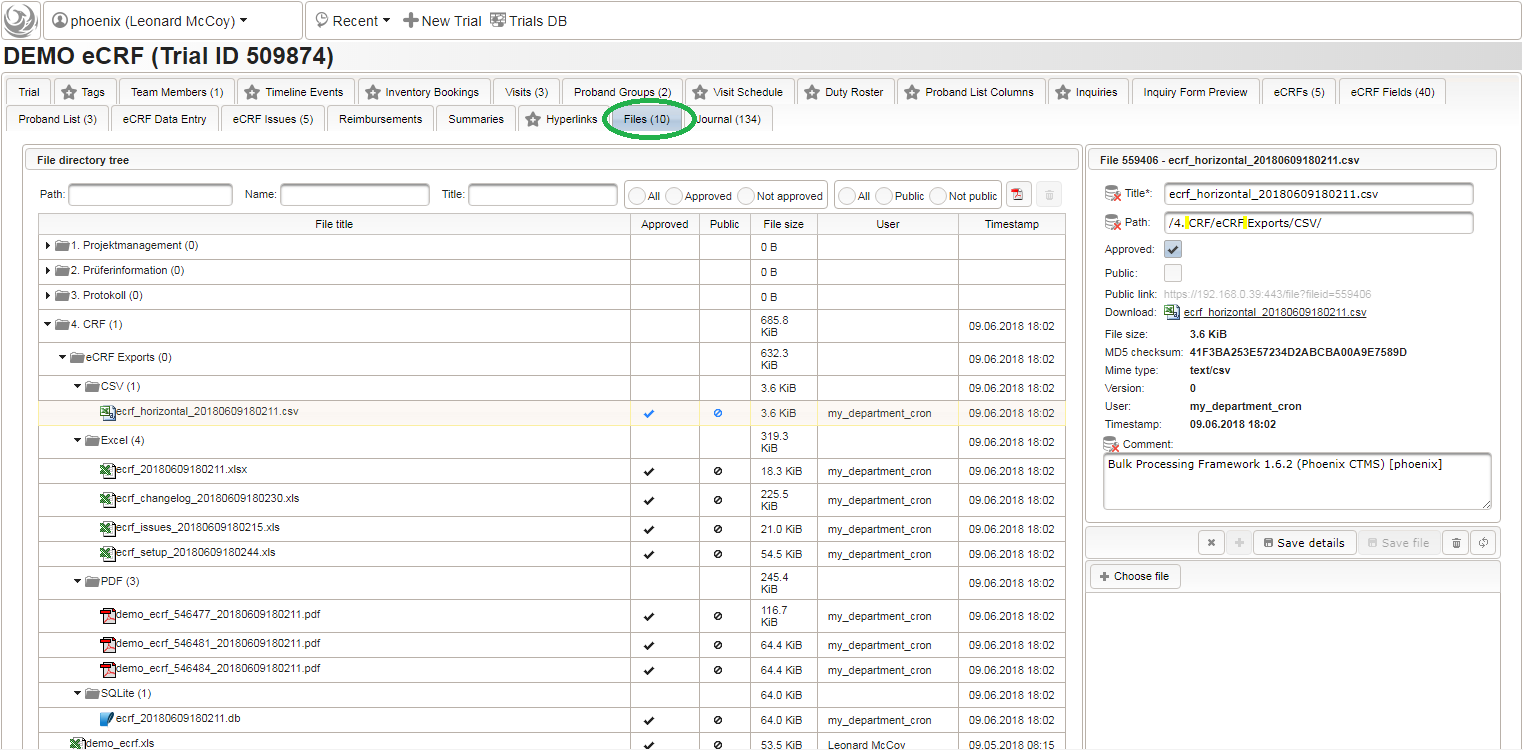
Variable Names
Horizontal formats are suitable for importing in statistics software such as SPSS, which expect a spreadsheet column per variable and variable names provided in a header row. To consider limitations, the generated column names use a abbreviation technique to produce unique but human readable variable names with a length less than 65 characters. Variable names of series sections have a suffix containing the index. Each selection set value of input fields of selection type by default results in a dedicated boolean variable (true: item selected, false: item not selected). The other option is to have the values of ticked items as delimited string in a cell.
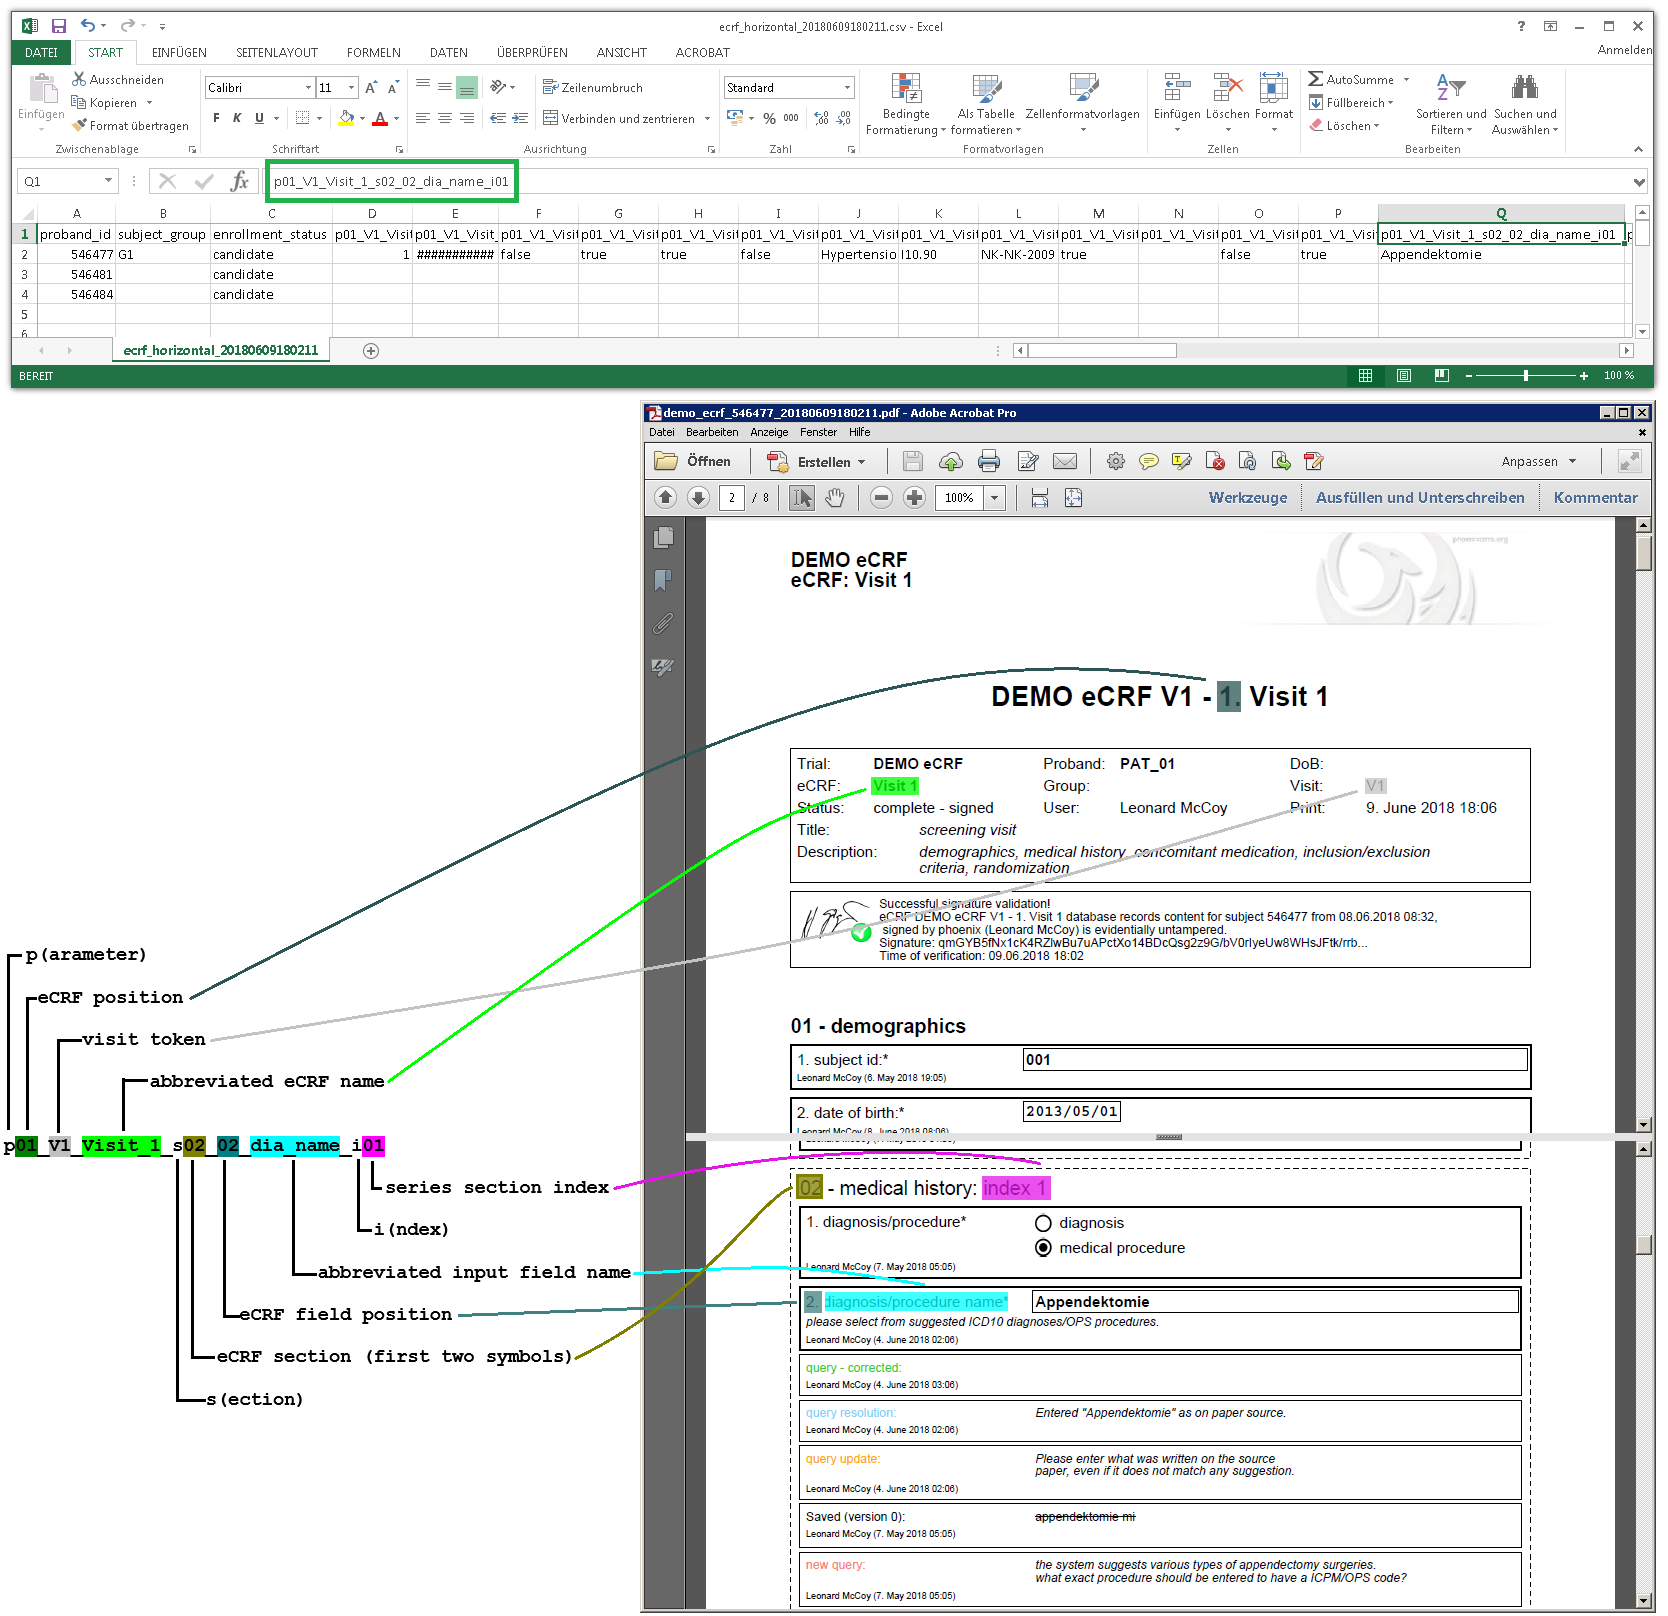
A generated variable name can be overriden with an explicit name by specifying the External ID of the eCRF field. The below example shows replacing the generated variable name for the date of birth by the CDASH suggestion (“BRTHDAT”).
Starting the export will be aborted with an error, if a collision of names is detected. For fields of the intervention visits (ie. body weight), it might be easier to specify the External ID for the input field instead in each of the 4 eCRFs where it is used (Visit 2 – Group A, Visit 2 – Group B, Visit 3 – Group A, Visit 3 – Group B).

Changing the body height as above would definitely cause collisions when exporting. To avoid this, the External ID of aech of the 4 eCRFs can be set to a distinctive name. It will be used as a prefix in the variable names, allowing to prevent colliding names.